Tuesday, March 30, 2021

Game 248: The Battle of the Bulge - Tigers in the Snow

Early in the morning of December 16th, 1944, Germany launched its final counteroffensive on the Western Front, bombarding and overrunning allied outposts throughout the Ardennes where they were the thinnest, with the goal of dividing the allied armies and forcing a surrender. Despite the initial chaos and devastation inflicted on unaware and inexperienced defenders, this was a desperate move; the war had been going badly for Germany. The once dreaded Luftwaffe had lost air superiority, and German industrial and population centers faced air raids day and night. Italy had surrendered, Japanese aid was impossible, and eastern Axis signatories were quickly falling to the Soviet army, who were already planning their invasion of Poland.

In over a month of ferocious, close quarters combat, German resources were depleted, and thanks to stubborn allied resistance and air support, miserable roads, and rapidly depleting fuel reserves, little advancement was made on the line before they could regroup. Even so, to the U.S. Army, which had most of the battle commitment, The Battle of the Bulge was the second largest and second costliest campaign of the war, after the Invasion of Normandy.

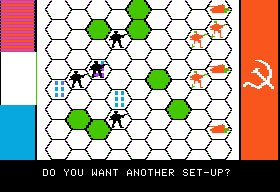
Allies face right, Germans face left.

Tactical Design Group's The Battle of the Bulge: Tigers in the Snow does not look terribly different from The Battle of Shiloh, produced the same year, and I'm sure it's running on the exact same engine. The graphics certainly don't scream "tigers in the snow" to me - why didn't they make the hexes white? The sprites could have been black, or perhaps some Apple-friendly color approximate of field grey and olive drab.

Although rated as an introductory game, Tigers in the Snow is significantly more complicated than Shiloh, with new features including:

  • A more complex map with varied terrain and multiple rivers
  • Objective hexes in the form of cities and map edges
  • Weather and air power, in an abstract form
  • Armor units
  • Airborne reinforcements
  • Supply mechanics, including fuel and supply lines
  • Zone of Control rules
 

A few aspects of Shiloh, in turn, are simplified. Battle tactics are now limited to defense and attack commitment levels without risk levels, and leadership mechanics including the possibility of killing group leaders is removed. Artillery is no longer a separate phase, but instead an expendable resource that merely gives you an edge in a sortie. Morale is replaced by "combat readiness," a simple metric that increases every turn that you don't move, and decreases every time you move.


Unfortunately, one of the big weaknesses of Shiloh hurts all the more here for its added complexity. The primitive interface provides no way of manually querying unit strength, which is crucial information for making informed battle decisions. In the above screenshot, one of your units "D" is being attacked by enemies "1" and "2" across the river. Now you have to decide how much artillery to commit to the fight and how hard you want to try to hold the position without knowing the size of any of these units, not even your own.

If you paid attention, you might have noticed that these are all infantry units, but that's not nearly enough info. In the seconds before the attack, the stats of several divisions flash by the screen, but when the computer doesn't decide to move any of them, which is pretty common in this game, they flash by very quickly, and this does nothing to help you actually identify which divisions are attacking you, or to match this info to an occupied hex.

Good info, but which one's the 272nd?


Shiloh had the same problem, but it's so much worse here, with more units to keep track of, and everyone up in each other's face from the beginning. The inability to check unit strength doesn't even make sense from a fog of war perspective - the defending unit should know how strong it is before committing to a defense strategy, and probably should have some notion of how strong the attackers are too.


In some ways it's when you're attacking. Here, you might know how strong the blinking target is, but it's not going to tell you how strong your infantry primed to attack from the west is until you've committed to attack. Even if you remember from the movement phase, there are five enemies it could attack, and the game simply asks "attack this unit" for each in sequence. You can't find out the strength of the fifth one until you've made a decision about the first four.

And when you attack with multiple adjacent units, it frequently alerts you that some attackers were unsupplied, which cripples their combat strength. This happens even when the unit meets the games's supply rules criteria - a general "supplies" variable decrements as you attack and defend, and as it gets smaller, this occurrence becomes more likely, but the actual formula for the odds isn't explained. This, too, is undetermined until you've already committed to an attack, which can ruin it. At this point, the best you can do is cut your losses by picking the least aggressive attack strategy.

To overcome these limitations, I wound up using each turn to take notes on each unit's strength as it was revealed to me, and then reloading a save from the start of the turn so that I could make informed decisions. The game allows saves at the start of each turn, so this didn't seem like cheating.

Allied reinforcements come quickly.

I am not completely sure what all this means.

The Germans will tear holes in your front line.

Combat lines start to form. I want to lure them out of the trenches, but keep them from the cities. A weakened infantry holds Bastogne, fourth row from the bottom.

Randomly congested bridges can impede river crossings, but the Germans generally get it worse. A strong Panzer division captured Bastogne.

The Germans get reinforcements too. Mine couldn't cross the river and the middle rows are poorly defended.

Defense in the north and south hold strong and some German divisions are routed. The 101st Airborne defiantly camps outside Bastogne surrounded by armor, and the 82nd holds Marche, fifth row from the top. German advancement in the center rows continue.
 

Attacking seems to rarely be worth it unless you have a huge tactical advantage. It seems better to hold in advantageous terrain like forests and cities and defend with aggressive tactics to sap away German strength until their units are weak enough to rout in one big counterattack. Artillery seems to eventually get replenished faster than you can use it.

The battle in the northeast devolves into chaos. The 101st is pushed across the river. The 82nd holds Marche while an unopposed Panzer unit takes Rochefort. In the southeast the Germans get their butts kicked even as they gain meaningless ground. More allied reinforcements arrive.

Low supplies hurt me in the northeast, but I've mostly cleared the southeast. Reinforcements rush to Bastogne and Marche, and more arrive, but some are British who aren't allowed to cross the Meuse, and the map doesn't clearly mark it. Incidentally, "score" represents German margin of victory.

Northeast continues to be a mess. Southeast forces push northward. The 101st aided by reinforcements pushes on Bastogne but the Panzers there hold. Reinforcements from both sides arrive.

At this point, the German army started running out of fuel, but curiously, even with the level at 0, this did not bring their units to a standstill. Sometimes a unit would be unable to move and lose its turn, as had sometimes happened before, but others would continue unimpeded. I assume that this is a random occurrence made more frequent as fuel reserves diminish, analogous to supply levels and attack effectiveness, and likewise, inadequately explained anywhere.

Tanks from the northeast rout forces besieging Marche and push on toward Bastogne. British reinforcements meander around the river but can't cross it.

A surrounded tank is hit hard but holds. Rochefort is flanked while the Brits watch from across the river.

Supply shortages keep me from taking out the tank this turn.

Finally took out the tank and am moving up toward Rochefort.


Last round. The Germans seem to get an 11th hour adrenaline rush and crush three of my divisions, but during my turn I eliminate a few of theirs.
 

And that was the end, a major loss. In retrospect, the reason was clear - I did not heed the objective points enough, and foolishly assumed that I could win the melee in the north and drive the Germans out. But the early grab of Bastogne and Rochefort earned them 150 points per turn, Marche another 50, and even the two units that spent such a long time camping in the southeast corner earned them another 12 points per turn.

To be fair to myself, the game makes forgetting about objectives far too easy. Objective cities aren't indicated on screen at all - they're all just dots, without anything to differentiate an objective city from a minor one. When a city is occupied you can't even tell there's a city there, which is what happened for almost the entire game. You wouldn't even know the Panzer in Bastogne was occupying any city, let alone one worth 100 points every turn that it lingered, without constantly cross-referencing the map in the paper manual.

And that's really the crux of this game's big problem - it keeps crucial information from you, for no good reason. The Germans have no issue recognizing your weakest units and surrounding them with exactly as much force as it takes for a total kill, but you don't even get to see your own units' strength until it's their turn to move, you don't get to see the enemy units' strength until the movement phase is over and you're ready to attack, and you don't get to find out if your units got supplied until you've already committed. And the solution is obvious - an "intelligence mode" that lets you move a cursor around the map and query individual hexes for terrain and unit data (including the names of important cities instead of just calling them all "town") would be so much more useful than my approach of playing each turn twice, once to awkwardly gather intel and once to make informed decisions.

Part of me wants to go back and try again, this time fighting tooth and nail to stop the Germans from occupying Bastogne, to see if I can turn a defeat into a victory, but I've also spent a lot of time already on a game that wasn't that much fun, in a genre that I don't especially like anyway. Is anyone interested in seeing another go? If not, then I'll just move on to the next SSI game Computer Quarterback (for all intents and purposes the debut of AIAS Hall of Famer Danielle Bunten Berry) and give this one a GAB rating of Average for the double-edged sword of its complexities and an interface too primitive to suit them.

Friday, March 26, 2021

Game 247: The Battle of Shiloh

I am a damned sight smarter man than Grant. I know more about military history, strategy, and grand tactics than he does. I know more about supply, administration, and everything else than he does. I'll tell you where he beats me though and where he beats the world. He doesn't give a damn about what the enemy does out of his sight, but it scares me like hell.
- General Sherman, as quoted by James Harrison Wilson

The Western Theater of the American Civil War gets less popular attention than the Eastern, where Lee's Army of Northern Virginia held off attempted invasions of Richmond for years, even after a northward advance was decisively defeated at Gettysburg. The Western Theater, in contrast, was steady push southward by Union forces through Kentucky, Tennessee, and Mississippi, leading to Sherman's March to the Sea. The Battle of Shiloh, fought in April 1862, could be seen as its most crucial battle, as it was the Confederate Army's last realistic shot at stonewalling Union advancement, and its failure ultimately cost them the front, splitting the confederacy at the Mississippi.

The two day battle began on April 6th as General Johnston led a massive surprise attack on roughly 40,000 Union troops encamped on the Tennessee River's west bank in an attempt to drive them out of the state. In a day of fighting, in which Johnston was killed in action, Grant's forces were pushed back to a defensible position, but were joined at night by fresh troops from Ohio, and counter-attacked the next morning, forcing a withdrawal. Shiloh was the bloodiest battle of the war to date with over 20,000 casualties, far exceeding all prior battles combined. The confederates lost their hope of holding Tennessee, and morale never recovered from the death of Johnston. Grant, however, faced reprimand for being caught off guard and for his failure to turn the confederate retreat into a rout.


SSI's The Battle of Shiloh, the first title by their internal Tactical Design Group, is rated as introductory level in their catalogs, but is in ways more serious than earlier offerings that I've looked at, especially coming from Computer Conflict. Simulated features include:

  • A bigger and more detailed map, based on historical ones
  • More terrain types, including rivers, bridges, and hills
  • Troop ferrying
  • Morale
  • Artillery and gunboats
  • Brigade leadership and tactics
 

This complexity comes at a cost, now requiring 48KB on the Apple II, up from the 16KB required for previous games. Simultaneous versions for Atari and TRS-80 computers only require 32KB and 16KB respectively, which I'm guessing is possible because of the Atari's more memory-efficient tile graphics and the TRS-80's lack of them.

After a disastrous first run of the game, in which the confederates wore down my fortifications and overran the river landing so thoroughly that my reinforcements couldn't even cross it to join the fight, I tried again with a new strategy - keep as many of their units as possible adjacent to as few as mine as possible, in order to maximize the potential of my artillery, and minimize theirs.

My artillery could hit ten of them, but their artillery can only hit four of mine.

The rules of artillery are that during a bombardment phase, any unit adjacent to an enemy may be targeted, but only once per phase, and any other units are safe. I'd almost always use light bombardment - it's the most efficient in terms of damage per shot, but occasionally I'd use medium if I had more ammo than targets. My own units would decline to attack, and when they were inevitably attacked themselves, I'd use tactics to minimize my losses.

Attacked by three brigades
 

Any time close combat occurs, the attacker picks a single target, and may attack with any adjacent units that haven't attacked yet that turn. Both sides then pick a combat strategy, from a selection of four risk levels and four tactics, allowing for sixteen possible combinations. I'm not really sure what a "bold retreat" or a "cautious all-out attack" is supposed to mean, but from what I can tell, more evasive tactics mean fewer men killed on both sides but more chance of giving up ground, and higher risk level simply means more death on both sides, with a slight bias toward the opponent.

By noon I had suffered multiple routs, but the line held.

I routed one of theirs, but suffered losses in multiple brigades.

Two more of mine routed. The line's not looking so good.
 
They are breaking through to Pittsburg Landing.
 
Almost there.

Naval support arrived but couldn't save the landing.

Reinforcements from the north, but I lost two brigades from the first army.

Nighttime reinforcements are slow to cross the river.

After nightfall, the next turn began on day 2. I started attacking more aggressively - kill ratios were generally in my favor as long as my attacking force was stronger, and aggressive tactics with safe risk levels seemed to produce the best results. This did mean having to pay close attention to enemy brigades while they moved, as this is your only opportunity to observe enemy unit strength values. As my artillery strength grew, and targets of opportunity diminished, I found I needed to use medium bombardment more regularly and even heavy sometimes to ensure my ammo didn't lie unused.

Don't know why my losses increased so much though.

Routed two weakened units and the tides are finally turning.

Picking off weakened brigades is costly but reaps bloody dividends.

Breakthrough force is no more, and the Confederate lead shrinks.

Routed two more weak brigades, finally deployed the reinforcements, and pulled ahead.

Confederate army is in retreat, and I routed one more brigade.

A mistep pursuing costs me a brigade and downgrades my victory.

A river slows down my counteroffensive.

And that ended the game. I roughly estimate that a single combat point represents about 35 men, and if this is accurate, then this battle simulation was quite a bit deadlier than the real thing, with nearly 30,000 casualties on my side, and 26,000 on theirs. Maybe I could have done better if I had played more defensively - day one had been a bloodbath, and much of day 2 was wasted trying to deploy reinforcements to the overrun landing. If I had withdrawn my troops to more defensive positions and focused on minimizing casualties rather than trying to optimize an artillery duel, could I have been in a better position to fight on day 2? I could have also probably executed my original strategy better too - perhaps if I tried again, I could pull it off more efficiently.

But I don't really care to test this theory, because The Battle of Shiloh is painfully slow. I guess it could be worse - after all, Computer Ambush allegedly could make you wait hours for a single turn to resolve, but Shiloh keeps you waiting several minutes between turns as the computer slowly, slowly ponders its moves and then erases and redraws its pieces all over the screen nearly as slowly. Such is the cost of using BASIC, I'm afraid.

GAB rating: Above Average. I am impressed by the balance between accessibility and depth that SSI struck here, and can tolerate some weird game rules (like the arbitrary-seeming artillery mechanics). I just wish it played faster, and that some of the interface quirks were improved, like not having a way to see enemy unit strength during your own turn.

Tuesday, March 23, 2021

Game 246: Computer Conflict

SSI's earliest products are all over the place in terms of complexity. First there was Computer Bismarck, certainly a complicated game by BASIC strategy standards, but self-rated Intermediate in SSI's catalogs, and later by CGW wargame retrospectives.

Their second product, Computer Ambush, is an impossibly detailed simulation of hand to hand combat in WWII, anticipating games like Commandos with its stealth mechanics and roster of characters with strengths and weaknesses, Combat Mission with its simultaneous order execution system, and Frozen Synapse with its incredibly flexible orders system, where you can give men specific orders and lay out contingencies using a terse programming language-like syntax. All of this was done in 1980 in BASIC, at the cost of turns taking up to 3 hours to resolve. This one just seems too hardcore for me, plus the original version of the game doesn't seem to exist any more, only a remake which doesn't interest me quite as much from a historical perspective.

Addendum - In June 2021, The Wargaming Scribe, who is hardcore enough for it, covered the 1982 remake. Check it out.

A third product of 1980, Computer Conflict, is a collection of two BASIC wargames, and both are about as simple as they get. The first, "Rebel Force," is the earliest known game of Roger Keating, who would later found Strategic Studies Group.


It's a very basic hex-based wargame, where apart from movement, all unit actions are performed by the space bar, and determined by context. Possible actions are:

  • Attack an adjacent unit
  • Clear mines
  • Fortify & reinforce unit
 

Your goal is to conquer the city, done by moving a unit onto it and withstanding the enemy's counterattack for several turns. The healthier the unit, the quicker it falls. The enemy's goal is to route your army, but can also score points by delaying you, or by pushing troops to the left edge of the map. Once either goal is attained, the margin of victory is determined by score differential.

A weakened tank faces a heavy counter-offensive.

The only enemies you face are militia and anti-tank guns, whose positions are unknown until you move a unit adjacent to them. Tanks have an advantage against militia but are weak against anti-tank guns, heavy troops (indicated by the sword) have an advantage against the anti-tank guns, and infantry have a slight advantage over either. Combat odds are further modified by terrain - gray hexes are better than black, and green better than either, but both cost more movement points to enter - by the relative strength of the units, and by numbers, as a unit's effective fighting strength is bolstered if more than one friendly unit is adjacent to its target.

This surprise encounter worked to my advantage.

Some of the hexes are mined, and when you move a unit in, you'll know. You'll see an explosion, your unit will take damage, and the hex will turn solid violet as long as the unit remains. If it's lightly mined, then you may as well de-mine it so that next turn you can pass through unhindered with the rest of your army. If it's heavily mined, then you also might as well de-mine it, but this will probably take several turns with your weakened unit, which is now useless in combat to boot. At least this way you won't accidentally move a healthy unit onto it again.

That's pretty much it. Units can't stack or pass through each other, so quite often some of your units will be stuck behind a logjam of friendlies locked in combat or de-mining for several rounds, which is a disaster on all but the easiest scenarios.

There are five scenarios in total, each playable in about twenty minutes. Three of them force you to play aggressively, because the enemy constantly receives reinforcements, while you never do. As the combat drags on, your army gets exponentially weaker - diminished strength causes it to fight less effectively, increasing the amount of damage taken even under the best circumstances, making it even weaker. While you can forfeit a unit's turn to repair damage, this is so slow that it's not even worth doing - better to cause some damage with its last breath, or to retreat to deny the enemy victory points from its otherwise inevitable destruction.

I managed to win a decisive victory on the second-hardest scenario, but only because absolutely everything went perfectly; I avoided most of the minefields, enemy units didn't form into deadly combinations, and in the end, when I got a heavy troop into the city at full health, the counter-offensive force's militia walked right into my tanks, and the anti-tank guns walked right into my infantry and heavy troops, fortified in the green and gray hexes. On the hardest scenario, the best I managed was a draw.


So that's Rebel Force, but what about the other game, Red Attack?

Note that the credit for this one is not Keating's.
 

While Rebel Force is strictly a singleplayer game against the computer, Red Attack is strictly two-player, with one player controlling a USSR invasion force, and the other a small militia defending the village. And it's even simpler than Rebel Force.

The scenario at first glance looks totally lopsided in favor of the Soviets. And in my experience it is, but not for the reasons you might think. A game lasts five rounds, and the Soviets win by occupying two of the three towns at the end.

I played some rounds with "B." In our first round, he played attack, and I played defense.

End of round 1. Nobody can attack yet.

As it turns out, tanks do not simply roll over infantrymen. All units have the same combat strength; tanks just move faster, 4 hexes instead of 3. Furthermore, it's very uncommon for units to be destroyed outright. The worst thing that usually happens is that a unit is forced to retreat. Even when a unit is attacked by three others at once, it seems like more often than not the defending unit holds its ground.


Take the above picture, where an overwhelming force attacked my defenders. The top black infantry company is attacked by one infantry and two tanks. It did not budge. The one two hexes south is attacked by two infantry. It also did not budge. The bottom-left infantry company is attacked by a single tank, and it alone must retreat.

So wait, I did say it's lopsided in favor of the Soviets, right? Well, the thing is, the Soviets have plenty of opportunities to fight, they tend to have control over the matchups, and they only need a few lucky victories in order to win the game. Winning a fight as a defender doesn't help you that much - push them too far away from the cities, and they can use superior mobility to flank you. In fact, "B" caught on quickly that he could just take the undefended backwater city without even fighting for it, and then his infantry company became the one that's hard to move.

Killing a carelessly moved tank. Beaten units die if they can't retreat.

But his tanks eventually beat my infantry, forcing them to abandon the city.

Made a last-ditch effort to take back the western city. It didn't work.


We replayed and swapped sides, and found the results to be about the same.


GAB rating: Below Average. Computer Conflict makes good use of AppleSoft BASIC graphics, but the gameplay of its two games is unbalanced and too simplistic to be engaging.

Of SSI's initial offerings, Computer Bismarck and Computer Ambush remained in the catalog for years to come, but Computer Conflict was quickly relegated to the discount section, its outstanding copies sold at a third of Bismarck/Ambush's price and shipped in Ziploc bags.

In 1981, Keatings would develop Operation Apocalypse and Southern Command for SSI, both of which also wound up in SSI's bargain bin. But the next year, he designed the Advanced-level Germany 1985, the first of the "When Superpowers Collide" series, depicting a hypothetical armed conflict between NATO and Soviet forces in the titular setting. This was followed by RDF 1985, Baltic 1985, and Norway 1985, all of which are also rated Advanced. I feel just a little bit bad that I'm playing this underwhelming budget disk as the sole introduction to Keating's career, as these games are probably more representative of his body of work at SSI, but I've got to have limits on how far into the weeds I go. I could easily spend the rest of the year exhaustively covering SSI's volume of works from 1980 to 1983 as an amateur grognard, but I don't think anyone wants that, least of all me.

Friday, March 19, 2021

Game 245: Computer Bismarck and the roads from early SSI

Wargames are among the nichest of all genres, but a crucial part of early computer game history. I've never been into them myself - they've always struck me as dense, abstract, and inaccessible - but can't deny that they've been instrumental to many of my favorite strategy games, and of course to RPGs.

Two of the most prolific computer wargame developers in the 80's were Avalon Hill and Strategic Simulations Inc, and they make for some interesting comparisons and parallels. I covered a selection of Avalon Hill's early titles more than a year ago - the company's primary business had been in boardgames, as it is now, but branched out into publishing computer wargames under their Microcomputer Games label. Most of these were licensed from independent programmers, and all of the games I played had been coded in BASIC, as it was their policy to favor BASIC games for the ease in portability and to encourage user modification.

SSI, on the other hand, was always a computer game house, from its 1979 inception when founder/designer Joel Billings' Computer Bismark was rejected by Avalon Hill for publishing, and he decided to self publish instead. Unlike Avalon Hill, none of their games from 1983 and earlier make whale status, or even come that close. Wargames like Battle of the Bulge and Battle for Normandy, acclaimed by CGW, only garnered 10-13 Mobygames votes of the requisite 25, and their most popular by this measure, Computer Baseball, only got 16. Avalon Hill's comparatively primitive B-1 Nuclear Bomber and Midway Campaign both come close with 24 votes each, and by 1982, Galaxy and Telengard pass the threshhold. SSI's wargames from this period, from the looks of it, are quite a bit more sophisticated, deep, and mature as war simulations. Perhaps Avalon Hill's games have more votes precisely because they're not as deep and therefore more accessible.

What's most important to me about these early SSI games isn't what they accomplished as war simulators, but what they led to. In 1983, Billings' partner Roger Keating left SSI to found a new studio Strategic Studies Group, whose debut title, Reach for the Stars, is among the first 4x strategy games and anticipates Master of Orion. The earliest extant games of Danielle Bunten Berry, then Dan Bunten, were created for SSI before leaving to design M.U.L.E. for Electronic Arts, an all-time classic which had been inspired by the ancient Hamurabi family of resource management games. SSI themselves later developed several noteworthy CRPG with wargame-like features, starting with Phantasie and Questron, and soon after the famous Gold Box series. Their line of wargames continued too, with 1994's Panzer General the most famous of them all. Avalon Hill, conversely, doesn't have a single whale to their credit coming out after 1983.

Using a combination of sources - mostly Mobygames vote counts and credits pages, but also using CGW's wargaming column, I've picked a selection of early SSI titles to give myself a broad representation of their early works, but also to serve as introductions to the other developers mentioned.


Computer Bismarck was developed for the Apple II on the recommendation of Trip Hawkins, who founded M.U.L.E.'s publisher Electronic Arts. Everything really is connected!

The German battleship Bismarck, launched in February 1939, was, according to SSI, the mightiest battleship yet constructed. Weighing over 41,000 tons, plated with armor nearly impervious to shells and torpedoes, as fast as a cruiser, and armed with eight 15-inch long range guns and a secondary battery with dozens of medium-caliber and flak cannons, the Bismarck was a powerful threat to the proud British navy, which had already suffered terrible losses to German U-boats.

On May 22, 1941, Allied reconnaissance reported that the Bismarck, last seen on the Norwegian coast, was gone - lost somewhere in the northern Atlantic, where crucial Allied convoys were vulnerable to attack. Under orders from the Admiralty, the fleet moved westward to hunt and sink the Bismarck. In the following nine day pursuit and naval battle, described in painfully specific historical detail in the manual, the Bismarck was caught and overwhelmed by a fleet of two battleships, a carrier, three cruisers, and seven destroyers. Outgunned and unable to slip away, the Bismarck sustained over 400 hits, disabling her rudder and guns. Her surviving crew scuttled and abandoned ship. All but 115 of the 2,200 man crew were killed or MIA.


The manual for this game is pretty intimidating. Eleven dense, double-columned pages describe commands, movement rules for all ship types, rules on reconnaissance, spotting, and shadowing, weather, and of course combat. On top of that, there are maps, vehicle stat tables, and turn record cards. Simply reading it without the game at hand for reference, I couldn't really take in much except the general goal of the game - search for the Bismarck and destroy it. The British have a fleet at their disposal with four battleships, seven cruisers, a destroyer flotilla, seven convoys, two sub groups, and four airfields, plus the possibility of reinforcements including two carriers. The Bismarck is only escorted by the Prinz Eugen cruiser and four wolf packs, but the Bismarck must merely evade detection in order to win.

The concept invites comparisons to Avalon Hill's Midway Campaign, another wargame about a WWII naval conflict in which one side had greater numbers and the other had more powerful ships and the element of surprise, and both games ran in 16KB BASIC, but Bismarck is clearly an order of magnitude more complex. Midway Campaign's gameplay instructions took up about 2 1/2 pages of its 4-page manual. This is possible because while Midway Campaign was distributed on tape and the entire program had to fit in 16KB, Computer Bismarck consists of seven programs, each of which can be loaded from disk into memory as needed, plus data files for the map and ship tables.


To try to grasp how to play, I started with a few practice games, keeping the manual for reference. In my most successful learning attempt, I positioned my fleet into a wall formation to the west of Ireland, where the Bismarck and its escort cruiser Prinz Eugen were eventually spotted but unsuccessfully shadowed as they broke through the blockade without engaging, disappearing into the stormy Atlantic and leaving behind a few wolf packs which harassed my convoys. Although I could see the U-boats' positions, my attempts to fight them were futile; no matter how many ships I moved into the square, it seemed that my ships would only return fire when a wolf pack struck first, and I somehow managed to crash my carrier's sole squadron when I thought I had ordered it to make a complete attack and return trip.

Eventually, the Bismarck's position was revealed, five sectors west of the blockade, and my recon planes were close enough to close in and shadow, buying me time as I moved my fleet away from the subs and toward the target. The planes eventually ran out of fuel and crashed, but not before enough of my fleet could get in range and take over the shadowing job, and soon after reinforcements arrived. They entered the map far from the action, but with the Bismarck slippery enough to evade combat for awhile but not enough to avoid being followed, they eventually caught up.

In the meantime, during the combat phase of one turn, the Bismarck slipped away to the east, but the Prinz Eugen and wolfpack escort stayed behind and fought. The cruiser did not last long. My subs caught up with the Bismarck and attacked without giving it a chance to escape, but inflicted little damage. A few turns later, the Bismarck engaged a destroyer flotilla, utterly annihilating it.

Quite a bit later, the Bismarck finally failed to disengage from combat, and while it did some light damage to two of my battleships, it quickly went down under a veritable hail of torpedoes and shells from seven battleships, ten cruisers, and two destroyer flotillas. In total, I scored 92 points from the destruction of the two warships, one submarine, and convoy survival, but the Germans scored 180 for the destruction of so many convoys, destroyers, and all the planes that I crashed. So, Pyrrhic victory?


I re-read the manual, absorbing more this time, and tried again to see if I could do better. Before playing, you're given a few options:

  • First, to enter a number from 1 to 99. I'm pretty sure that the purpose of this is to seed the RNG, like in Akalabeth.
  • Whether you wish to play against another human, or against Admiral Otto von Computer. The game just doesn't seem like it would be much fun for whoever plays as the Germans, though according to the designer's notes the computer opponent was a late addition.
  • Whether or not to play an introductory scenario. The only affect of this, as far as I can tell, is that before the game starts you will be told exactly where the Bismarck will end its first turn.
  • To enter a secret two-digit number as a password. Presumably this is a vestigial feature of the two-player mode, but still required for singleplayer. I guess that you're supposed to leave the room when your opponent is playing so you can't see their movements, and then it prompts you for your password before returning control to you so that your opponent can't cheat and play your turn for you.


The starting map:


 An overview of what's going on here with all those letters and numbers:

  • M's represent merchant convoys, which are worth points for you to get to certain destinations, and points for the Germans if destroyed. The three "M2" convoys have battleship and cruiser escorts.
  • The D represents a destroyer flotilla, escorting two battleships.
  • C's represent cruisers.
  • B's represent battleships, but right now none appear because no sector contains only battleships.
  • S's represent sub groups.
  • The numbers to the right of these letters indicate the total search strength of the ships in that sector.
  • The numbers on the right edge of the map indicate the visibility at that latitude. To see anything in a square, the search strength must match or exceed the visibility level. Right now I'm practically blind.
  • F represents fog. Ships in fog are virtually invisible.
  • Crosses mean airfields and ports.

A big drawback of the map function is that it can't show you when multiple units occupy the same sector, and the weakest tends to take priority. That's why we don't' see any B's here - the ships they escort or are escorted by overwrite them. Even worse, when you move a unit, it "erases" the square, regardless of if other units remain behind, making it look as if it's empty! There are commands to redraw the map, but once you start issuing ship movement orders, you're stuck in that mode and can't use the map commands until you're done issuing orders to all of the ships, which is frequently a source of frustration - there's nothing more annoying than having to figure out what orders to give a ship when the map is wrong, and you can't redraw the map until after you've given orders!

The most important non-movement order is Patrol, which greatly improves the ship's search factor; 4 for most of the battleships and cruisers, and 3 for submarines. At night, patrols' search factors are 2-3, but moving ships only have a factor of 1 regardless of time of day.

I decided to repeat my strategy from before, setting up a wide search net northwest of Ireland, and hoping that the Bismarck would pass through it and be seen. The risk was that if it went around, or slipped through its holes, I'd have no way of knowing. This time, though, I sent my convoys, which can't patrol, directly to their objectives, unescorted. I had my planes search closely in tight formations around the UK coasts.

The map after moving everything and redrawing.

End of turn 2. The wall is starting to form.

Turn 3. Nightfall. Consolidated the wall a bit for concentrated nighttime visibility and recalled all the planes just to be safe. The fog has lifted.

Turn 4. A few ships patrol, and two level bombers scout the coast of Bergen but it's not enough.

Turn 5. The wall is coming together, and planes scout the Bergen coast.

Turn 6. A column of ships have good visibility in five sectors, my subs head north around England, and planets continue to scout Bergen.

My planes spotted the Bismarck! It never left port.


The Bismarck sailed south, but my plane shadowed successfully, and reinforcements were deployed at Scapa Flow and Clyde bases in England.

Start of turn 7. Bismarck is the color-inverted B.

I moved every ship but the convoys toward Bergen, and did my best to keep the Bismarck under aerial observation, with with Scapa Flow's reinforcements consisting of a battleship, carrier, four cruisers, and a destroyer flotilla, this was hardly necessary. I was able to attack the Bismarck with this group right away, starting with a torpedo bomber run launched from the carrier.

End of turn 7. Four cruisers, a destroyer flotilla, six recon planes, and three bombers are on the Bismarck.

I expected combat, but none at all happened, and the next turn the Bismarck was gone, with no opportunity presented to shadow. But I kept moving my forces toward its location, and spread out the Scapa Flow fleet. I had to recall most of the planes to refuel. Then I realized what happened - the fog had returned, and the Bismarck got away in it.

End of turn 8. Note the fog at Bergen.

The Bismarck was spotted again! My destroyers had the first shot at it.

Damnit guys. You suck.

Next, the battleship had a chance to engage.

Aaand it got away.
 

Night fell, but my surviving destroyers were able to shadow. Guess they're good for something. I dogpiled my fleet on the Bismarck once again. I had to ground most of the planes to refuel, except for the torpedo bomber, with which I once again attempted a bombing run from the carrier.

End of turn 9. A battleship, three cruisers and half a destroyer flotilla are on the Bismarck.
 

The combat phase began. The torpedo bombers struck first, which shows that the game recognized my intent, but missed the 120 foot wide vessel completely.

Next, the surface ships engaged, though the destroyers stayed out of the fight, I'm guessing because they were out of torpedoes. The Bismarck did not disengage.

Round 1 results: You sank my battleship!

Neither fleet annihilated, round 2 began.

Why not? Were you saving them?

Bye bye, Otto.

The game didn't end, as the Prinz Eugen was still a target of opportunity, but I didn't feel like scouring the ocean for it. I simply put my warships in patrol, kept the planes grounded, and continued moving the convoys toward their destinations. Subs sank one of my battleships, and a plane somehow crashed even though I had them all grounded, but I didn't care at this point. All but one of the convoys made it to their destination, two of them on the final turn that they were allowed to move. The Prinz Eugen was never seen or heard from.


I guess I was fortunate that the Bismarck hadn't moved at all before I spotted it, because it made the task of sinking it much easier. But I didn't feel like playing again to see if another scenario might play out.

GAB rating: Average. This game has the steepest learning curve I've seen yet in any game played on this blog, though a lot of that has to do with grappling with the interface, which is frankly quite clumsy. For instance, why are there three kinds of ship movement orders, when only one is valid for any given ship? And why is one called "Fast Move" when it's slower than a regular move? And the "move plane" orders mode, for some inexplicable reason, forces you to manually issue "no orders" to your torpedo bombers when it isn't legal for them to move (e.g. their carrier hasn't even arrived yet!), even though it's smart enough to skip other planes when they're grounded and reloading.

The learning curve would be fine if there was a good payoff of deep gameplay, but Computer Bismarck just isn't satisfying enough to be worth the effort. My wins did not make me feel smart, they made me feel lucky, and combat just seemed like a mess of randomness, with the odds heavily in British favor. And the wolf packs were a nuisance that couldn't be mitigated.

A lawsuit from Avalon Hill, settled out of court, alleged that SSI's design had been improperly appropriated from their board game Bismarck, and from a brief overview of the manual of its 1978 second edition, the similarities are indeed strong enough to preclude coincidence. But, there is a crucial difference - Avalon Hill's design is set up like Battleship in that each player has their own board and set of tokens for secretive movement, but the mere act of searching a sector would signal to the other player that you have a ship or plane eligible to search there. Finding nothing would give information to the enemy and none to you. Only Computer Bismarck permits fair and secret spotting, which is why Billings put so much emphasis on it. To allow this in a board game would require a human arbiter, and who would want to be stuck in that role? As the manual notes, automating this sort of tedium is exactly what computers are for.

I do wonder how much I'll enjoy SSI's other offerings of this era. These games weren't really meant for me, but given that Computer Bismarck was one of the first games of its kind, I have to be open minded to the idea that they'll get better. We'll see if they do, to an extent that I have more fun playing them.

Most popular posts