Saturday, August 29, 2020

Game 208: Dunjonquest: Upper Reaches of Apshai

In September 1981, one year after the initial release of Temple of Apshai's sequel Hellfire Warrior, Automated Simulations released two expansion packs, one for each.

Upper Reaches of Apshai is, unsurprisingly, the expansion to Temple of Apshai, and although it came out a year after Hellfire Warrior, it incorporates none of its improvements or advances over the original save for some level design paradigms and shenanigans. There is no new code in this expansion; it is simply a set of four new levels to be played using the Temple of Apshai Innkeeper and Dunjonmaster programs, and carries the limitations of the original game. There's almost no character advancement here, there's nothing worth spending your silver on past some basic provisions available at the start, and no reason to bother with treasures except that they're there.
 
The manual is pretty brief this time, giving the barest of backstory for a "William Nailfoot" who like many other adventurers traveled by sea to join the Temple of Apshai looting, but found only a rusty nail through his foot. Months of convalescence and therapy later, he can walk again, but the action has come and gone, and now he's stuck doing odd jobs around town to pay for his trip home.

Normally I play the earliest release available, but for the sake of my sanity, I played using a "rev2" edition of Temple of Apshai, for bug fixes and quality of life improvements. Tracing the provenance of TRS-80 games is troublesome, but I'm satisfied that this was available at the time of Upper Reaches' original release. I imported my Ahab character as he was in Temple of Apshai (prior to any cheating), so he could continue his adventures, making it sort of a parallel universe to my playthrough of Hellfire Warrior, in which I had also imported him.


The biggest difference of rev2 that I noticed was that it supports saving your character to disk, so that you didn't have to keep re-typing his stats. Rev2 also fixes some bugs, among them that your shield no longer disappears for no reason. Saving the dungeon state to the disk still doesn't work right; loading it still produces corruption. There's also an inconsistent use of a lowercase font. Rev2 still doesn't keep track of your silver or tally the value of your haul - that's something you just have to keep track of yourself (not that it matters).
 

The first level is the innkeeper's backyard, which according to the manual we are hired to clean up.


It's not clear what he meant by cleaning it up, but there are field mice and dogs crawling around here. A few coppers can be had by scrounging through the trash strewn in the yard, which also unleashes a few flies. To the north, eggs can be taken from a poultry coop, if you can brave the chickens and geese guarding them. To me, they posed no threat whatsoever. To the south are the stables, where a nest of mice gather around some cheese. The adjacent structure has a surprise.


Opportunistic adventurer that I am, I killed the innkeeper's wife and took his dirty laundry. He never said that wasn't part of the cleanup job.


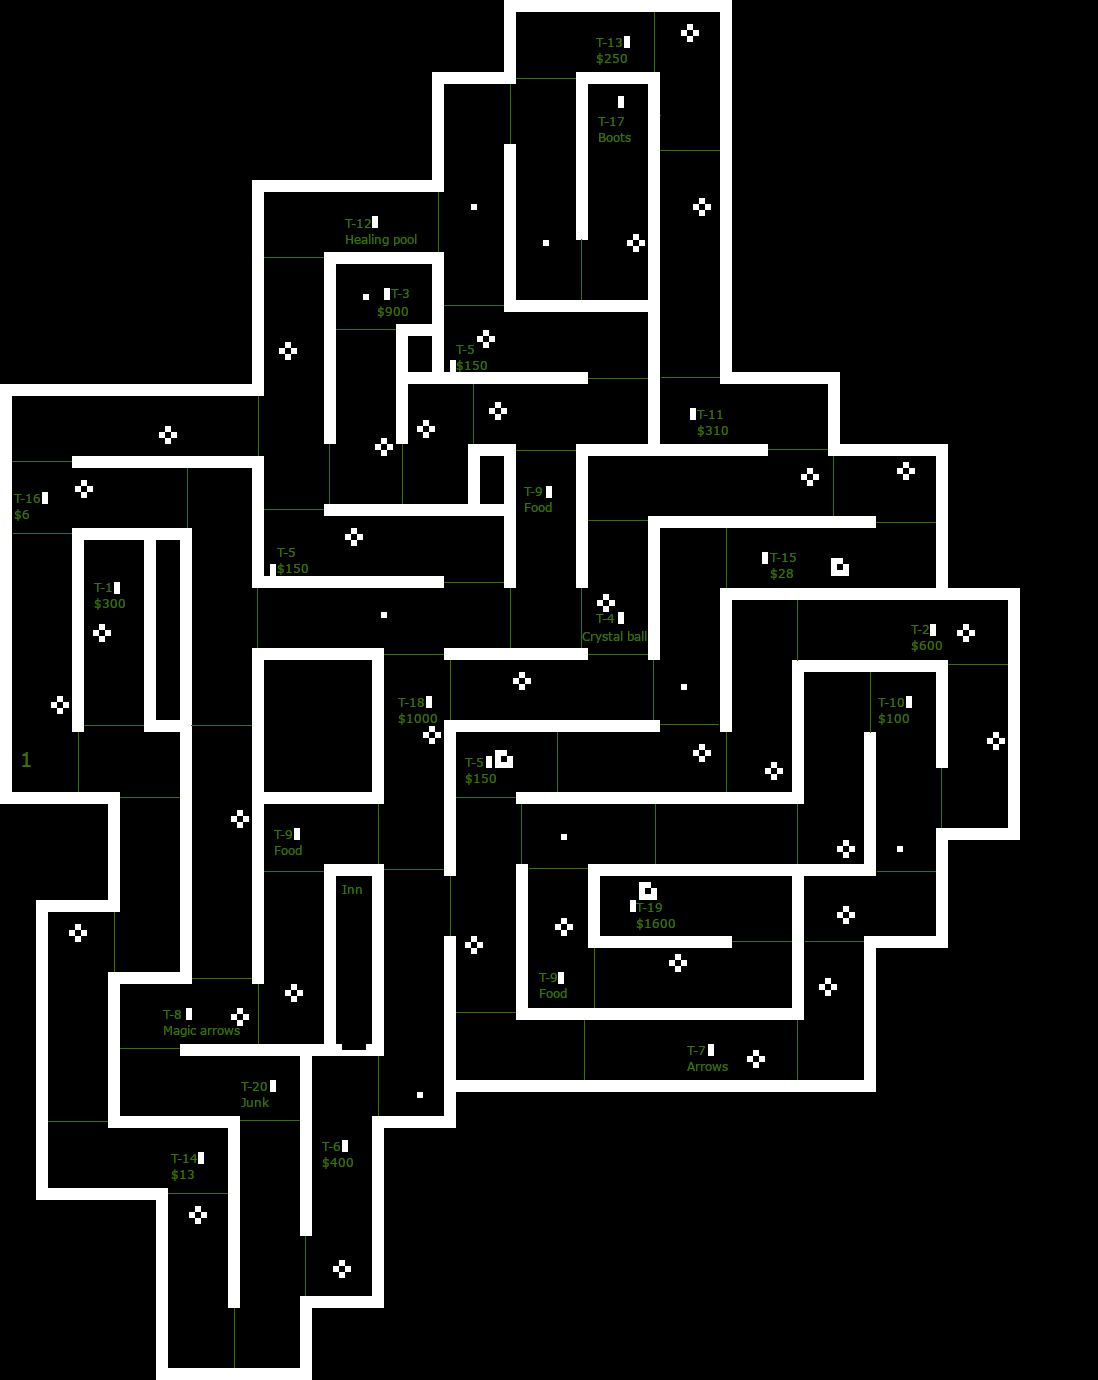
The central area in this level is a large, open field of berry bushes, divided into 24 small rooms. It somewhat reminds me of the plains of hell in Hellfire Warrior, but nowhere near as confusing to navigate. Unlike it, though, it is painfully slow to navigate, as the engine here seems to uselessly draw walls around every visible "room" on the screen before removing walls that shouldn't exist, which is most of them. More field mice infest this area, and on occasion we're attacked by killer tomatoes!
 
To the east of this field is a secret door leading to a passage to a cavern under a hill, where we find a bandit and his treasure, the best in the level. This bandit is the only creature in the entire level capable of landing a scratch on me.
 
South of the field is a toolshed storing useless items and occupied by drunken sailors.


To the southwest is a vegetable garden where the killer tomatoes come from. Here, I make some killer chicken cacciatore (no, really), and find a purse full of money, the second best treasure in this level.

 
The next level is Merlis' cottage, and the manual explains we are here to collect lost wages for painting his fence. We're warned not to hurt the cats, and although I'm certain the engine is not capable of punishing us for this, I took heed anyway. They seem to respond well to negotiation. One exception though was the rare black cat, which drained stats, and therefore I de-clawed it with magic arrows before it could do this.

At only 21 rooms, his cottage is easily the smallest level in the entire Dunjonquest series, discounting the Microquests. However, the rooms past a tapestry in his hall of magic don't all connect orthographically, making for a confusing, warp-filled headache of a map. For what it's worth, Hellfire Warrior's final level was much worse. At least we have room numbers to keep our bearings this time, especially useful here as there are mirrored rooms that look identical to each other, and connect in strange ways.

I did my best to make some coherent sense out of the level. Rooms 3, 4, 6, 7, 10, 11, and 19 have special rules.

 
The special rules are:
  • Rooms 3 & 4 occupy the same space. Adjacent rooms 2, 5, and 10 are connected to 3, while 6 is connected to 4. Heading east from 3 or 4 will take you to room 10. Heading north from 3 returns you to the inn.
  • Rooms 10 & 11 occupy the same space. Heading north from 10 takes you to 7. Heading north from 11 returns to the inn. The treasure chest in room 10 holds moths, and the treasure chest in room 11 holds copper. Heading west from 10 takes you to 3. Heading west from 11 takes you to 4.
  • Room 6 can only be accessed from room 4. Heading east from 6 is a one-way trip to 10. Heading west from 6 returns you to the inn.
  • Room 7 can only be accessed from room 10. Going south from there takes you to room 11.
  • Room 19 can only be accessed from a secret door found in room 11. Walking back through the west wall returns you to room 11.
 
Some of the other interesting things found here are:
  • A secret door in the starting area leads to a hall full of Merlis' cats, and a chest full of silver.
  • The winding passage in the southeast is full of bees, and leads to a collectable honeycomb which serves as a healing elixir.
  • Room 9 is a laboratory, and here a guinea pig spontaneously explodes as you enter!
  • Room 19 is a hidden closet with respawning magic serpents, and in the southeast corner there is a nearly invisible magic wand.
  • Room 6 holds the best treasure in the level - a chest of 100 gold pieces.
 
On my return, my intelligence had gone up by one. I'm not sure why - could have been the wand, but the manual seems to suggest the wand is useless.
 

Level three, Olias's Cellar, has no quest expressly stated, but it sure would be nice to rob him for a change.


With 34 rooms, this is still on the small side for a Dunjonquest map. It's bigger than the previous one, but doesn't have the confusing multi-dimensional rooms. There's a little bit of funny stuff going on with the map here - lots of traps, cave-ins, and one-way doors, but the kicker is that rooms 20 and 15 occupy the same spot on the map, as if 15 is a crawlspace built above 20. They're not exactly the same shape, though, and the doors aren't doing anything too complicated like Merlis' hall of Magic - 12 connects to 20, 19 connects to 15, and both 15 and 20 exit northward to 21. I tweaked the map a bit - you may notice that room 19 is squashed somewhat - to make them fit into a 2D space well enough to make the spiraling path from 20-22 to rooms 17-19 and 15 clearer.

Room 20, south of room 21


Room 15, also south of room 21


Olias' cellar is also home to many cave-dwelling animals, most of them posing no threat to me at all such as bats and moles, but a few are more dangerous, such as bears, vipers, black widows, and creeping cruds, the latter of which did a number on me when I encountered several in a tiny alcove affording no chance to kite around the slow-moving amorphous blobs. A few of Olias' hidden rooms are guarded by other dwarves, who are about on par with bears. Nothing here was much of a threat individually, but battle after battle, not to mention the weight of the dwarf's treasures, wore me down. It took me four trips to clear out the cellar.

One of his treasures - I don't know which, but am guessing a glowing belt found in a huge cache of gems and platinum, raised my strength a point, and with this boost I was able to buy a bastard sword. This was a temporary downgrade from the +2 broadsword I started with, but room 15 contains a magic sword upgrade, which I collected, giving me a +4 enchantment. There is also a quiver of magic arrows on this level, which can't be purchased in this game.


The final level - Benedic's Monastery - is cursed by a vampire, and we are offered fame and glory should we drive it out. We are warned not to bother the monks or steal their possessions. The game does in fact mete out retribution for failing to heed this - monks are generally not hostile, but a few rooms are trapped in a manner which summons an instantly fatal "Spirit of Geb" monster, and only trigger if you've killed the monk in the room. Treasures found in unoccupied bedrooms are trapped and summon hostile Angry Monks, but there's no consequence for killing them. Angry monks may also spawn randomly, and on occasion you may even find a vampire monk - again, both types can be killed with impunity.


The first quadrant is a large courtyard, where a useless-seeming "empty hand" treasure permanently increases your intuition. To the west are the dormitories, where you can steal treasure from sleeping monks without incident, the most valuable of them healing lilies. To the east is a walled garden where low-value food and more lilies can be taken, and to the north of that a foul-smelling kitchen where eating a bit of stale bread increases your constitution, if you survive a mold trap.

Fighting a rat over moldy, stale bread


In the northeast of the monastery is the cemetery, where moderately strong zombies shamble around. Here, a secret passage leads to a spiral staircase downward.

It's linear but can be confusing to navigate.


The vampire lies not at the bottom, but in a secret room halfway down. He isn't that much harder than the zombies, and some fabulous treasure waits in his lair.


At the bottom of the staircase is a room with that old scent of vanilla, and endlessly respawning antmen.


Satisfied that I did everything there is to do, I returned to the inn, reviewed my list of pointless treasures, and closed the game.

Final stats


GAB rating: Below Average. The "rev2" release helped make this a somewhat more pleasant experience with its bug fixes and character saving, and some of the levels have interesting ideas, but Temple of Apshai was always very limited in what it could do as an RPG, and these limits had been hit pretty early on in the original game. I had more fun than I thought I would, but by the last level I was getting burnt out. An expansion pack can only expand on the concept so much by abusing the engine. "Upper Reaches" indeed.

It's curious that Upper Reaches of Apshai not only provides more opportunities for character growth than the first game by means of items that permanently affect stats, but it's also an easier adventure, where I didn't need to use a healing item even once. Maybe the idea was to train starting characters here before moving on to Temple of Apshai and Hellfire Warrior, but if so, that idea came two years too late, by which time I imagine anyone who bought these games new and found them too hard would have either given up or cheated their way through.

There was a second expansion in 1982, Curse of Ra, but I won't be playing it. I wasn't planning to originally, and after this much Dunjonquest, I'm ready to move on. We're not totally through with the series, though - I intend to give The Keys of Acheron, the first expansion to the meatier Hellfire Warrior a try, but I am taking a break from Data Driven Gamer for a little while first.

Wednesday, August 26, 2020

Game 207: Starquest: Star Warrior

The second and last of the Starquest series, Star Warrior technically uses the Dunjonquest engine, but  heavily modified and offers a radically different kind of game, anticipating 1981's Crush, Crumble, and Chop! Instead of dungeon crawling, it's an open world combat sim with stealth, without any walls, but instead terrain that hinders but does not obstruct. It also has graphics and sounds.

I didn't say they were good graphics and sounds.


The manual details an overwritten plot, par the course for Freeman's sci-fi games, where the peaceful citizens of planet Fornax, under the protectorate of the militaristic Stellar Union, decide they're sick of it and hire space mercenaries to route the occupying forces. The weirdest bits here are the very USA-centric aphorisms wildly misused in context ("Freedom isn't free," ruminates the Fornaxian client, meaning "we will pay you lots of money"), or make no sense in any context ("The only thing worse than taxation without representation is taxation with representation," lectures the Furies' receptionist - bet the Mises Institute would love to hear how your society functions!).

Star Warrior has two missions, set on two different maps, implied to be taking place concurrently by two different warriors. In mission 1, "Diversion," your goal is simply to create as much mayhem and destruction as possible, with forts and military bases worth more points than any other target of opportunity, and your successful extraction (based on a transport rendezvous time which you set before the mission), though not strictly required, worth a final bonus. Mission 2, "Assault," has you search for and kill the Stellar Union governor under the cover of the havoc wreaked by your counterpart. It would be neat if the game remembered your score from mission 1 and used it to adjust the heat on your Fury in mission 2 accordingly, but alas it does not.


You have three weapons available and a number of other bits of gear, depending on which of three mobile suits you've selected at the start. The disk version, which I could not get running correctly at all, allows you to customize your weapons and gear, using a point-based system where each module, upgrade, and ammo count costs points and/or comes with a tradeoff, such as slower flight speed for heavier armor.
 
Your designated primary weapon is the powergun. As in Rescue at Rigel, power level is adjustable, and it does not inflict damage, with a successful hit either killing or not killing. Unlike Rescue at Rigel, power level does not affect lethality or energy usage. It is, essentially, a guess on how far away the enemy is. The screen dimensions correspond to 1000m across each way, and each powergun setting optimizes for a kill at 50m per level. The odds of a kill decreases hyperbolicly with distance plus error. For instance, if an enemy is 150m away, and your powergun is set to 2 (optimal for a 100m kill), then the 50m difference is added to the distance and your gun will be as effective as it would at 200m aimed perfectly. In practice, I found the powergun, even in its heavy variant, rarely killed at longer distances than 200m and allowed return fire. I found it most effective for sniping unaware enemies from cover at fairly short ranges.

The secondary weapon is the blaster, which I found quite effective at long ranges, but not worth using unless I was leaving an area and wanted to take out a target on my way, because it is loud and brings heat down on you hard. You don't need any help looking for trouble in mission 1 - you'll encounter plenty of it while searching for high value forts and bases - and when you find them you really don't want them to spot you too soon or to call for backup.
 
Unloading missiles at a tank
 

Finally you have nuclear missiles, which first prompt you to enter an azimuth, and then a range of detonation. Aiming is done in 45 degree increments, and range goes from 110m to 300m. These are the only weapons that can take out forts and bases, but the blast radius can also destroy mobile targets. It's very similar to the missiles seen in Starfleet Orion. These are probably the best overall weapon, though the strict 8-way firing lines are more limiting than your other weapons, and estimating range can be difficult, but unlike the powergun you at least get an explosion to tell you how good or bad your guess was.
 
Annoyingly, the only way to tell if you took out a base or not is to scan it, which rarely works unless you're fairly close by, and even then may take multiple turns, allowing reinforcements. If it stops firing on you, maybe it just doesn't see you any more. If you get fired on, maybe it's coming from an unseen reinforcement.

Approaching a fort in the mountains in a Dragoon


The three suits are:
  • Dragoon, which has the heaviest armor and shields, heaviest weapon variants, and seems to be well suited to the diversion mission.
  • Marauder, which has standard armor, faster flight speed than the Dragoon, heavy shields, a heavy blaster but a standard powergun, and a holographic decoy device to draw fire away.
  • Ninja, which has standard armor and shields, fast flight speed, standard weapons, and an invisibility device, which reduces your odds of being spotted (but is no guarantee).


The Ninja's invisibility device


Energy is limited, but in practice, and very much unlike Rescue at Rigel, here I couldn't run out even if I tried. On the hardest settings I just don't live long enough to run out, and otherwise with a 20-30 minute mission I find myself being recalled to the transport with plenty of energy left. It's probably a good idea to have your shields on most of the time, as enemies may be present but unseen. And sometimes they see you first.

I couldn't really find a good strategy for consistently performing well or winning. There are some interesting stealth mechanics in play, but there's so little feedback that when you get seen, it's impossible to know if you made a mistake, or if you just had bad luck, and therefore have little incentive to approve. I preferred the Dragoon for mission 1 and the Ninja for mission 3, but even in my heavily armored and shielded Dragoon, damage taken was wildly inconsistent. Sometimes I'd take 6% damage from a hit, sometimes I'd take 60% instantly. You can heal, but it's very, very slow - about 1% per turn, during which enemies may just spot you even if you're in a hiding place and invisible, leading to a cycle of hurt where you never quite finish repairing your damaged subsystems or getting your health back up to a reasonable level. As a Ninja, not being seen is paramount, as there's no such thing as getting a light scratch even with shields on, but this too is subject to luck and skill, and there's no way to know which one failed you when you get spotted.

For what it's worth, I managed to win the second mission and extract successfully on the second-highest difficulty level, but doubt I could repeat this consistently.


GAB rating: Below Average. This may not be entirely fair, as I don't really "get" this game. Maybe with a more thorough understanding, it becomes a tactically sound game of skill. But I wish there was more transparency in how things work, and didn't have enough fun to spend more time figuring it out. For instance, is it better to inch your way through difficult terrain, giving enemies more time to spot you, or is it better to use your jump jets or flight to go through it quickly, giving them much less time, but higher chances of spotting you (if not also of hitting you) on any given turn? Neither strategy worked consistently, and it just frustrated me.

In Star Warrior's defense, the engine does seem to be quite a bit improved. The horribly long wall drawing routines that characterized earlier Dunjonquest games is gone here - no walls to render, after all - and the numerous sprites representing you, your enemies, and the terrain all draw relatively quickly, making movement itself significantly zippier than ever. At times it's a bit too fast, and often I inadvertently skipped a turn simply because I didn't press a button fast enough. But it also never dropped inputs, as far as I can tell, which was a constant problem in earlier games, especially Rescue at Rigel.

The next two upcoming games, unfortunately, will not benefit from these engine improvements, as they take the form of expansion packs and contain no coding of their own. Upper Reaches of Apshai in particular, based on the flawed, buggy, and incomplete feeling Temple of Apshai, gives me a bit of dread.

Monday, August 17, 2020

Game 206: Starquest: Rescue at Rigel

Read the manual here:
https://mocagh.org/loadpage.php?getgame=rescuerigel-alt

Dunjonquest meets Starfleet Orion, sort of. For all intents and purposes, this is another Microquest - a single-run dungeon crawler with a fixed character and no opportunity for development.

You are Sudden Smith, a character introduced in Starfleet Orion as one of the fighter pilots in its ultimate scenario, and presented here as a Buck Rogers pastiche. For reasons not very well explained, an insectoid species called the "Tollah" have taken ten human colonists hostage and whisked them to a secret moonbase in the Rigel system. Beaming in and armed to the teeth, you have 60 minutes to explore the base and rescue as many hostages as you can and beam out before your transport leaves.

Zapping a High Tollah's pet cerbanth and rescuing a hostage.


It's basically Datestones of Ryn, but bigger and with some much-needed combat depth. Not a lot, mind you, this is still a 16KB TRS-80 BASIC game and it hardly transcends the system's limits, but it's nice to have some options, which include:

  • Your powergun, adjustable to nine levels of incrementing lethality and draws energy from your suit's battery, which you need to teleport hostages and yourself out. Unlike arrows in Dunjonquest, this can hit your target from anywhere in the room, though its accuracy diminishes over distance and fatigue levels. Hits do not inflict damage; they either kill or do not, but unlike in Dunjonquest, a kill gives the target no chance to retaliate.
  • A blaster pistol, which holds 3-5 shots of ammo depending on difficulty and does heavy damage, but also tends to alert the Tollah.
  • Dodge-rolling, which moves and also reduces your chances of getting hit. It's awesome to dodge-roll right into a High Tollah's face and zap it with your powergun as his own shot burns a hole in the carpet where you used to be standing, but this is no guarantee of avoiding a hit, and the extreme fatigue cost also reduces your chances of landing a hit yourself.
  • A force shield, which reduces damage taken somewhat, but drains your precious power every turn that it's on.
  • The AMBLE system, which when turned on lets you perform two moves per turn. But every action (even resting) drains 12% stamina in addition to its normal exertion cost, and you're doing two of them per turn, so this can't be left on for long, and you'll need to rest after using it.
  • Melee combat, which I found a complete waste of time. It tires you out quickly, never kills in one hit, and you really don't want anything within arm's reach to be not dead by the next turn.
  • Negotiation, which unlike prior games actually works often enough to be worthwhile.


The first thing I did was to map out the Tollah moonbase. There are 61 rooms spread over six floors, and to have a chance of rescuing all of the prisoners in just 60 minutes, you absolutely must have a traveling salesman plan to check each room with minimal backtracking. Prisoner locations are semi-randomized; there are 18 rooms where they may appear, and ten are randomly populated each game. Enemy locations are also randomized, but some rooms are more likely to spawn specific enemies, e.g. Commons almost always have Common Tollah, and Sanctums often have High Tollah or their pet Cerbanths.

Floor 1, the top of the base, consists only of a vestibule and a dropshaft that can be taken to any of the larger floors below, but you haven't got enough time to methodically explore each floor in descending order by using the dropshaft. Walking to the dropshaft back across the entire level would simply waste far too much time. There's also a "liftshaft" that goes from floors 6 to 3, but no higher, and with smart use of both shafts, you could probably explore most of the ship rather efficiently. Your main method of interfloor transportation, though, will likely be the base's network of one-way teleporters, which are in fixed locations but indistinguishable from doors, making it all the more crucial to have a map.

My maps:


A cruel aspect here is that the sixth level is partitioned into two sectors, and the northwest sector can only be accessed by one of three mystery teleporters, which take you to one of three random locations. I have always found two or three prisoners in this sector, including Smith's friend Delilah Rookh, who is worth more points than any other. The starting vestibule has one of these random teleporters to its west, so you should always start a game by taking it.

These teleporters' destinations are randomly selected per use:

  • Level 2 refectory
  • Level 4 main chamber
  • Level 6 main chamber


If you arrive in the refectory, then you may as well check out the connected store room, a possible hostage location, then teleport to the level 3 anteroom, check out the sanctum here, and teleport back to the start and try again. If it takes you to a main chamber, you can exit to the east, and if it's a lab, you're on level 6. If it's a disposal unit, you're on level 4, and may as well explore the whole level before taking the south anteroom teleporter. If you wind up going to the same place twice without landing on level 6, then you're screwed and may as well restart.

There are a number of enemy types, and each has three stats which are invisible to you and unexplained, but nevertheless important. These stats, whose names I made up, are Armor, HP, and Servility.

Your powergun's chances of killing on a successful hit are (Power - Armor)/HP. The Tollah, who have 1 armor and 6 HP, will therefore always be killed by a level 7 shot. Note that these odds don't consider the chances of missing your target entirely, which is a complex formula of its own totally independent of your gun's power level.

A hit from your other firearm, the blaster, does 6-11 damage, minus the enemy's armor level. A melee hit does 6 damage minus the enemy's armor level. Nonlethal damage will reduce the enemy's HP, making a follow-up powergun shot much more likely to kill.

Odds of a successful negotiation are (8.4% * Servility). Because negotiation isn't fatiguing, it's a good idea to turn on AMBLE mode so that you can attempt it twice per turn.

Cowing a Common Tollah in its quarters.
 

Enemies you may encounter include:

  • Common Tollah. 1 armor, 6 HP, 5 servility. Unarmed, and can be found just about anywhere, but are almost always found in the Commons rooms. Negotiating works quite well, as they have high servility, and as they lack ranged weapons, don't move very fast, and are most often found in large rooms. You should have plenty of time to successfully negotiate before they get close enough to hit you. If they do, though, waste them with a level 7 power blast.
  • High Tollah. 1 armor, 6 HP, 1 servility. Armed with highly damaging blasters, it's best to AMBLE past them if you can leave the room in two hops. The second best is to just shoot them with your powergun. Closing into the appropriate distance can be tricky; firing from too far away will likely miss and waste your energy, but moving in drains your own stamina, especially if you're on AMBLE, and each round that you don't kill them, there's a non-zero chance that they'll hit you and do some damage.
  • Cerbanth. 2 armor, 8 HP, 1 servility. The guard dogs of the High Tollah are unarmed but will do serious damage at melee range, even when your shields are up. Crank up your powergun and put them down. I have never successfully negotiated with one, but in theory it should be possible.
  • Sentry robot. 4 armor, 8 HP, 2 servility. There are two types with different weapons, both of them bad news on hard mode. If you can AMBLE past them, I would. If not, then a blaster shot followed up with a powergun shot usually deals with them, but the blaster will attract more enemies. Hopefully easier ones. Double negotiation with AMBLE works surprisingly well, but don't even try it if they're close enough to have a good chance of hitting you.
  • Thornet. 2 armor, 1 HP, 0 servility. These aren't very dangerous, and a powergun at level 3 will kill, but hitting them is tricky. I haven't seen them very often.
  • Plasmoid. 0 armor, 15 HP, 0 servility. They move slowly, so AMBLEing past them is probably the safest bet, and are rarely found outside of the disposal unit. Should a hostage be found there, zap it with the powergun at the highest level, with AMBLE on so that you get two chances per turn.


In a few days of attempts, I managed to just barely rescue all ten hostages on the hardest setting. Here, you get 200 units of energy, which means you most certainly can't run around blasting everything in sight with your powergun. When you must, it's best to use level 7 for a guaranteed kill against Tollah, and 9 for anything more powerful. Anything less and it will fail to kill just often enough to make spending the extra energy point worth it.

Before leaving a room where I wasn't under pressure, I would rest to near 100% stamina if possible, and also turn on AMBLE. This maximized my mobility upon entering the next room. I would also heal even slight injuries. Even though you only get two medical kits and it may seem like a waste to use one at 80% health, combat performance suffers when you're hurt, making it more likely that you get hurt even worse.

I uploaded a recording of my victory to Youtube. I don't expect anyone will watch it, but the option is there.


GAB rating: Below Average. This might be the best Microquest-type game yet, but that isn't saying very much. Datestones of Ryn was the worst of them, and Rescue at Rigel follows very close in its footsteps, improving on many of its inadequacies, but still bound by its limitations, offering no character growth, not even the gear upgrades found in Tower of Morloc. The "dungeon" is big, more interesting, and although the rooms aren't unique, the room types at least have corresponding manual paragraphs describing the sights and sounds, and offer distinct gameplay characteristics. Tactical combat is the best in a Dunjonquest game yet, though still extremely reliant on luck.

Bad luck is more punishing than bad decisions, and there are so many ways that a roll of the dice can screw you over. You only get two heals on the hardest setting, and after using both, you're circling the drain, getting worse at combat and more irreversibly exhausted with each hit you take until you're dead. Miss a High Tollah at close range? You're probably going to eat a blaster bolt and have to use a heal. Try to dodge-roll? There's still a chance of getting hit. Shields up? You might take a big chunk of damage anyway. The amount of health restored by one pack is random and is sometimes so poor that you have to use your second right away. Sometimes enemies just don't stop spawning. Sometimes teleporting hostages out works right away, and sometimes it takes more than ten tries, draining your precious power and giving enemies more chances to come in and hurt you. Sometimes an enemy teleports in right next to you when you've already buffered your next input, all but ensuring you take a hit from them, and probably curse TRS BASIC for being so laggy.

All that said, damned if the last minute of my successful play didn't get my heart racing, in which, being exhausted, badly wounded, and having barely any energy left for my gun or teleporter, I blasted a High Tollah scientist, and beamed out the hostage he was using as an alien guinea pig as his pet cerbanth entered, hearing the noise. As I hailed the transport to teleport myself out, it failed, and the cerbanth got closer. I set my powergun to maximum level, only to realize that this would deplete my own reserves completely, leaving me stranded. I dodge-rolled out of the cerbanth's way, took a nearly fatal bite, and fired my last blaster shot behind me, blowing it to bits. I then teleported out successfully, just as another High Tollah entered the fracas.

Thursday, August 13, 2020

Hellfire Warrior: Won!


By most accounts, hell is an awful place, that if you must visit, you'd better visit quickly. The Book of Lore game certainly paints an intimidating picture of a land filled with fearsome beasts, wailing souls, deep crevasses hidden in the dark, and scourging hellfire everywhere. There are no room numbers or descriptions, but instead two pages describing the obstacles and encounters seen during our journey into hell and back.

I prepared by spending most of my remaining money on stat-boosting potions and magic arrows. The very atmosphere can affect you in ways that you'll never recover from, so I went all out in the hopes of making this trip a fast one.

My character sheet, pre-juicing


A trip to the apothecary later


Welcome to hell!


The denizens of hell weren't nearly as much of a threat as it might have seemed. Lost souls and shades can drain your stats if they hit you, but in the wide open areas that characterize this game's final level, my magic boots allowed me to easily stay out of their melee range and kill them with magic arrows, or to just run past them. My enchanted armor gave ample protection from the other monsters, such as pyrohounds and behemoths, who simply deal damage.

The real challenge is navigating the bleak void, which is the central area in the plains of hell. With no room numbers and no walls except on its very fringes, loose treasures are your only beacons, and it quickly becomes very clear that hell exists in non-Euclidean space. Retracing your steps will not always take you back to where you were before, and it's not always clear when it does or doesn't, as the "rooms" lack means of telling them apart. You're meant to wander the plains aimlessly, drinking elixirs and nectars to stay alive, until you stumble upon the way out. Hell is impossible to map.

Or is it?

I realized that one thing does uniquely distinguish one room from another - their dimensions! By using the ingame save function within a room, then counting the steps needed to leave it in one direction, reloading, and counting the steps in a different direction, I could accurately measure the size of it, and uniquely identify it. I found that the rooms all fit together nicely into a grid, and that the size of a room could determine exactly where it lies in the grid. I had to use a new character for this approach, though, as the magic boots I found in the labyrinth double your movement, making it impossible to walk only one step at a time.

This still took days, though. Although the grid is laid out simply, navigation between the cells isn't. Sometimes moving east takes you one cell east, and sometimes it takes you somewhere completely different, but without the map you would have a difficult time telling the difference; either just looks like wandering aimlessly in a pitch black void. I initially used Trizbort to map things out, and then used my Trizbort map to annotate the edges which defy orthographic mapping (e.g. C5's east, west, and north edges).

My map of the plains of hell:


The entrance is the southernmost of three vertically-connected rooms, each one with a corridor to the plains area.


Even in this entrance room, there's an evil trick. The manual states that you may see a set of crystalline javelins in the shadows, but that isn't apparent here. This is because while the screen appears to be one large room, it is actually two. It would probably not occur to most players to bother exploring the section of the room east of the north passage, but it counts as a separate room, and its treasure, three javelins that will kill anything in one hit, reveals itself when you enter it.


Moving north through the passage, we encounter hellfire in the next big room.


Hellfire appears to be an environmental hazard that inflicts heavy damage if you stick around, but is in fact a standard enemy with an invisible sprite, and can be fought like one. With my stats and gear, it isn't even very challenging. You can just swing your sword blindly and will eventually hit it.

The tunnel to the east leads to the plains.


The simplest path to the exit is to first head north until you reach a room I designated A4. Here, you'll find treasure #8, some nectars. Then head east, past C4, to D4, where you find treasure #13, an orichalcum ring which I assume has some intrinsic benefit.


Turn around and go west, to enter a room C7, which has identical dimensions to C4, but is in fact a different room, and I've positioned it far above the plains. Keep going west to the exit.


This room looks just like the entrance to the plains, but it isn't.


Pyrohydra! A good place to use a javelin.


From here on it's a linear path, past a cavern full of treasures better ignored than weighing you down, to the demon that guards the cavern where Brynhild slumbers.

And another one gone, another one bites the dust


Ingame she's just "treasure #10." The manual's treasure description is more detailed.
 

Brynhild weighs 150lbs, and it is quite fatiguing to sprint through hellfire, with hellhounds on your tail and a battle armored Valkyrie slung over your shoulder. This is where all those stamina-restoring nectars come in very handy, because you probably don't want to slow down.

On the return trip, the bridge itself attacked, but I killed it with my last javelin.


On the other side, death itself awaited. I simply ran.

Not today!


With my map, I had no trouble finding my way back to the entrance. I simply ran past enemies whenever possible, drank more nectars when I had to, and when enemies appeared in narrow corridors, I killed them with my magic arrows.

Victory! This is the only ingame acknowledgement you get.


GAB rating: Average. Hellfire Warrior improves much of what I found lacking in Temple of Apshai, and is made a more complete CRPG experience by the expanded shops and services, and of course by having a real quest. It's a much better game than Akalabeth of the same year, and better than Ultima in many ways. Exploring the dungeons is as entertaining as it was in the first game, but more purposeful, now that your treasures and gear are both permanent and useful. It's just too bad that the room descriptions didn't have the same amount of effort put into them - half of the dungeons don't even have any, and the setting here just doesn't feel nearly as well developed as the desolate but menacing ruins of the Temple of Apshai.

There's plenty of room for improvement, though. Dunjonquest's tactical depth is barely expanded on at all. Only the magic boots are a real game changer, and while it's great that you can finally get enchanted armor, often your victories in battle are determined by how good your armor is rather than your combat actions. There is no magic system, there's very little to distinguish monsters from each other aside from how bad it would be if they hit you (even Morloc's Tower had spellcasters!), and of course the original TRS-80 version is still almost unbearably slow, made tolerable by MAME's turbo key.

I also really wish that Hellfire Warrior weren't so coy about what magic items do. I still have no clue what the expensive mandrogoras do, and I noticed no difference in combat performance from collecting any of the magic items except for enchanted weapons and armor. They don't even show up on your character sheet, and apart from the magic boots, poisoned darts, and javelins, I'm not even satisfied they do anything at all. The orichalcum keys, for instance, supposedly unlock the doors to hell according to the manual, but they weren't necessary at all for the throwaway character that I used to map out the plains.

I did try to read the game's BASIC code, but it was no use. I extracted it just fine, but found it an undecipherable mess. Clearly, readability was not a priority, and the more immediate concern was getting everything to fit wherever it could in the system's tiny 16KB footprint.

Two more Dunjonquests await me, but I'm not looking forward to them, especially not Upper Reaches of Apshai which re-uses the extremely limiting gameplay of the first game. Before that, though, I will play a two-game spinoff series. In space.

Monday, August 10, 2020

Hellfire Warrior: Mazes, minotaurs, mausoleums, & mummies


The Labyrinth is a bit of a doozy. As the manual warns, the rooms are all long stone corridors, unnumbered to reflect their undistinguished appearance, and the exit is not in the same place as its entrance, which closes behind as you enter. The usual Dunjonquest strategy of making quick dungeon runs and retreating when your health starts to dip is impossible here - when you enter, you either solve the maze, or you die, and randomly discarded food scattered in the halls are your only source of health, aside from what you bring in.

Not that dying is necessarily a bad outcome. With some luck, it's a way to leave the labyrinth, and you may even find and keep some of its treasures, which are valuable enough to upgrade your weapons and armor a bit. I found $1600 worth before locating the exit, enough for a +4 enchantment.

At the very least, there aren't any traps here, and almost no secret doors. Almost. I wandered around for quite some time and mapped out a good chunk of the maze before realizing that the exit was behind the only secret door. It wasn't even that far from the start, though being a maze, one could easily traverse the majority of it before even entering the room where it's found.

In a vignette in the manual's backstory, Hammerhand had met an adventurer named Shalimar, who had been lost in this labyrinth for days, but escaped with a bag of treasures, and a good gash in her side from a minotaur's axe to prove her efforts. Shalimar advised "watch out for minotaurs" when he asked where the exit was. Almost all of the monsters here are minotaur-like creatures: unitaurs, gynotaurs, saytaurs (a pun on satyrs?), criotaurs, elasmotaurs, extra-tough brontotaurs, and yes, regular minotaurs. True to Shalimar's hint, they are found in the room concealing the exit, but can be found in other rooms too.


I had actually entered the minotaur room early on, but completely missed the secret door despite searching for it. The total lack of secret doors discovered elsewhere had misled me to think that this dungeon didn't have any, and the presence of minotaurs in other rooms had me disregard Shalimar's clue. This is a bit of a problem with secret doors in this series; there's just no way to be 100% sure that a room hasn't got any.

With the exit located and my armor upgraded, I had no trouble mapping out the rest of the maze and looting its treasures, which were good enough to buy +5 armor and +4 weapons from Malaclypse, and still have about 2,000 left over after restocking on basics.

But the real treasure was a pair of boots, which doubled my distance traveled without draining more stamina. With this, fatigue instantly became far less of a problem, and kiting monsters in medium-sized rooms was suddenly possible. I also found a crystal ball of no monetary value and unclear effect - the manual said as much that what you ought to do with it is hard to discern. Neither treasure appeared on my character sheet, but the boots' speed was permanent. It makes me wonder what other treasures may have subtle effects on your abilities - the previous level had a mysterious talisman.

My map of The Labyrinth, which includes treasure numbers in lieu of room numbers:


The next level is the Vault of the Dead, a more conventional dungeon, with room numbers and descriptions that suggest this place has been undisturbed for centuries. Secret doors and traps abound too, either or both in nearly every room, and unsurprisingly the enemies here are predominantly undead, though there are also gargoyles and lesser enemies like rats. The biggest threat here is the chilling touch inflicted by ghostly enemies, which permanently reduces your stats. This, I found an intolerable loss, and never saved my character in this event. Even worse, some of these spectral foes are invisible, and while checking for secret doors in a room I thought was empty, I would suddenly see the screen shake and the message "A CHILL" appear, and instantly know my character was ruined.
 
Struck by an invisible ghost
 

For this dungeon, I started getting into the habit of juicing up at the apothecary before each run, to maximize my stats and therefore minimize my chances of ever taking a hit. This included the $100 mandrogora, whose purpose I still remained ignorant of, just on the off-chance that it helped. This would cost in total $300-$400 per run depending on what was available and also on how successful I was at bargaining, but most of the treasures here were valued in the hundreds to the thousands. I could afford this, and then to buy all the elixirs, nectars, and magic arrows I could get my hands on, and still upgrade my weapons and armor every few runs. The most valuable treasure, a huge golden statue, is very close to the entrance, but taking it dumps you into a pit of extremely dangerous vipers. It's worth $4000, itself enough to by a +6 enchantment and have hundreds left over.

With magic armor +6 and plenty of magic arrows to take out ghosts from afar, I simply stopped getting stat-drained altogether, and eventually cleared out all 60 rooms and their treasures. By the end of it, I had a +6 weapon, +7 armor, 30 magic arrows, 33 elixirs, and 32 nectars. This dungeon also had a few treasures of no monetary value, and no obvious effect.
  • An ebony caduceus (along with $1000 worth of diamonds)
  • A serpent amulet
  • A silver apple, consumed upon finding it
  • Two orichalcum keys
  • A pouch of herbs (along with a gold ring)
  • A glowing spider found in a laboratory shelf full of glowing blue flasks
  • Quite a bit of junk


I did notice that my constitution went up a point, which I assume but did not verify was attributed to the apple. It would be really nice if this game was clearer about what stuff does.
 
My map of The Vault of the Dead:
 

Last stop, the plains of hell!

Most popular posts