Monday, May 24, 2021

Games 259-260: Olympic Decathlon and Track & Field

I wasn't originally planning on doing 1980's Olympic Decathlon. I knew it existed, if only because it was one of Microsoft's earliest gaming products, but it didn't occur to me that it had any historical significance or that it had influenced anything. But I've played Konami's Track & Field, a game thematically similar to Activision's Decathlon from a few months earlier, and the similarities run deep. They're not identical by any means, but both are minigame collections controlled mainly by furiously bashing the controls to build speed, and occasionally pressing a single button with pinpoint timing to jump or throw. It seemed like one had to influence the other, but the dates don't work - The Activision Decathlon appears to have been released in August 1983, and Track & Field in October. Could an arcade game, with its bespoke PCBs and cabinet design and manufacturing, really have been produced in two to three months? Plus, how likely is it that The Activision Decathlon was known to anyone in Konami, given the system's relative obscurity in Japan?

Then it occurred to me to try Microsoft's Olympic Decathlon, which had been originally released for the TRS-80 in 1980, ported to Apple II in 1981, and ported to the IBM PC in 1982. So I did, and can conclude almost for certain that it influenced both Activision and Konami in similar ways, and also in different ways.

Game 259: Olympic Decathlon

The IBM and Apple versions' titles are preceded by the Microsoft logo, but the TRS-80 original is not.

I'll be taking a look at the ten events here and comparing their interpretation and execution to the later Activision and Konami games. I will also discuss the Apple II version where it differs or expands, as I believe that this is the version which principally influenced the Konami game. Speaking of which, the Apple II and IBM versions both play Bugler's Dream, as does Activision Decathlon.

TRS-80 intro

Apple II intro

You can practice individual events or compete in the full decathlon, just like in Activision Decathlon.


The 100 meter dash has you tapping the "1" and "2" keys alternately to simulate your left and right footsteps. Activision Decathlon takes a similar approach except that you waggle the joystick left and right instead - something far more strenuous than tapping keys, though to be fair I have no idea how different it feels on an authentic TRS-80 keyboard. Uniquely, Olympic Decathlon has you approach the start manually, which is kind of a clever ingame tutorial, straightforward as this action might seem.

When playing with more than one contestant, two players dash at once, and the second player uses the left and right arrow keys and runs in the second lane. The Atari 2600 version of Activision Decathlon only supported one sprinter at a time, but later ports allowed two, as did Track & Field.

One crucial similarity between Activision Decathlon and Track & Field not seen here is the side-scrolling perspective.


Next, there's the long jump.


Here we can already see some big gameplay differences in this family. Olympic Decathlon gives your sprinting arm a rest - you simply type into the program how fast you'd like to run, knowing that the faster you approach the line, the more challenging it will be to time your jump close to it. Jumping is a two-keystroke action - down plants your feet and starts an animation, enter launches yourself, and the delay between determines your jumping angle.

The Apple II version's pretty similar, just more colorful.
Activision Decathlon shows your arm no mercy as you must continue waggling the joystick to run fast, but the jump is simplified to a single button press with no consideration for angles. Track & Field likewise makes you work to run fast, but otherwise plays more like Olympic Decathlon.

Event 3 is the shot put.


This involves some QWOP-like shenanigans with separate controls for your triceps and shoulder muscles. It's confusing, uncanny, awkward, and kind of awesome. And you don't see anything like it in Activision Decathlon where it's fundamentally the same as the long jump.

The Apple II version requires paddles, and if you don't have them, you're stuck here.

I haven't quite figured out the timing involved, but paddles feel better here than keyboard controls. Also, unlike the original, we get a zoomed-out view of the field once the shot is thrown.


The high jump is similar to the long jump, but with different angle requirements, and also no option to set your own speed. Also that instead of recording your best of three trials, you instead must clear a series of bars with progressively incrementing heights, just like in the real-world event.


The 400m run is just like the 100m dash, but four times as long, and you go all the way around the track. This one made my arm start to hurt, but it's nothing like the brutality of Activision's version.


Now this is interesting. If I'm not mistaken, the 110m hurdles event is the earliest example of sidescrolling I've ever seen, predating Defender by a year!

The controls are kind of interesting too, but not fully explained in the game. You run by alternating presses of 1 and 2, but jump by pressing and holding both at once. Unfortunately, there seems to be a delay that can't be easily predicted. Activision Decathlon and Track & Field both simplify this to a single button press for jumping.


The Apple II version uses the buttons on the paddle controller - and rapidly tapping them alternately on my Atari paddles is no easy task! Jumping seems more responsive, though, and this time the hurdles actually topple when you fail to clear them.


The discus is all about timing. You set your turning speed manually, and then tap a button at the right time to toss - the higher your speed, the further you can potentially throw it, but also the more difficult timing becomes.


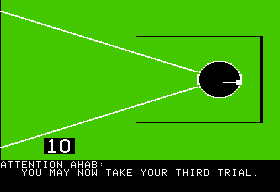
The Apple II version is pretty much the same, except it adds a zoomed-out field view. Which we'll see again in Konami's game.

Activision's interpretation bears little similarity here - you just run up to the fault line and press the button before crossing it, just like the other field events. But Track & Field lifts this almost wholesale for its hammer throw event.


Look at all those controls! Is this a vaulting pole or a Cessna?

The pole vault is probably the most complicated event in the game. First you have to manually set your grip height and your runup length. I don't really know why you'd want your runup to be anything less than the maximum length, but a shorter grip height makes building up momentum easier.

You run up to the box by alternating left and right arrow keys. Then you press down to plant the pole into the box, but you've got to do it a bit early. Just as importantly, do not stop tapping left and right until the pole is lowered all the way into the box! Once it's planted, up begins the handstand, and Clear (mapped to Home by default in MAME) releases.

Activision's version is quite a bit simpler - you just have to run, mount, and dismount.

To throw the Javelin, you run toward the fault line with left and right, press up to begin your throw, and press enter to throw. Timing determines the angle, and if timed well, it will be launched at the optimal angle close to the fault line, but the angle is far more important (as long as you don't go over the line).


The Apple II version of this event, like the discus event, adds a zoomed-out field view.

Activision once again simplifies this - you just have to hit the button close to the fault line like in all of the other field events. Konami's version is closer in execution.


The final event is the 1500m run and it's weird. They could have busted your keyboard with a marathon of tapping 1+2, but instead you use the WASZ keys to just move around the track, and try to stay on it. It's bizarre and doesn't feel anything like an endurance race, but given the pain of Activision's version I'm kind of glad. The straightaways involve no skill - you just hold the right directional button, and the curves are about transitioning to diagonals with the right timing.

What's kind of interesting to me here is that you have to hold the keyboard buttons to move in that direction. That might not sound special, but the Apple II and early IBM PC models didn't support this, because apart from modifying keys like shift and rept, their keyboards only recognize when you press a key, not when you hold it continuously. So clearly the TRS-80 keyboards were a bit more forward thinking in their design, in some aspects. The Apple II version makes you tap WASZ to "steer" rather than move in an absolute direction.

Even more interestingly, this event allows two players to race at once, and assigns the second player the PL;. keys. If both players wanted to move northwest at the same time, player one would need to old W and A, while player two would have to hold P and L. This does not work on my modern, USB keyboard! And it probably doesn't work on yours either. For technical reasons I won't get into, most USB keyboards choke on certain combinations of simultaneously pressed keys. So it appears that the TRS-80 supported n-key rollover, which is expensive to implement. Or maybe this event is broken on a real machine too.


My best decathlon scored over 7,000 points, far better than my Atari attempt.


GAB rating: Average. This isn't really my kind of game, but I like it better than The Activision Decathlon. All of the events feel and play distinct from one another, and don't leave me feeling like I'm giving myself arthritis.

With this predecessor scrutinized, how does Konami's Track & Field compare?

Game 260: Track & Field


I actually saw a Track & Field machine in public recently, and it was a sad sight to behold, with cracked, barely working buttons, and a scuffed, faded control panel overlay. To play it for DDG, I used my arcade control panel with concave Happ microswitch pushbuttons.

With the assumption that both Activision Decathlon and Track & Field are adaptations of Olympic Decathlon, there are still a couple of similarities in how both games reinterpret the events for their respective platforms.

  • Both games use a side-scrolling perspective extensively.
  • Both games emphasize button-mashing to simulate running for most of the events.
 

But there are more general differences than similarities.

  • Track & Field obviously has a much more advanced presentation, with parallax scrolling, realistically-proportion multicolor sprites, and speech synthesis that produces intelligible barks (e.g. "the distance is seventeen point six one meters").
  • Activision Decathlon simulates running by waggling a joystick back and forth. Track & Field has two "run" buttons and a third "jump" button, but doesn't seem to care if the "run" buttons are alternated. In fact, I got better performance when I mashed just one of them.
  • The Activision Decathlon adapts all ten events. Track & Field has only six, including a hammer throw instead of a discus.
  • Track & Field has a much more punishing difficulty, where each event has a qualifying score, and failing to reach it will end your game. There is also no option to practice specific events.
  • The Activision Decathlon has Olympic decathlon-style scoring. Track & Field uses an invented aggregate score system, but also records the top three scores for each individual event.
  • The Activision Decathlon uses Bugler's Dream as its theme. Track & Field uses Chariots of Fire.
 

The 100m dash is as basic as it gets - just bash "run" like mad. As I mentioned, there are two run buttons, but I performed better when I hit only one of them.

This version always has two runners, and if you are playing solo, an AI opponent will race in the second lane. It doesn't matter who wins, though. You don't need to beat him, you just need to beat the qualifying time.


The long jump has you bash "run" to get to the fault line and jump as close to it as possible, much like The Activision Decathlon. But unlike that game, you also have to optimize your angle, as in Olympic Decathlon, which is done here by holding the jump button and releasing when the onscreen angle indicator is as close to 45° as possible, which, defying physics, affects your trajectory mid-jump.


The javelin event is basically the same thing as the long jump. It's a bit closer to the Olympic Decathlon event as in that one you still have to do the work of running up to the line, though here you want to begin your throw as close to the line as possible, and in the original you need to give yourself a fair bit of clearance first. Olympic Decathlon is more realistic feeling and more strategic as a result.


110m hurdles is simplified and winds up being just like Activision Decathlon. Run and tap jump at the right times to clear the hurdles.


Hammer Throw is almost exactly the same as Olympic Decathlon's discus event, down to the overhead perspective and zoomed-out view. The main difference is you don't set your speed - you just press the throw button to start spinning, and your speed automatically ramps up exponentially. No button mashing is required, for once.

I couldn't beat this one, but it had more to do with the difficulty in reaching this stage than in beating it. I only reached it once, and eventually got fed up with trying to get to it again. Control panels are expensive, and so is RSI surgery.

GAB rating: Below Average. It's better than The Activision Decathlon, but not as good as Olympic Decathlon despite the improved presentation. The games in the TRS-80 original just have more variety, more depth and authenticity, and actually let you see all of the events without needing to meet some pretty stringent qualifiers.

Friday, May 21, 2021

Games 257-258: Anteater & Oil's Well

It's been awhile now since a Sierra game was the focus of a post. I covered games from their "Hi-Res Adventure" series in my 1980 and 1981 phases, but skipped the company's 1982 output almost entirely, save for Ultima II which isn't often thought of as part of the Sierra canon. It's not as though Sierra had been idle; apart from Roberta Williams' beastly adventure Time Zone, they also produced some odd half-dozen arcade-style games for Apple II, VIC-20, and Atari computers. Though they'd become mainly known for adventures in the years to come, and indeed, their original releases had been Colossal Cave-inspired adventures from the start, an awfully large portion of their early products were these obscure, now forgotten arcade-like computer games.

By 1983, a few of them, though not exactly iconic, are famous enough to qualify for whale status, and a playthrough for Data Driven Gamer. The first qualifier, a maze runner called Oil's Well, is clearly based on Tago Electronics' Anteater, which I will play first as an ancestor.


Game 257: Anteater


I get a weird European-like vibe from this game, although developer Tago Electronics appears to have been based out of Grand Prarie, Texas. There's not a lot of info about them on the Internet, and MAME only lists two releases. Anteater feels technically outdated, even by 1982's standards, being based on Galaxian hardware. The titular vermilinguan you play as is this huge, lumpy, awkwardly animated background object taking up a signficant portion of the screen rather than being a conventional sprite, but you don't control it directly - rather, you guide its infinitely-extendable tongue through a maze-like ant colony, scooping up ants, worms, and dots as you try to avoid getting bitten on the dorsal surface.


Your main goal, as you wind your tongue through the maze, is to eat all the dots, Pac-Man style. Ants are your main threat - you can eat them by moving the tip of your tongue onto them, but will kill you if they touch any other part of it. You'll be constantly retracting your tongue to avoid this, and the deeper you go, the trickier it gets to manage. Worms are generally less dangerous, as they will pass by your tongue harmlessly, unless your tip touches their head. You can eat them by grabbing from behind, and sometimes eat them by carefully timing a grab around a corner, or just let them pass. Eating lots of worms is crucial to scoring lots of points. Their biggest threat to you is in area denial, as sometimes they can make retracting your tongue dangerous.

Retract and the worm kills me. Don't retract and an ant kills me.

Lastly, if you don't finish the level before the sun sets - and it's virtually impossible to do this - a spider emerges, which, like the worm, only kills you by touching the tip of your tongue. Unlike the worm, there's no way to eat it, and it tends to follow the path of your tongue, making it so that if you retract, you die.

There's one defense, though - the ant queens live at the bottom of the colony, and eating one kills all of the ants, worms, and spiders on the screen. Since this is the only defense against spiders, I found it best to save the lower rows for last, where you can quickly munch on a queen when needed and use the few seconds of safety that this buys you to finish off the dots.

GAB rating: Average. Anteater's yet another game one may summarize as Pac-Man with a twist, with a slower, more methodical pace. Sometimes - see Lock 'n Chase for an example - it works out, and you get a smart, strategic puzzle challenge. But Anteater doesn't do enough - the gameplay is basic, the maze layouts are boring, and it just feels unexciting rather than thoughtful.


Game 258: Oil's Well


There's oil on your land. Great, you're rich! But the oil barons know, and they've sent armies of goblins to sabotage your drilling operation. Using a retractable drill claw, you've got to drink your milkshake before they do.

So, this is just Anteater with an oil drilling theme, right? Well, sort of. The controls are heavily tweaked - manually reversing, for instance, is impossible; you can turn or extend with the joystick, but the only way to retract is by holding the joystick button, and you retract FAST. The various "oozies" assaulting your pipelines are faster and more aggressive to compensate for this, making the gameplay quicker and more difficult than its leisurely inspiration. Often you've got to take chances - can you grab that last, tricky to reach bit of oil and still have time to retract the claw before an incoming monster smashes your pipeline? You retract very quickly, but not instantly!

Oil's Well also adds a power pill which grants you a few seconds where everything but you slows down. Unlike in Anteater, where the late-appearing spider encouraged me to save the bottom rows by the screen-clearing queen ants for last, I would try to get the power pill as soon as I could, to clear out the trickiest rows without pressure.


Oil's Well has a total of eight levels, and the further you get, the more visually interesting and maze-like they are. Figuring out efficient paths on the later levels becomes imperative.

I beat all of the levels fairly on the middle difficulty, "unleaded," which was already pretty challenging. But set the difficulty to the highest one, "premium," and you can hear Big Oil chuckle.


This should have been called "Jet A-1." The oozies here come at you fast and relentlessly, and you've got to learn how to twist and turn your pipes pretty efficiently (and, sometimes, how to retract at the last nanosecond), because chances to reach into the longest, deepest tunnels without being forced to withdraw are few and far between. Aggressively pursuing the bonus goblets is crucial too - every 10,000 points gets you an extra life, and you'll need them.

I had to use a single save state to beat all of premium mode's levels, and it isn't concealed in the video.

GAB rating: Good. Oil's Well is a big improvement on Anteater, and the fix was almost shockingly simple - just make it faster and make the level layouts more interesting! Despite some randomness - your windows of opportunity depend on having long enough breaks between oozie waves - there's a good overall difficulty balance, which tests your dexterity, timing, strategy, and greed, and without being excessively unfair about it, and the pipeline-based gameplay gimmick makes it stand out in an ocean of Pac-Man clones. I had fun playing it without the bias of nostalgia, and give Oil's Well my recommendation.

Tuesday, May 18, 2021

M.U.L.E.: Tournament mode

I did it! I caught the mountain wampus. I don't understand how - all I did was touch his pixel with my sprite, which I'm sure I did plenty of times before, but it finally registered for once, and now I can say for sure that this is possible.


M.U.L.E. features three modes of incrementally challenging play - Beginner, Standard, and Tournament. All are based around harvesting and trading commodities - Smithore to build the robotic MULEs that your space colony depends on, solar energy to keep them fueled, and food to keep you fueled, and all can become brutal mind games of market speculation and exploitation. During the last post, I played a Standard round with "B," "D," and a robot taking the fourth player's control (and winning), but only Tournament mode has the full features and complexities that M.U.L.E. has to offer.

Tournament mode adds a fourth commodity, crystite, which replaces Smithore as the most reliably profitable export. Crystite has no practical use whatsoever, but its average selling price is $100/unit, compared to Smithore's $50. Furthermore, being an intergalactic commodity, its price fluctuates wildly turn-by-turn and is not affected by local surpluses and shortages, and can reach rates up to $150/unit. Smithore's price rarely gets much higher than $50 without deliberate artificial shortages, as selling every turn ensures a steady supply and keeps the price under control. Food and energy can certainly go for rates far higher than $150/unit by pressing desperate players, but players will only buy as much as they need, while the space market will happily buy all the crystite you've got. Hoarding until you can sell it high can make you quite rich, but carries risk, as pirates love to come down and steal it all.


Producing crystite is also a different beast from everything else. Smithore is best mined in the mountains, but can also be found in plains. Food is best produced in the river, and energy in the plains, but crystite deposits are invisible. To locate them, you've got to bring soil samples to the assay office - an action that short turn durations leave little time for once you've installed a MULE or two - which will tell you if the land has any, and if so, how concentrated they are. But this will also inform other players if they're paying attention, and if you sample land that nobody owns with the hopes of claiming it, another player might just be able to claim it first. Once you own land that you know (or hope) has crystite, simply equip a MULE with crystite mining gear and bring it to the plot to start harvesting.

I played a round with "B" on Tournament mode. "D" sat this one out.


For this game, I picked a blue spheroid, "B" picked a green gollumer, and the AI opponents were purple and red.

No fair, the mechtrons get extra starting cash!
 

Turn 1:

  • I bought an extra plot of land, bidding $628.
  • Purple and red both built farms in the river and assayed some land.
  • Green went for smithore, and discovered a high-yielding crystite deposit near his property.
  • I went for food and energy.
 

Before the auction phase, pirates came and stole all the crystite. Of which, of course, there was none.

  • Green sold his smithore for $50/unit.
  • Green had a food shortage but bought the difference cheaply from Red.
  • As the sole energy producer, I could sell at the store price of $45/unit. When I ran out, the other players who all had shortages bought from the store.
 

Turn 2: 

  • I tried to grab the high-yield crystite deposit that Green revealed, but Red got it first, so I got the adjacent plains instead, which would be medium-yield. It seems like you can never beat the AI at the land grab. "D" was right - the computer rigs the game in its own favor.
  • Green and Purple both bought extra land plots as they came up for auction. I lacked the cash funds to participate.
  • Purple put Smithore and energy MULES to work in its new land plots.
  • Red went for energy, putting a new energy MULE to work in the plains and converting the food MULE to energy as well.
  • I mined crystite on my new plot and failed at assaying my plains plot.
  • Green farmed the river and made hash out of an attempt to assay the mountainous plot.
  • An earthquake cut mining production in half. Purple and Green sold their meager Smithore yields. My crystite plot produced nothing.
  • Red alone had a food shortage, having given up the farm, but bought the difference from me and Green after some petty haggling.
  • Green likewise had an energy shortage, but bought the difference from Red who had an abundance. I cleaned Red out while the price was cheap.
 

Turn 3: 


  • I grabbed an adjacent plot for further crystite mining, as this creates a production bonus. But lacking adequate funds, I couldn't begin mining just yet, so instead I just assayed to confirm presence of crystite.
  • Red bought an extra plot of land, converted the river back to food, and mined smithore in the mountains.
  • Green mined more Smithore.
  • Purple mined smithore in the mountains and converted its solar farm into another smithore mine, leaving the river farm as the only non-ore producer, and discovered a high-yield crystite deposit in its southern plains plot.
 

This turn, a fire in town destroyed the whole store's stock! 

  • Smithore sold for a slightly inflated $57/unit, mainly benefiting Purple.
  • Crystite went for $76/unit. I held.
  • Purple and Green both had small food shortages. Red and I waited for them to raise their bids, but I sold once they hit $50/unit. Too soon in retrospect.
  • Purple and Green completely lacked energy, and I alone had a surplus, having bought Red out last turn. They bid up to $69/unit, and I sold my entire surplus to Purple, leaving Green in the dark.
  • This pushed Red up to first place, though only by a little, as his energy reserves became worth much more.
 

Turn 4: 

  • Red and I both bought extra land plots, but this cleaned me out of most of my cash.
  • Red equipped two of his new plains with solar farms and discovered another high-yield crystite deposit in the southeast of the map.
  • I found crystite in my new plot near the river. But lacking the cash to do much about it, I spent the rest of my turn trying to catch the wampus and failing.
  • Purple put an energy field in its unused plains, and converted its ore mine, where the high-yielding crystite deposit was found, to crystite mining.
  • Green installed an energy field and successfully assayed one of his mountain plots, finding no crystite there.


Pirates came again this turn, stealing all the crystite. Oh no.

  • Smithore still sold for $57/unit, but Green couldn't produce any without energy.
  • Red and Green had food shortages, nobody had a surplus, and the store was still empty. Green decided to sell his sole food unit to Red for $79, which frankly was much too little.
  • Purple and Green had energy shortages, and Red had a big surplus, selling to them at $56/unit, and the rest to the store at $39.
 

Turn 5: 

  • Purple and Red bought extra plots cheaply and virtually unopposed. Green and I were too cash-strapped to participate in the auctions.
  • Red converted two of its energy plots to crystite mines.
  • Purple swapped the smithore and energy MULEs in the northeast of the map and I don't know why.
  • I put an energy MULE on my new plot to get the adjacency bonus. This was about all I could do on my budget.
  • Green's starvation meant he had barely enough time in his turn to duck into the pub and win a few bucks. MULE purchasing and installment was out of the question.
 

Acid rain this turn boosted food production but hurt energy production. Counter-intuitively, this was to my benefit as an energy producer.

  • Purple and Red, and Green sold Smithore for $50/unit.
  • Crystite went for $104/unit which I sold for some much-needed cash, but Red was the bigger producer of it still.
  • Everyone produced enough food.
  • I alone produced an energy surplus, but just barely. The store quickly sold out at $76/unit, and I waited for the other players' bids to skyrocket before selling at $130/unit.
  • Red was still in first place.


Turn 6:

  • Computer land-grab advantages struck once again as purple took the plot I wanted.
  • Red built two crystite mines and an energy field in its empty plains plots.
  • I finally built my second crystite mine adjacent to my first. I also built a third energy field, at which point they all produce more efficiently.
  • Purple built two more crystite mines.
  • Green built two new smithore mines. "I don't need your newfangled crystite," he snorted. "Y'all need my smithore."


One of Red's crystite mining MULEs malfunctioned and ran away. But he still had three left.

  • Smithore sold for $57/unit, and only Green was producing much of it.
  • Purple produced 13 crystite units, far outpacing my five. This was starting to feel really skewed - having three plots shouldn't produce that big an advantage over two. It sold for $64/unit, and I held.
  • Red had a food shortage, Green and I had a surplus. Green sat out this auction, but I allowed Red to buy out the store and then increase its bid to $142/unit before selling.
  • Everyone but me had an energy shortage, I had a surplus, and the store was out. I got some sweet $178/unit trades out of that leverage, and although I didn't sell out, it made my remaining energy stocks worth that much, boosting me into first place.
 
An ideal seller's market.

Halftime standings. Green's Smithore operation isn't doing too hot.

Turn 7:

  • Purple once again took the land I wanted, which to be fair I would have lost anyway since I was in first place. But I bought two more plots with the cash I squeezed out of my energy-strapped rivals in the last turn. Unfortunately, my land plot was getting pretty scattered, which isn't ideal for efficient production.
  • A random event penalized me for $150, and I only had enough cash left to build a second farm adjacent to my river farm. Assaying revealed crystite on my southern mountain plot.
  • Purple built a new crystite mine and a new energy field.
  • Red built a new crystite mine.
  • Green built an energy field and smithore mine.

Sunspot activity increased everyone's energy output this turn.
  • Green produced 14 smithore units and sold some for $50, but held onto the rest.
  • Purple and Red both outproduced me on crystite. Purple's was bafflingly high considering the energy shortage from last turn. At $96/unit, I held.
  • Purple produced no food at all, and the rest of us had a surplus, me most of all. I fleeced it at $120/unit.
  • Everyone had an energy surplus. I had 18 to spare, and sold it to the store for $78/unit.
 

 Turn 8:

  • I put a new crystite mine on my southern mountains plot, and confirmed through assaying that the adjacent plains had some more.
  • Red built two more crystite mines, converting one of its energy fields.
  • Purple also build two more crystite mines, converting one of its smithore mines.
  • Green missed his land claim. Out of any room to expand, he bought several MULEs and set them free, hoping to drive up the cost of smithore.


Pests ate my main crop plot.

  • Smithore's price did not increase despite Green's waste, and he continued to hold most of his stock.
  • Purple and Red produced 26 and 22 crystite to my 12. Even with their larger plots, this didn't seem fair. Red, for instance, was producing six crystite on a single low-yield deposit. The production bonuses from adjacency and learning curve can't account for that! At $84/unit, I held.
  • Nobody had a food shortage. Even with the turn's end blight, I had just enough to sustain myself. Purple sold its surplus at $93/unit.
  • I had an energy surplus, Purple and Red had shortages, but the store had plenty, selling for $67/unit. I held and let them buy from the store.
  • I was still in the lead, with $12,076, but Purple and Red were catching up. Green was behind by thousands, worth $7,680 compared to Red's $10,229.


Turn 9:

  • Purple and Red grabbed the last two land plots. As ties always favor the computer, Green didn't get a fair chance at grabbing them despite being in last place.
  • I was robbed of one of my plots of land in a random event. One that I was counting on using for crystite mining to get an adjacency bonus too.
  • I built a third farm in the northwest corner and assayed my other two lots, finding low crystite deposits in both.
  • Purple converted its smithore mine to crystite.
  • Red built an energy field and a crystite mine.


Pests ate my crops again.

  • Smithore dropped in price to $43. Green unloaded his stock of 45.
  • Purple produced triple the crystite that I did, 36 to my 12, and Red produced 33. At $140/unit, we all unloaded our stocks.
  • Purple and Red had slight food shortages, but I wasn't able to exploit this. This late in the game they accepted it rather than pay my premium prices.
  • Purple and Red also had moderate energy shortages, which I sold to them at the store's price of $60/unit.
  • I lost my lead to Purple, who now had an astounding $18,866.

Turn 10:

  • Red claim-jumped the land I lost last turn, because of course it did.
  • Purple got two more crystite mines, converting one energy field. Its food shortage didn't seem to stop it from doing this much.
  • I built two more crystite mines on the properties that I assayed on the last turn.
  • Red also got two more crystite mines in spite of a food shortage.
  • Green wasted a few more MULEs.
 

Acid rain fell once again.

  • Smithore stayed at $43/unit. Seems that despite Green wasting MULEs, the store didn't anticipate much demand for them this late when every plot was taken and most of them worked. Nevertheless, Green held.
  • Purple produced 46 crystite units, Red 36, and I 11. At $136/unit, we all sold.
  • I had a pretty big food surplus, and Purple a small shortage, but it did not buy.
  • Everyone but me had a sizeable energy shortage, and I had only a small surplus. Purple, Red, and Green bought the store out at $80/unit, and I foolishly sold at the same rate.
  • I slid down to third place and it was clear that the rankings weren't going to change. Purple led with $24k, Red followed with $20k, I with $17k, and Green trailed with $9k.
 

Turn 11:

  • Purple converted its river farmland to energy and its energy field to crystite.
  • Red put an energy field in the southeast corner and converted its last smithore mine to crystite.
  • I converted one plains farm to a crystite mine and went wampus hunting, but failed.

Then something cool happened. Too little and too late to make a difference, but cool nonetheless.


A meteorite landed right in my farmland, destroying the MULE there but leaving a big crystite deposit.

  • Smithore prices plummeted down to a pathetic $29/unit. Green begrudgingly sold, but curiously, Purple and Red bought.
  • I produced 20 crystite, still hardly enough to match what Purple and Red were outputting. Prices were at $72/unit, and I held, while Purple and Red made a half-hearted attempt to buy.
  • Purple and Red bought my food surplus at the store's price of $52/unit.
  • Purple had an energy shortage, but everyone else had a surplus. Purple bought Red's out at $78/unit, but needed more, and kept upbidding until it bought a few more from Green and me at prices in the $130's.
 

Turn 12:

  • Purple converted its energy field back to farmland, and its northwest crystite mine back to energy. I can't imagine why this seemed like a good idea.
  • Red earned $600 in a community chest event, and then converted one of its energy fields into crystite, and its river farm into an energy field.
  • I installed a crystite MULE onto the fresh deposit and then went wampus hunting. And won.
  • Green converted one energy field to smithore, being stubborn to the very end.
 

The ship returned, and the final harvest of the game was reaped.

  • Smithore went back up to $43/unit. Red and Purple therefore had benefited from buying low.
  • I produced 32 crystite, but Purple and Red produced 51 and 47 respectively. 
  • None of us sold any crystite, food, or energy, as is customary at the end of the game.


The final score:

Overall, the colony succeeded... extremely well. You can now retire in elegant estates!

Trendlines:


I saw no need to break this down by revenue type. My lead from turns 6-8 came from high food and energy prices, but the late game gravy train was all crystite.

The mechtrons beat us soundly, but is this outcome so bad? Maybe I could have become first founder had I been even more ruthless, allowing the mechtrons' underpowered mining operations to fail rather than selling them any energy, even at highway robbery prices. But despite "losing" we all got lavish retirements - even poor old smithore codger Green. A victory by sabotaging the mechtrons would have lowered the colony's score, and given us all more meager livelihoods. It's a centuries-old critique of meritocratic capitalism - pursuit of personal gain can encourage wasteful behavior.

But there's an important question I sought answers to. How badly does the computer cheat? We've already established that they always win land grabs, which is a pretty unfair advantage already. They move with greater efficiency than seems possible, especially with food shortages. They seem suspiciously adept at assaying, as they identified the last of the crystite deposits by turn 4. They even get extra starting cash. And I had a sneaking suspicion that they get unfairly high mining yields.

To test that last suspicion, I took a screenshot of the turn 11 yields, added a "crystite heat map" indicating where the deposits were located, and annotations to show projected crystite yields.

With heatmap

Without heatmap

"D" was right. The computer cheats like a mafia accountant. Most blatant of all is that both red and purple are mining crystite in areas where there isn't any. And while this is possible in the game rules - the adjacency and learning curve bonuses still apply even in plots without any naturally occurring resources, it shouldn't be this high for anyone. For instance, Purple's yield in the top row, third column, gets six crystite units in a barren plot - the learning curve rule should only grant a +3 bonus to a base yield of zero, and the adjacency rule shouldn't apply at all here.

For other crystite yields - I've drawn boxes to show how much should be mined - the computer players overperform more often than they underperform, while for me it's the opposite. Consider too that Purple has an energy shortage, and still produces 47 crystite in ten plots of land, and a "house edge" is challenging to deny.


In spite of all that,

GAB rating: Good

It's been slightly longer than a year since the last time I awarded a harpoon, but M.U.L.E. deserves it. Economics made fast, fun, and accessible on a 48KB machine, with only the most rudimentary of BASIC predecessors to draw influence from - who would have thought it possible? Equally impressive is how it teaches market economics lessons - nothing as in-depth as Cartels & Cutthroats but nonetheless ones that apply to the real world - in an organic manner through gameplay experience. Supply and demand, speculation, economies of scale, diminishing returns, market failures, interplay between cooperation and competition, and all without a single lecture or explanation. You learn through experience. Its simple-looking exterior hides an incredible amount of depth and breadth of strategy. Forget Monopoly, or even Settlers of Catan - nearly 40 years later, M.U.L.E. kicks.

It's entirely possible that I may revisit M.U.L.E., should I get a chance to play it again the future, and that the game proves interesting to write about. For now, though, I am moving on.

Most popular posts