Monday, December 27, 2021

Game 302: O'Riley's Mine

From 1982 to 1985, past which point we needn't be concerned with the company, Datasoft's most supported platform was the Atari line of computers. It wasn't a definite favorite as it had been with competitors such as Synapse Software or LucasFilm, as Datasoft, being more of a publisher than a development house, still had wide support for the Apple II and Commodore 64, but for these emergent years, Atari was their biggest platform in terms of numbers of releases per year.

The Sands of Egypt, developed for the TRS-80 CoCo, was quickly ported to the Atari, but I felt that a Datasoft retrospective should have an early game made for the system. 1983's O'Riley's Mine appears to be the earliest.

You play Miner O'Riley, and must clear an unending series of stages by digging tunnels to collect all of the treasures, including coal, oil, gold, uranium, rubies, and diamonds. Your main threat is the onrushing water which floods the lowest tunnels first but will rise if all of the tunnels below its level are already submerged, and you must be careful to dig your tunnels in a manner so that the main shaft doesn't flood too soon and make escape impossible. Of secondary threat are the mineshaft's monsters, who wander the tunnels thoughtlessly and can be misled or blown up with a well-timed stick of dynamite, though their speed greatly increases at night and can catch you off-guard if you aren't paying attention to the sky.

The below footage is played with red hues artificially saturated to 400% of their natural values. This was necessary because my colorblindness makes it nearly impossible to discern rubies buried in the lowest level of dirt at default NTSC color settings.


The influence from Dig Dug is undeniable, but O'Riley's Mine is a pretty different, puzzlier sort of game, as your main job is to figure out how to dig tunnels to reach the treasures without letting the water level get too high too soon. The monsters are, for the most part, a minor nuisance. The important thing is to stay away from the highest layer of dirt, and if you must dig there to snag a treasure, always go back down to a lower layer before continuing the dig (unless you're about to finish the level). The water won't flood the upper levels as long as there's a deeper one to seep into.

Here, the water will not rise farther up into the main shaft.

Now it will, sealing off your only escape.


Calamity averted, for now.

The gameplay, unfortunately, doesn't really evolve. The monsters get faster, more likely to trip you up, the dynamite gets scarcer, and the treasures more numerous, forcing you to dig longer, more winding tunnels to scoop them all up, but the basic strategy of sweeping the level side-to-side to prevent the main shaft from flooding before you need to take it up to the surface that works on the first level works just as well on the 20th. It took me an hour to feel like I mastered it, and my first and only recorded session after that took me past level 20, where most of my deaths happened due to boredom-induced carelessness.

GAB rating: Average. O'Riley's Mine would have been an okay arcade game, albeit one that would need much quicker difficulty escalation in order to keep the quarters rolling in, not to mention better graphics to draw players to begin with, but its value as a home game leaves a lot to be desired. Its depth and challenge just isn't what it ought to be. Oil's Well offers a comparable experience despite the absence of a digging mechanic, and provides a much more satisfying challenge. Or there's Dig Dug itself, which Datasoft even published after converting to diskette format.

Thursday, December 23, 2021

Game 301: Early Datasoft & The Sands of Egypt

Our next whale of 1984 is Bruce Lee, by Datasoft, but as this is the first (and only) of the company, I have selected a few ancestors to play as a short retrospective. I am largely unfamiliar with Datasoft, having only heard the name a few times mostly in connection to Atari computer games, 
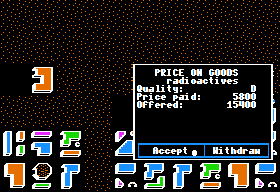
such as the Alternate Reality series and of course Bruce Lee, and as a publisher/localizer of Japanese arcade games and European computer games.

The earliest games of Datasoft are TRS-80 programs listed in a full-page ad in the March 1981 issue of 80 Microcomputer magazine:


Although Arcade 80 and Football Classics appear to be lost, The Resurrection of Iago has been dumped.


It's just Othello. Nothing unique about it. Iago plays a pretty strong game, which isn't an especially hard to program a computer to do. There are six selectable levels of difficulty, but on levels 5 and 6, the game either freezes a few moves in, or takes so long to calculate its move that I can't tell it hasn't frozen. Even on level 4, the AI can take between two and five minutes per turn except for the very first and very last ones.

I lost on level 4, but it wasn't a total curb stomp. I even managed to capture two of the corner pieces.


Later in the year, Datasoft partnered with Tandy and became one of the first third-party developers to support the new TRS-80 Color Computer, affectionately known as the CoCo. Despite the name, these computers are not color-capable versions of the TRS-80, and have virtually no hardware similarities, lacking even the Zilog Z80 CPU from which it got its namesake. Retailing for $400 in 1980, the machine cost only a bit less than the much more capable Atari 400, while also costing more than the VIC-20 machines it was intended to compete with. These machines failed to gain the sort of traction that the black & white TRS-80's had, and did not produce a single game that interests me in particular.

Nevertheless, the CoCo is an important part of Datasoft's early history, if just a stepping on the way to becoming an Atari shop. From 1981 to 1984, Datasoft released six original games on the platform (the originality of all but two is debatable) and three licensed arcade ports, most of them published by Tandy. The first of them is called Popcorn.


It's a technically fine conversion of Atari's Avalanche and controls as well as any paddle-based game I've seen yet. Avalanche is still a mediocre game, and Popcorn is more mediocre still.

For one, popcorn lacks any kind of difficulty progression; the speed you set at the start is the speed you get until you run out of lives, not even incrementing if you clear a screen. Missing a rock means the loss of a paddle, just like in Kaboom!, but in Kaboom! this handicap was offset by a decrease in difficulty, and you could earn paddles back. Neither happens here, and missing even means the stage resets to its initial state, so you're just trapped in a feedback loop where if you can't beat a stage in one try, it only gets harder for your next one. And if you can beat a stage in one try, then it doesn't get any harder the next loop and you can probably do it again, indefinitely.


Neither Iago nor Popcorn is interesting enough for me to rate or number.

In 1982, Datasoft released four games for the TRS-80 Coco; Card Games, a collection of, well, card games, Clowns & Balloons, a copy of Exidy's Circus, The Sands of Egypt, an adventure game, and Shooting Arcade, a clone of Sega's Carnival. One of these interests me more than the rest, and no points for guessing which one.


Game 301: The Sands of Egypt


Read the manual here:

My first thought while reading the manual was that Michael Berlyn must have played this. Not only is the premise nearly identical to Infidel - you play a Sir Percy, searching for a lost pyramid in the Egyptian desert after being ransacked, abandoned, and stranded in the desert by your own disgruntled archaeological team - but the backstory is even written as a letter from Sir Percy on a sheet with a hotel letterhead (nonsensically called "Hotel de Mecca"), just as we'd see in Infidel's folio packaging. It's played for laughs here, with Percy's excessive English poshness and not-so-secret judgmental attitude irritating the crap out of his colleagues.


Ok, so the writing isn't exactly on Infidel's level, but if I'm not mistaken, this is the earliest adventure game I've played with animated 
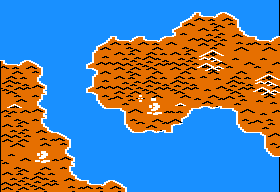
graphics. There's even some parallax scrolling when you move.

Huh, Moon Patrol wasn't the first!

If it isn't clear yet, this is a MOTLP, without much in the way of landmarks or changing scenery to help make a map, and you have no inventory items to breadcrumb with. It's potentially hell, but thankfully I found a shovel after a little bit of wandering. A snake was very nearby and I figured I could probably kill it with the shovel, but decided to map out the initial area first. A fairly low branch complexity factor makes mapping it more doable than most. Even though almost every screen has four exits, most just loop back on themselves, which you'll recognize if you dropped the shovel, and only one takes you "back" more than a room or two.

In the middle of the maze, there's a small cliffside area where I found a rope that disintegrates when touched but tells you it's made from palm fronds, which I'm sure is a clue. More desert is on the other side, and at the end of it, a pool area, which wouldn't even let me drink from it.

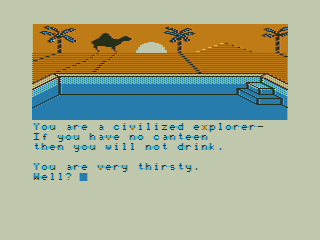
It's a joke and it works better if you've read the manual

"GO CAMEL" advised me to try "MOUNT," but that didn't work. "GO POOL" worked, and showed a cover in the water, but I couldn't figure out what to do with it.


Not only could I not figure out any way to lift the pool's drain or do anything that resulted in useful feedback, I couldn't figure out how to leave this screen either! And I died of thirst, waist-deep in a pool of water.


Restarting, I got the idea to try digging in every screen, which located a torch and magnifier scattered around. The shovel did kill the snake, leaving behind a puddle of snake oil, and opening the way to more desert, where I found a canteen. The procedure to drink was a bit confusing - I had to bring it to the pool, fill it, and then after DRINK didn't work, I eventually realized that filling it caused me to drop it without any indication that I had done so. Picking it up again, I could drink the water for a respite from my thirst. I brought it back to the snake oil, where I took one more drink, emptied the canteen, and got the oil.

Stuck, I turned to a walkthrough. What you have to do next is type "GO TREE" from the pool area. This is a situation where the interface is lying to you, as it lists "pool" as a goable location, but "pyramid" is also listed but unresponsive to commands, and "tree" isn't listed at all. You have to rely on the graphics to divine that possibility, and I didn't.


Dropping everything allowed me to climb, where I saw fronds that I couldn't figure out how to interact with, and dates that I could take. Feeding them to the camel let me mount it, and ride to the pyramid.


Examining the carving here showed the pharaoh engraving to be holding an actual scepter, which I could grease with the snake oil and pull out! The pyramid could be climbed too, and an axe was sitting at the top. At this point, I was hitting the inventory limit, and I'd have to start leaving excess items at a centralized location. I picked the pool for this, where I swapped the snake oil for more water. The axe cut the palm fronds, which I could braid into a rope.

I thought I could lift the pool cover with my hooked scepter, but once again, none of the commands I could think of trying worked. Nor could I find a way to convey my wish to lift the pool cover with my rope instead. "TIE ROPE" was accepted but demanded a followup, and "TO HANDLE" didn't work, nor "SCEPTER" or "COVER" or "HOOK" or any permutation I could guess.

The answer, shown in walkthrough is to type "HOOK SCEPTER," followed by "TO HANDLE." Right then. Pulling the scepter then opened the cover and drained the pool.

Leaving behind the shovel and dates, and taking with me the axe, magnifier, rope, torch, and canteen, I figured it would be dark beneath the pool drain, and that I'd need to light the torch by using the magnifying glass in the sun. But my attempts to communicate this to the parser were in vain; "LIGHT TORCH" was recognized, but demanded to know how, and I couldn't figure out the expected verbiage. "WITH MAGNIFIER" did not work. Sure enough, going into the drain got me killed in the dark. I consulted the walkthrough again.

My verbiage was right. But it only works while inside the pool, and not on the screen outside of the pool where the sun is clearly visible. Arghh!

With light I could explore this falaj, and discovered a boat.


I could float it, but without any way to control it, the boat drifted east and over a waterfall.

Reloading, this time I took the shovel instead of the axe, and could paddle the boat.


Securing the boat to the pole, I got out and went through the archway.


TRANSLATE HIEROGLYPHS showed this meaning.


So I put the scepter back in the pharaoh's hands, and then a thin crack, just wide enough for me to carry my torch through, opened in the wall, leading to the inner chamber.


The treasures, we're told, are far too heavy to be carried by one man, but the ladder can be taken back to the entrance and climbed up and out through the drain, back into the pool. CLIMB STEPS got me out, I discovered after fumbling a bit more with the parser, and finally I rode the camel back to Cairo, victorious.

You have mastered The Sands of Egypt in 126 turns. This Adventure is over.

GAB rating: Below average. The animated graphics are what make The Sands of Egypt stand out from its contemporaries, and they are honestly not bad at all for the era. The warm-hued palette is more pleasing than the harsh six-tone graphics available to Apple's hi-res mode, and more appropriate for this kind of game than the cool colors typical of Atari games. It makes me think that the CoCo might have had untapped potential as a games machine, perhaps marketed as a cheap alternative to the very expensive Apple ][+ rather than trying to compete with the cheaper VIC 20.

But this isn't a particularly inspired or well designed adventure. Even padded with a MOTLP, which makes up the majority of the game's rooms, this is a tiny, inconsequential game, without a single clever puzzle, and the only difficulties I had were the difficulties with its parser. This is still preferable to the downright player-hostile design in Sierra's late-era Apple adventures, but it's overall not much of an experience.

Datasoft's last TRS-80 CoCo game would be 1984's The Dallas Quest, and would reuse the engine of The Sands of Egypt, but I'm not particularly interested in playing it. The next ancestor I play will be one originally written for Atari computers, bringing us into that era and setting the stage for Bruce Lee next.

Monday, December 20, 2021

SunDog: Frozen Legacy - Won!

As I expected, SunDog's gameplay hadn't evolved at all since the last session. The only meaningful ship upgrades in the game can all be found on one planet. Once you have them all, and have located the Banville colony on Jondd, and have a good amount of money, the gameplay loop goes like this:

  • Take note of Banville's material demands
  • Fuel your ship
  • Jump to a system that has cities you haven't visited yet
  • Fly to a planet that has cities you haven't visited yet
  • Refuel
  • Fly to each city and locate its exchange & warehouse. Purchase any goods that Banville demands, and take note of any cryogens' locations
  • Haul the goods and cryogens back to Jondd, two loads at a time, dealing with pirates as best as you can
  • Repeat
 

There are 50 cities spread over 18 planets, and the cryogens are the only reason you must visit them all. Once they've all been located and transported back to Jondd, which I accomplished partway through  Banville's fifth phase out of nine, you can remove them from the equation and just fetch Banville's ever-changing cargo from any planet known to sell it. Thankfully, I took notes during my initial tour, and found that the various cities on planet Shoot, first planet of the Shoot system, sells most goods and at relatively low prices, though you may need to exit and re-enter the exchange repeatedly until the one you need shows up.

It's still quite monotonous, boring, and repetitive, especially given your hold's limit of two items. All but the final two phases will take at least two trips to carry everything back, plus the cryogens themselves who also take up an item slot each. The monotony is broken up only by the need to stay in the black, as continually buying cargo, fuel, and most of all replacement ship parts (especially black market ones) drains your funds. There are multiple means of doing this, but none seemed more efficient than just playing with Jondd's local exchanges, where pirates were a non-issue and goods could sometimes be sold right back to the same city for more money than I paid. My ground scanner even meant I could fly from city to city instead of needing to travel by land once I burst the local bubble and had to move on.

As the phases near the end, the number of required materials goes down but the number of required cryogens go up. Phase 8 only required a load of nullgravs, which are rare but can be located on Shoot, though I had to exit and re-enter the starport's exchange several times before they showed up. Three cryogens were needed too.

The final phase needed spices, chronographs, and four cryogens, the latter of which I had stashed in Drahew and just had to tote across the planet two at a time. Spices and chronographs could both be found on Shoot, and aren't rare or expensive. One final trip through pirate space, and the game ended.

String concatenation error as a pirate chastises me for not surrendering the booty.

Delivered.

Game over. This is the whole ending.

No sandbox play allowed. SunDog flags your disk as unplayable until you use the utilities to restart.

We never did find out the real reason for Zed's uncle's disappearance, or uncover any truths about the "Society of the New Faith" or discover its purpose.


GAB rating: Below average. SunDog is ambitious, and I admire it for that. The promise of being able to freely zip around the galaxy, smuggle and barter goods, battle pirates, explore alien cities, get into scrapes all sounds good on paper. The ZoomAction interface is innovative, if nothing else, offering modal views that seamlessly zoom from galactic scope at the top, down to solar systems, planets, continents, cities, and all the way down to the contents of a hardware store's shelf or a closeup on your ship's burnt-out control panel after a particularly fierce battle.

But like so many ambitious open world games, SunDog spreads itself thin, and no aspect holds much substance. Only space combat and trading offer anything approaching depth, not that they have much of it, mind you, and both are flawed in execution and actively discourage using an orthodox approach. Everything else is window dressing at best, and momentum-killing busywork at worst. I don't think I got into street fights even once, and I still have no idea what your strength and IQ stats do. I certainly didn't bother using drugs. And there's just no reason for the game to go on for nearly as long as it does, especially considering how long it takes to do basically anything.

I do think that many of SunDog's problems would be significantly alleviated if your ship could simply hold more cargo and fuel. The potential to load up with extra fuel would mean more combat tactics become viable, being able to hold a variety of cargo types for price checking could make interstellar trade a worthwhile enterprise instead of a pirate-baiting waste of time, and holding more cargo means fewer trips spent fetching it and cryogens to finish the colony.

What it really needs, though, if not a shorter playtime, is more options for upgrading your ship and its abilities. A game this long should reward your efforts with an RPG-like power curve, to make you feel stronger and more capable as you progress through the game, and the four black market components that you could buy right at the start of the game if you know where to go aren't nearly enough. I understand the Atari ST version fares a bit better in this regard, offering more equipment and more ship upgrades, as well as the mouse compatibility that the Apple II version sorely needed (or just a better-designed interface for a joystick, preferably a joystick/keyboard combo).

Designer Bruce Webster envisioned SunDog: Frozen Legacy as the first in a trilogy, but never got around to the sequel, abandoning FTL Games shortly after submitting a "version 2.0" with bug fixes and unspecified new features. Two years later, FTL Games would release "version 3.0" for the Atari ST without his involvement, rewriting everything in Pascal, followed by Dungeon Master the next year.


Update: I briefly played "version 2.0." Some observations on what changed:

  • The title screen is animated.
  • An "demo" option runs through some of the gameplay modes, annotated with plot and gameplay features. In it, a shield and upgraded gun can be seen in the player's inventory, which were not possible in version 1.0.
  • Credits are added, which allude to "SunDog II: Old Scores to Settle" for the Macintosh as an upcoming game which never happened.
  • Loading a saved game, or starting a new one, is a streamlined process that involves less disk flipping than before.
  • There's way less disk loading once a game has started.
  • Cities are more colorful.
  • A new building type will teleport you anywhere in the city for a small fee. The real value here is seeing the city map so you can locate the exchange, because you can't teleport the pod.
  • Ship stores offer free information about parts, though this is mostly useless fluff and doesn't mention the price, which is the one thing apart you'd actually want to know.
  • On the other hand, they no longer shun you for rejecting a purchase.
  • The general store on Jondd sells rapidheals and body shields, and also gives free information. The shields will absorb up to seven hits before breaking.
  • The exchange may sell quality 'G' cargo.
  • Exchanges generally pay the same prices for cargo as what they charge. Furthermore, when you sell cargo, the price you originally paid is shown on the screen along with the sell price.
  • Liftoff and landings have new first-person animations. The hyperspace animation is also redone to be more Star Warsy.
  • 'Cloaker' is spelled correctly.
  • Distress calls will cost you, and you'll be grounded until you can pay off the fees at the bank.


Combat, sadly, doesn't seem to be made any more reasonable.


Friday, December 17, 2021

SunDog: Low zenith, long arc

In my last session, I played with the volatile commodities markets of Jondd and acquired a $150,000 chunk of seed money for my mission. I had also discovered the colony I was to settle, and one busload of the cryogenically frozen colonists, which I brought there. But it was time, I figured, to man up and search the other systems to find some things other than money.

"Ferr" was the second system on the bank's list of branches. Might as well go there next, I thought, and transferred my entire account there before taking off in the SunDog and enjoying a pirate-free hyperjump to the starport Industron of the world Ferrwork, second from the sun.


Fuel prices were $142, a bit less than on Drahew, which meant black market goods! I took out $10,000 from the bank here and checked out the local supplier.


Two new items were here - concentrators and autoslews, whose sellers demanded $6,000 and $3,000, respectively, and I bought one of each. I had no idea what they'd do, but through trial and error, I found that the concentrator could be inserted into the weapons array replacing a photon bridge, and the autoslew into the tactical display, replacing a j-junc module. With money to spare and four component arrays per subsystem, I bought and installed another three concentrators, whose prices fluctuated up to $7,600 and down to $4,800, and I tried to buy more autoslews, but the bartender told me that his man ran out of them.

The local exchange had some goods I hadn't seen on Jondd - Radioactives and gems - but neither was anything that Banville demanded, so I ignored it for the time being.

Planet maps showed there was another city on this world, but I couldn't reach it in the pod.


$125,000 left in the bank, I explored the two other planets in the Ferr system.

  • Starport Ferring, on planet Ferr, had cryogens in the warehouse, and sold multiple required materials; silichips, synthesizers, cadcams, and wood. I bought these at low quality but kept them in the warehouse, and took the cryogens with me.
  • Barnum city was the only other Ferrian city accessible by land, and had nothing of note.
  • Icebox, the only city on planet Snowball, had another cryogen to collect at its exchange.
 

I had $95,000 left after all this and returned to Drahew with my two cryogens, which I delivered by pod to Banville. While on Jondd, I visited neighboring planet Heavy, which had three cities, but only one, Lightning, was possible to explore, and nothing worthwhile was on it.

The next step was to transport materials from Ferring, which meant I'd finally have to deal with pirates. So I returned to Ferring, loaded the pod with one load of silichips and one load of extra fuel. Three pirates attacked me on the way to the warp node, and I bluffed my way out of two but couldn't bluff the third. In combat, my ship, now equipped with concentrators and an autoslew, automatically rotated to face it, but this didn't make hitting it any easier. But my lasers destroyed it in one hit.

A fourth encounter en route to Drahew wasn't so easy. Bluffing failed, and my lasers kept missing, as my fuel drained uncontrollably and I took hit after hit. I arrived, but with barely any fuel, and with multiple expensive parts destroyed, including two concentrators.

Warp drives, one of six subsystems, after a poor fight performance.

Total cost of the refuel, repairs, and parts replacement was $20,000. Just to deliver one load of cargo, out of seven required for the first of nine phases. Utter bullshit, I thought. At this point, I started delivering two loads at a time, and had no qualms about using saves to ensure an acceptable outcome. And making it to my destination on a single tank without taking damage was a very acceptable outcome.

The Ferr system as cleared-out as I could at this point, I moved on to Enlie, a one-planet system with a starport "Plepa" and one other inaccessible city "Tuie.: Fuel here was even cheaper than in Ferr, and on the black market I purchased two new components; "clokers" and ground scanners. The cloker exploded while I tried to install it, diegetically illustrating that black market components aren't the most reliable, but the ground scanner would be a literal game changer as once installed, "city-city" travel became an option in the SunDog's navigational computer. I could go anywhere now, and also eliminate the tedious overworld travel. I flew to Tuie, where there wasn't anything important.

Down to my last $27,000, I checked goods' prices on the two cities, and found making a profit here would be impossible. Gold and gems were pretty cheap, and I tried bringing a load of both around the Jondd system just to see what I could get.

On Jondd itself, I'd make $9,000 profit, not counting the cost of the fuel and repairs, but on Ft. Savon on neighboring planet Heavy, grade A gems from Tuie would sell at a $40,000 profit. I didn't feel bad at all about reloading my save and taking advantage of this, delivering two loads, though on the reload the prices went down somehow, and only earned me about $29,000 profit each. Still, I went back for more, and snatched up some exotic metals when I saw them. Banville only needed rare earths and "sunsuns"now, and I had just over $100,000 in the bank.

More savescumming showed me I could make about $13,000 hauling cheap spices to a town called "The Mines" on planet Ferrwerk. It was probably not worth the time it took, but the Ferr system still needed to be searched for cryogens and supplies, and I found some rare earths at The Mines' warehouse, and "Sunsuns," the last needed item, at Industron starport.

After hauling these back to Banville, the phase was complete, and the city expanded, though none of the new buildings were functional.


The next phase required:

  • Radioactives
  • Gems
  • Exotic metals
  • Cadcams
  • Cryogens
 

Three loads of cryogens were already there, so I delivered one right away, and then returned to the Ferr system where one planet, also called Ferr, remained to be fully explored. In the exchanges of its four cities I found and purchased radioactives and cadcams, and in the attached warehouses I found two cryogens. In two round trips I brought it all back to Banville.

This was all getting rather routine, and the ZoomAction interface, intended to enhance immersion, was making this very tedious. Step-by-step, a single trip to Ferr and back went like this:

  • Drive the pod to the SunDog
  • Enter the bridge
  • Navigate->Sublight->City-City to go to Drahew starport
  • Exit the bridge
  • Exit SunDog
  • Go to the depot
  • Buy fuel
  • Exit depot
  • Return to SunDog
  • Enter the bridge
  • Navigate->Warp->Set Warp to set a course to the Ferr system
  • Navigate->Sublight-Liftoff to enter orbit
  • Navigate->Sublight->In-system to set a course to the nearest warp node
  • Wait to arrive at the warp node
  • Wait for the warp engines to finish charging if they haven't yet
  • Navigate->Warp->Do Warp to warp to the Ferr system
  • Navigate->Sublight->In-system to set a course to planet Ferr
  • Navigate->Sublight->Land, and pick a city
  • Exit the bridge
  • Launch the pod
  • Drive around the city in search of the exchange, which is like finding a needle in a haystack
  • Check health every now and then, and rest/eat/buy food as needed
  • Check the warehouse for cryogens
  • If there are cryogens, take them
  • If there are cryogens but the pod is full, leave them and take note to come back for them later
  • If the exchange sells any required commodities, buy them at the lowest quality offered
  • If there's no room for the commodities and I'm carrying cryogens, leave cryogens at the warehouse, load the commodities in their place and take note to come back later
  • Exit the exchange
  • Drive the pod back to the SunDog, if I can remember where I parked it
  • If the pod is carrying fewer than two commodity loads, or if there are any cities I haven't visited yet, then use Navigate->Sublight->City-city and pick a city, and repeat all of the city-based steps until I have two commodity loads or until every city has been searched.
  • Once either of those conditions is met, use Navigate->Sublight->City-city to go to Ferring starport
  • Exit SunDog
  • Go to the depot
  • Buy fuel
  • Exit depot
  • Return to the SunDog
  • SAVE THE GAME
  • Enter the bridge
  • Navigate->Warp->Set Warp to set a course to the Jondd system
  • Wait for the warp engines to finish charging - important that you do this before anything else so that you can warp without delay once pirates show up
  • Navigate->Sublight-Liftoff to enter orbit
  • Navigate->Sublight->In-system to set a course to the nearest warp node
  • As soon as pirates approach (or if I arrive at the warp node first by some miracle), Navigate->Warp->Do Warp to warp to the Jondd system
  • Navigate->Sublight->In-system to set a course to planet Jondd
  • Deal with pirates by bluffing, and if that doesn't work, fight them if you're far from Jondd, or use shields if you're close
  • Reload if anything goes wrong
  • Navigate->Sublight->Land, and pick Banville
  • Exit the bridge
  • Launch the pod
  • Drive to the exchange and deliver the goods 
 

What I didn't mention yet is that you deal with multiple seconds of disk loading with almost every single one of these steps. With 18 planets in the game, you'd have to do this process at least once on each of them just to locate all of the cryogens, and a few would certainly take multiple trips. The most you can gain from each trip is two commodities, or two cryogens, or one of each, and it's better to take one trip transporting two commodities and another of two cryogens than it is to take two trips transporting one of each, because the latter means dealing with pirates on both of them.

Combat is the only challenging part of this loop, and as I've mentioned more than once before, it really sucks. Just getting to the tactical computer means fiddling with menus controlled with a joystick-driven mouse cursor, and it even lags when you're under attack. By the time you successfully activate it, make a failed bluff attempt, and arm your guns, fighting back is a great way to burn up all of your fuel with missed laser shots. I feel like every single combat, either I nail them in the first volley or two, or I miss all of my shots and run out of fuel. I've won combats and still ran out of fuel before arriving at my destination, which is thankfully an outcome you can survive by making a distress call, but only if help arrives before more pirates do.

Anyway, with the Jondd and Ferr systems fully explored, I returned to the Enlie system where I knew I could find cheap gems for Banville. Exotic metals were sold at the starport as well.

I picked up a new cloker here too, and it didn't explode this time. It turned out to be quite handy on the return trip - make no mistake, using it drains your fuel alarmingly fast and is only worth using on the sublight trip from the warp node to your destination planet and only if you're fairly close once the pirates approach, but it makes you completely invulnerable until fuel it runs out, and still drains less than your shields do at maximum strength. Under the right circumstances, it's the perfect thing to keep you alive until you reach the safety of planetary orbit and can land and refuel.

By the numbers, I've fully explored 3 out of 12 systems, 6 out of 18 planets, 17 out of 50 cities, and am about to complete the second of nine phases of my mission. I'm at most a third of the way done with the game, but have already exhausted its space of gameplay possibilities.

Wednesday, December 15, 2021

SunDog: Knowledge equals profit

Rolling a new Zed.

I restarted the galaxy, now a little wiser to its ways. In this new game, I maxed out Zed's luck - the only stat which can't be boosted with drugs - leaving the rest at their default of 30/100. Right away, I completely refueled, repaired, and refit my space ship. That last task is made rather tedious by the drag & drop interface and other quirks.

Buying replacement parts

...and installing them

Controlling what is basically a mouse cursor with a joystick is already kind of annoying just because of a senseless scheme based on the stick's absolute analog position, where if you want to click on something in the upper-left quadrant of the screen, you've got to push the joystick partway up and to the left and wiggle it around in that vicinity to get it where it needs to be, and if you release the stick so that it returns to center, the cursor snaps back to the center of the active window as well. You get used to it eventually, but it's never convenient, and there are further inconveniences.

  • Ship stores are cash-only, so you've got to withdraw from the bank, and whatever you withdraw, you risk losing to muggers.
  • The store view shows you a bunch of arcane icons representing each ship part, and it doesn't tell you what each part is or what they cost until you click on them. Doing this prompts you to buy the component, and if you don't, the shopkeeper gets annoyed and stops talking to you (and gets rude if you re-initiate dialog).
  • You can only carry four objects. And with all that cash you're carrying, you might want one to be a gun. You probably will need multiple trips to the store and back.
  • Why, oh why, does the act of walking require me to fiddle with weird joystick controls to move a cursor and then click when it's pointing in the direction I want to walk? I'm already using a joystick. Just let me walk with the joystick!
 

Before leaving, I queried prices at the exchange. As I mentioned in the last post, you won't get a complete picture. However, I found that the deals you can view will rotate each time you enter and leave, and by doing this repeatedly, I got prices on ten different commodities at a variety of grades.


Cargo Low High A B C D E
Stimulants 180 200


18000
Furs 145 160


16000 14500
Art objects 140 176
17600
14000
Hand weapons 101 156 15600 13900
11100 10100
Pharmaceuticals 72 91
9100 8000 7200
Stock embryos 68 86
8600


Biochips 65 91 9100 8100 7200 6500
Fruits 23 36 3600 3200 2800
2300
Seeds 21 32 3200 2900 2500 2300 2100
Grain 16 22
2200 1900
1600


Following the advice of commenter MorpheusKitami, I started exploring the planet rather than trying to warp to others. This can be done by leaving the city grounds, and it's best to do this in your pod. I first transferred my food and medicine from the ship stores to the pod - a tedious process that must be done in batches of four items at a time - and then drove off into the wilderness.


I half-expected random encounters, but found none. The world maps are pretty barren. The only threat here is running out of stamina, which you aren't warned about - you just fall asleep in your pod. You've got to eat too, though if you forget, you'll probably pass out well before you starve to death, and this shows your vitals onscreen when it happens, likely reminding you that you need food. It's better to check your stats manually once in awhile and eat before sleeping.

Exploring around, the first town I encountered was Obburg, which seemed to have the same economic properties as Jondd - same general prices, same black market goods, just no starport to buy fuel at. Repeating the exercise at the exchange, I found these prices:

Cargo Low High A B C D E F
Stimulants 144 160

16000 14400

Furs 144 144


14400

Clothing 124 124 12400


Hand weapons 92 156 15600 13900 12300 11100 10000 9200
Art objects 92 144 14400
11300 10200 9200
Droids 58 90 9000 8000
6400 5800
Biochips 47 57
6400 5700 5200 4700
Pharmaceuticals 47 73 7300 6500 5700 5200 4700
Meats 33 52 5200


3300 3100
Stock embryos 29 50
4400 3900

2900
Grain 9 16 1600 1400 1200

900

Running art objects from Obburg to Drahew seemed like it might have the biggest profit yields, but just because you can get B-grade art objects at Drahew for $17,600 a load doesn't mean they'll sell that much, so I kept exploring the planet.

The next town I discovered was interesting.


Consisting entirely of an exchange-like complex and a nonfunctional building, I figured this must be the lost colony! Still, my initial goal remained to explore the planet, gather commodity prices, and then use them to make money.

I scouted out the remaining cities - Esposito, Darvilton, and Dramming, and found them all to have the same economic factors as Drahew and Obburg. Esposito had a cryogen stashed in its warehouse, which I noted but ignored. After querying commodity prices everywhere, I compiled a list of planetwide prices using grade 'A' values, estimated where exact prices were unavailable.


Darvilton Drahew Dramming Esposito Obburg
Stimulants
25600
20300 20200
Furs
22800 20200
20500
Art objects
19800 19900 17500 14400
Hand weapons 13800 15600
21400 15600
Clothing 9300
9300 11300 12400
Droids 9000
10000
9000
Pharmaceuticals
10200 6800 6800 7300
Stock embryos 5400 9700 6100 4100 4950
Biochips
9100
8100 7200
Meats 4700
4700 5300 5200
Seeds 3600 3200 2800 2800
Fruits 3100 3600 2500

Grain
2500 1600
1600
 

From this list, my best bet for making a profit seemed to be running hand weapons from Darvilton to Esposito, so I went there and picked up a load, throwing in some stock embryos for good measure. Then, checking to see what the local sell price was, I was caught by a big surprise - they sold for more than what I paid!

The hand weapons, at grade A, cost $13,800, and the stock embryos, grade B, cost $4,800. Turning around and selling them right back, they netted $18,200 and $6,400, respectively.

New strategy - buy every offer if it's well below the planetary going rate, and then immediately check the sell price and sell it right back if it turns a profit!

My trade logs over the next session:

Good Grade Buy Sell Profit
Hand weapons A 13800 18200 4400
Stock embryos B 4800 6400 1600
Hand weapons B 15600 16200 600
Stock embryos E 3500 4600 1100
Clothing D 6600 8400 1800
Art B 15600 18300 2700
Hand weapons D 11100 11500 400
Art D 14000 14600 600
Clothing B 10100 12500 2400
Clothing C 7300 10200 2900
Art F 11600 13600 2000
Hand weapons A 15600 20300 4700
Hand weapons C 12300 14400 2100
Stock embryos B 5400 3200 -2200
Hand weapons C 13800 14400 600
Hand weapons C 12300 14400 2100
Furs E 11600 12000 400
Hand weapons A 15600 16200 600
Clothing D 8800 10000 1200
Furs A 18000 8250 -9750
 

I did not sell the stock embryos or furs at a loss, but held on to them with the expectation that they'd fetch a profit somewhere else. This pirate-free, zero-fuel exercise made me $8,800 richer without having to go anywhere, and I had two loads of cargo potentially worth much more than that. But I also learned something about SunDog's cargo economy, even if it raised more questions than it answered.

The buy and sell prices took a real journey! There doesn't seem to be any connection at all between a good's buy and sell price, but I took a look at price trends, using the assumption that each good's grade is worth 90% of the grade above it.

  • Art's purchase price relative to quality went up, as did its sell price. The value of grade 'F' art was noticeably higher than I expected it to be.
  • Clothing's purchase price spiked twice but ended exactly where it started. The sell price zig-zagged.
  • Fur's value tanked after I bought the second load of it.
  • Hand weapons were the most commonly traded item, and here you can see quite clearly that C-grade weapons' purchase price went up and down while the sell price stayed the same. The overall buy and sell prices crested and dipped seemingly independently of each other, though in all cases I was able to sell for more than I paid.
  • Stock embryos' purchase price went up with each purchase, sharply so after the last one, while the sell price free-fell after my third purchase.
  • Fruit prices, interestingly, dropped a bit even though I never touched the market.
 

I took one last look at the sell prices of my cargo, and the stock embryos at gone up in price to $6400, the same price that I sold the first load for! But this time I didn't sell, and took my pod on another tour around the planet to check prices.


Darvilton Drahew Dramming Esposito Obburg
Stock embryos B
6400 7700 7000 6300 7000
Fur A
8250 22500 31600 31600 31600
 

I sold both of my loads on Obburg for a handsome profit, and then repeated the exercise of buying stuff and selling it back, which apart from the cost of buying two C-grade stimulants which would sell at a loss here, earned me $14,400. Sadly, these stimulants, though much cheaper to buy in Obburg than Drahew, turned out not to sell for a profit anywhere on the planet, and I sold them for a combined $6,200 loss. But I learned that stimulants are a market drain, and soon after learned that so are biochips and pharmaceuticals.

Eventually, I racked up $120,000, my last big haul coming from a delivery of two loads of hand weapons to Dramming, and I decided it was time to get on with the game. I picked up the cryogens from Esposito, plus some more hand weapons (see Ferengi rule of acquisition #292), brought them to Banville, and took a look at the exchange ticker to see what else was needed; a list of materials unavailable on the planet.

  • Rare earths
  • Exotic materials
  • Woods
  • Silichips
  • Cadcams
  • Synthesizers
  • Sunsuns
 

I went back to Dramming to sell my hand weapons for about a $10,000 profit, where I amazingly saw two loads of fur priced at a total of $34,000 which I sold on Obburg for $53,100! With nearly $150,000 in the bank, and the sights of Jondd getting pretty dull, other worlds beckoned.

Monday, December 13, 2021

SunDog: Fuel economy

Space is a tough place where wimps eat flaming plasma death. It's happened to me a lot lately, but I've learned a lot about SunDog: Frozen Legacy's economy in the process, even though I have yet to make any real star bucks.


You make money buy purchasing cargo low and taking it somewhere it will sell high, but there are two problems. The first is a problem of incomplete information - you might see a load of cereals offered for $1,700 at the Drahew exchange, but then you need to know where you can sell it at a profit. There are three ways of finding out what goods are worth at a given city, all of them with some disadvantages.

  • First, the commodity exchanges have tickers that show what goods are selling for. You won't see all of the goods this way, and it doesn't show the goods' quality, which affects price, so at best you'll get a ballpark range. The ticker moves fast too, so writing things down is tricky.
  • Second, you can enter the exchange as a buyer, and deals will be offered to you directly. This shows you the quality of what's being offered, but you'll only see a random subset of the trades shown on the ticker, and only trades that you've got the cash on-hand to afford.
  • Third, you can take any good to any exchange and find out directly what you can sell it for there. This is always a fraction of its purchase price - a fraction which varies from good to good (and possibly city to city).


Visiting every starport to query purchase prices is an expensive proposition. You can expect a single intersystem trip to use up half of a fuel tank, or about a $900-$2000 refuel charge depending on the city. This is somewhat viable, as Zed's uncle left cash here and there at various banks throughout the galaxy, but eventually you've got to start making money.

What you certainly can't afford to do is transport goods to every starport to query prices that way. As useful as it would be to find out the highest and lowest prices of a specific commodity, the second problem you must contend with as a space freighter is also the reason you can't do that; transporting goods gets pirates on you like stink on a wookie, and space combat is borderline unsustainable. Your ship has enough space to carry two container loads, and if I allocate one to auxiliary fuel and the other to cargo, I'm lucky if I drift into the dock at my destination blasted half to scraps and running on fumes. On a blind run there's no guarantee that the cargo will even sell at a profit, let alone enough of one to completely repair, refuel, and be in a better position than when you started. Transporting two loads of cargo, leaving no room for auxiliary fuel, seems completely impossible.


By the numbers, I estimate that a full fuel tank holds 64 of what I'll call liters. Fuel is sold by "units," and a full tank holds 16, but fuel depletes in smaller increments than that. Your main tank automatically refills when empty if you have any auxiliary fuel, and as mentioned, you can only hold one if you have a single load of cargo. So, for all intents and purposes, you can bring 128 liters of fuel on a single freight run. And you'll need about 32 of them just for travel, assuming your ship is in perfect working condition - a costly initial investment.

A typical intersystem trip involves taking off from your departure planet, cruising to a warp node on sublight drives, warping to your destination system, cruising to the destination planet on sublight drives, and landing. If you carry any cargo at all, you're guaranteed at least one pirate encounter on each of the sublight trips, probably two, and this is where the real fuel guzzling happens.

Missing a pirate

Simply being in the vicinity of a pirate slows you down, which means more fuel is consumed for the trip, and any system component damage further reduces your fuel efficiency. Switching to combat mode requires navigating a cumbersome system of menus in realtime, while coasting on precious fuel and being shot at. Shooting back - you can fire lasers or cannons but I don't see what the difference is - costs two liters per shot, and forget about using shields; merely having them up at the minimum strength will drain half a tank in less than a minute, and that's on top of fuel burned by your engines and guns. At maximum shield strength you'll burn ten liters every four seconds!

I don't know if I'm just doing combat wrong, but making a trip with two loads of cargo and a single full tank seems to be completely impossible. Combat is a simple system where you rotate your craft to face your target, using radar to guide you, and then align it in your crosshairs and fire your guns. There is nothing you can do to avoid taking hits except kill it faster or raise shields. At my absolute best performance, I'll lose a good 4-5 liters just from navigating the combat menu to switch to the tactical view, arming my guns, and then rotating to face the pirate, and after that, I'll waste the better part of a tank shooting and mostly missing the pinpoint precision needed to score a hit. If you win but don't have enough fuel to make it the rest of your way to the destination, you can send a distress signal and get a free refuel. If you run out mid-combat, you're dead.

Alternatively to combat, you can try to talk your way out, and this is certainly the better option. You could jettison your cargo, if you don't mind that the game will basically be over if you do this. You can also bluff, threaten, or fast-talk, and in my experience, only bluff ever works. Taking charisma pills slightly increases the success rate, but not enough to be worth the $6000 or so that they cost.


I did some scouting around the galaxy, visiting starports without cargo, just to check on the prices of cargo, goods, and services, and in the process got a better understanding of how the economy works in this game.

  • There are 18 planets, split over 12 systems. Most planets have multiple cities, but each has exactly one starport, which is the only place the SunDog may land.
  • Each city has two invisible and independent factors that determine multiple aspects of the economy, which I will call "inflation" and "fuel rate." Neither seems to determine commodity prices, unfortunately.
  • Inflation determines the prices at general stores and ship stores, and works as a simple multiplier. Determining it is as simple as attempting to buy a good from such a store and doing math; if a control node costs $1,520 on Drahew and $2,660 on Malesti, this means Malesti has an inflation rate of 175% and you can expect all goods at these stores to charge 75% more than on Drahew. The lowest prices I've seen were 50% of Drahew rates. Inflation does not affect fuel prices.
  • Fuel rate is set on a per-system basis - all starports in a system charge the same fuel prices.
  • Fuel prices also determine availability of black market goods. The lower the fuel price, the more items will be available. Most systems only offer drug types to boost your four core stats - strength, intelligence, dexterity, and charisma. Systems with the lowest fuel prices also have illegal ship modifications - concentrators, autoslews, clokers [sic], and ground scanners. Systems with the highest fuel prices may only carry brawnboosters and brainboosters.


I hadn't mentioned the "pod" before, as I hadn't quite grasped how it works until the writing of this post.

  • The "pod" is a ground vehicle that detaches from the SunDog. You may drive it around town or walk on foot. Any building may be entered on foot, but only depots and exchanges may be entered driving the pod, and you must to pick up or deliver cargo.
  • If you purchase cargo at an exchange without the pod, it will be stored in an attached warehouse, where it can be retrieved for free later.
  • Some warehouses store cryogens. These are free to pick up in your pod, but as I don't even know where to take them, I am just leaving them for the time being.
  • If you visit a depot on foot, you may refuel and repair the SunDog's hull. But you must be in the pod to buy auxiliary tanks.


Some more notes on how cities work:

  • Banks safeguard your money for you, and funds in the bank can be spent at exchanges or depots without needing to withdraw first. Each of the twelve systems has its own bank system, and you can transfer funds to a remote system, but not from one.
  • Bars will sell you cheap food and ale, but by requesting "information" you may get access to a black market dealer. The bartender may or may not request a bribe, but will usually connect you for free if you buy an ale first. Prices seem to be somewhat random, but everything I've looked at costs between $2000 and $9999. I have not looked at these prices extensively enough to determine if there is a pattern, or if local economy affects them. Needless to say, these places are cash-only.
  • General stores sell rapidheals and stinger pistols. They are always in stock, and they never carry anything else as far as I can tell. Prices are determined by inflation; on Drahew a stinger costs $400 and a rapidheal costs $480.
  • Ship stores sell shunts and replacement parts, which vary in price from $96 to $1,520 on Drahew. Prices on other worlds are also determined by inflation. Not all parts are available in all stores, and their inventories don't seem to be determined by economic factors. Drahew's stores have complete inventories.
  • Sometimes you encounter people on the street. The few times that I allowed them to approach, they turned out to be muggers, who might be scared off if you have a gun and threaten them. Or they might just be unfazed and gun you down. If there are other types of encounters, I wouldn't know, because I always run away before they can speak.
  
Vultures, vultures, everywhere.

Most popular posts