The Rivalry, offers up a symmetrical map of two fortified islands separated by two parallel passages. Seems simple, but there's one problem - your Rival, Julius Caesar, has more than twice as many men as you.
There's not a lot of room for sneaky flag-stealing tricks here. Map rules conceal your enemies until they are very close, and make it prohibitively slow - and dangerous - to cross challenging terrain.
You've got every unit type at your disposal, and so does Caesar, and so it is vitally important that combat conditions, which will occur mostly in the middle passage, are favorable to you. Micromanaging units to ensure advantageous match-ups doesn't guarantee a win; Caesar's over-performing archers can destroy your barbarians if they're somewhat tired or even unlucky, and just one lucky knight who makes it through a hail of your own arrows can inflict harrowing losses to you on the other side. He can afford a few such losses, but you can't.
Retreats, whether used to avoid losses or to hit-and-run, are terribly risky here too, as not only can this very quickly make your archers combat ineffective from fatigue, but there's a good chance of them becoming lost in the mountains, or worse, the sea.
My winning strategy - take the northern farm and hill, and be aggressive, but not reckless. In retrospect, reckless might have worked even better.
In the front, we have archers, knights, and a mixed unit of knights, barbarians, and a spy. Everyone moves toward the hill, but I have the knights and barbarians separate and merge the detached knights with the ones ahead to make one big, slow-moving wall of armor.
In back, on the village, we have more archers, who I also move across the bridge and south toward the hill.
In the middle are more knights, more archers, and another barbarian unit with a spy, but these units are low on supplies, so I have them move toward the village before sending them on their respective journeys. The knights and archers head toward the hill, but the barbarians are sent the long way on the east passage for reconnaissance and perhaps a sneak attack. One barbarian is detached from this group and sent to the fortress to train more troops.
A lone barbarian engages my front line and falls easily, and a knight squad guarding the village leaves his post. My front row of archers are fortunate; they kill the full knight unit, over twice their size, without a single loss. An archer company follows, and my barbarians rout them and take the village.
My archers alone can hold the village from the incoming forces.
Like fish in a barrel.
With the village and hill secured, I can either wait it out and defend this point against Caesar's forces who must march a long distance and meet my forces tired, hungry, and forced to fight uphill, or I can press the offensive. I press the offensive, main forces down the middle, while my barbarian detachment continues down the east passage.
My archers continue to hit above their weight, but begin taking some losses in exchange.
Team Barbarian #1 eats it
Team Barbarian #2 goes for the flag
My last archers pull off one more miracle
And with that, my forces outnumbered Caesars', who immediately surrendered.
I suspect this one needs a bit of early luck in order to win. Caesar's early archer unit can decimate your troops and you absolutely cannot afford for this to happen before gaining some ground. Barbarians routing them, as mine did, is no guarantee.
But once I took the first hill without any major losses, I basically had this one. Caesar was ceding his numbers advantage with almost every battle, and even if my archers had lost that last fight, I'd still be able to starve out his fort with my incoming barbarians while knights in reserve come clanking down from the north, or even sneak them in with the ol' spy bait technique.
After more than a dozen humiliating defeats, and some pointers from Wargaming Scribe, Custer has had his revenge. I finally won, but my victory feels a bit hollow, as my strategy only works if the enemy focuses the brunt of his forces against my useless fort.
You can't see the Indians until they are very close, but I knew from repeat failures that two archer units always attack your flag from the north, either through the mountains or through the hills. It's tempting to guard the hills where you have a tactical advantage, but this exposes the flag to an easy capture through the mountains. The best I can do to prevent a quick loss is just regroup everyone onto the flag. The Indians have every tactical advantage - they're well supplied, they fight better in the mountains, and their archers beat my knights, but it's two units against five.
To win, I send the unit in the southeast quadrant across the northern bend of the river where it's the thinnest, then split them into three and march them close to - but do not capture yet - the villages where the enemy flags are kept.
This doesn't always work. The enemy may ignore your fort and storm your north position with overwhelming forces before you can finish deploying your forces near the villages.
This can also go wrong if Geronimo lingers around the villages before heading north, in which case your own force will be captured easily. This is unusual, but it's happened to me at least once.
But if you're lucky enough that he goes for the fort first, then you can have your southern forces take the villages in one coordinated swoop.
Some other strategies discussed:
Send the main force south across the river to get the two northern villages while the spy gets the south one. Scribe can reliably do this before Geronimo reaches the flag, but I can't.
Force the enemy to return across the river, weakened, and finish them off there.
Leave one unit behind, east of the north flag, out of Geronimo's sight. After he takes it and has to march south to re-conquer the villages, sneak back and retake the flag as he crosses the river.
I feel like that last one may work as a contingency to my own eventually winning strategy, but I'd rather just move on than test it.
I've decided to make this last post before the weekend a two-fer, hence the title. A literal marathon, where I successfully guide a runner to deliver a message, and a figurative Waterloo, where I meet a crushing defeat against seemingly insurmountable difficulty.
The marathon, titled "The Elusive Spy," is another gimmicky puzzle level, the third one so far, and introduces a new mechanic - fog of war. You command a lone spy, and have to reach the fortress in the north while Athena's forest patrol, a minimum of eight units, hunts for you. At least this time you needn't race anyone.
The spy is War's only non-combat personnel, who only appears in fog of war maps and greatly extends the line of sight of any unit he is part of. Athena is relentless, but not much of a strategist, and will aggressively pursue enemies without much regard for defense, or supply lines, or favorable matchups, or, thankfully in this case, for terrain. Her owls will pursue you almost at line of sight, even if that means slowly trudging directly through the dense forests, which you yourself should go around.
I found Elusive Spy much easier than War's opening mission, Race for the Flags, but more substantial than that other gimmick level Contest of the Gods. It might take some trials to find the path through the woods that doesn't run you into Athena's talons, but it didn't take me many.
First things first, I go to the nearby village for much needed food. And then wait for Athena's hunters to approach before marching - not running - around them. This is, after all, a marathon and not a sprint.
Athena's wisdom is, shall we say, questionable.
Gotta time this well; go too fast and you just get caught on the other side. Too slow, and they catch up with you.
Later!
Oh, crap! Fall back. Fall back.
I'm lucky these guys are deep in the woods.
Stamina runs low. I can no longer outrun the hunters.
...but at this point I don't really need to.
Oh wow you guys suck.
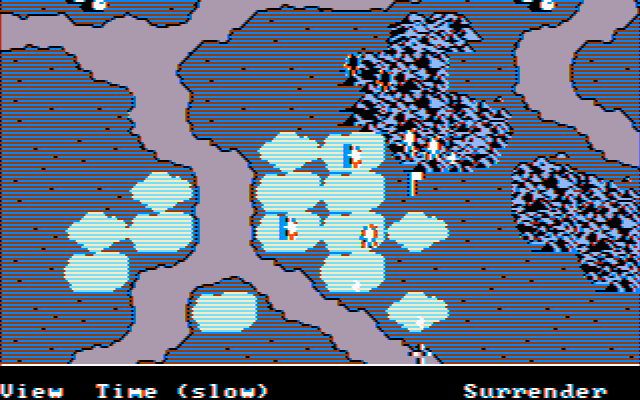
My Waterloo is Custer's Last Stand, which I haven't been able to win yet. War was never committed to historical accuracy, but
inclusion of Little Big Horn in a game with knights and barbarians, and no cavalry or gunpowder, is
just silly.
Geronimo, apparently a stand-in for any Indian war chief, ahistorically commands the Sioux/Cheyenne forces, which double Custer's, and are nearly invisible under this map's fog of war rules. The manual advises us that he prefers difficult terrain, which his troops can navigate more quickly than most, but is weak in the open.
This map has some custom rules that haven't played much of a factor in prior ones:
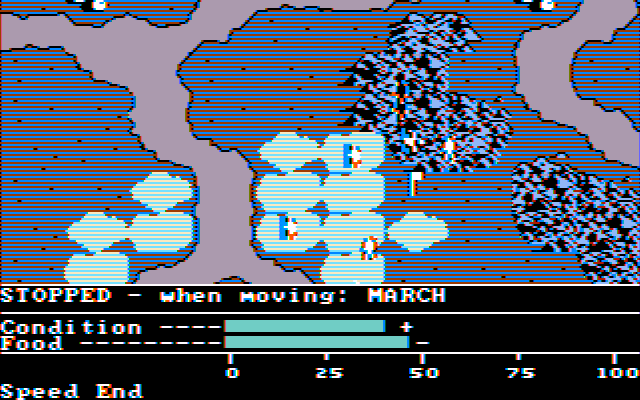
Supply lines are short. I don't really have a grip on how supply lines work yet, but I feel this is pretty important here.
The fort in the southwest trains new archers regularly.
Enemies are unseen until very close.
The water is shallow and safe to cross, but slow and tiring, nonetheless.
The mountains are safer and easier to cross than in prior missions.
The situation is pretty desperate. You only have five units - mostly knights and archers - close enough to the flag to defend it, supplies are dwindling, and you can't see the enemy until they close in. The hills are good defensive terrain against anyone crossing the river to the south and west, but the more immediate threat is invasion from the mountains to the north. The fort in the southwest provides new archers but is too far away from the action to help at all with the initial threat. The detachment in the southeast seems well-poised to sneak across the river and snatch the flags to win, but timing this without knowledge of the enemy's position is a tough problem.
My attempts so far have been outright disasters.
First contact
Lots of contact
Uh-oh.
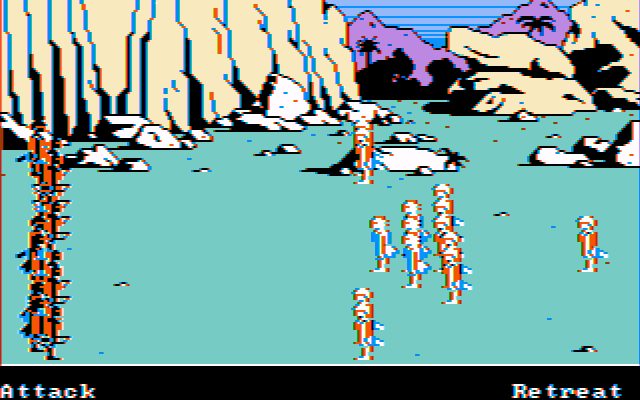
My troops in the mountains are getting tired, while Geronimo's are well supplied from the villages further north. As if that wasn't bad enough, he relies mostly on archers, which are strong against the knights that make up half of my army. This goes very badly for me.
I have an archer unit, overlooking from the northeast hill, descend and try to help, but this barely slows them down.
The archers retreat to the hills, and my remaining mixed unit puts up a pathetic final defense.
I'm at a bit of a loss on how to win this. I'll grant that I do not have a good grasp on how to manage mixed-type units well, but I'm done no favors by the stamina disadvantage, nor by the terrain favorable to the enemy, nor that his archers naturally counter my knights while I have so little of my own to counter his archers with.
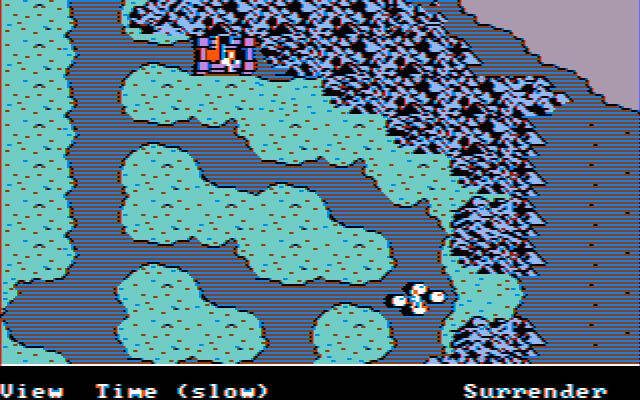
Sherwood Forest is diametrically opposite of the preceding battle in multiple ways. Unlike Pharsalus, the map here is labyrinthine. The enemy starts a comfortable distance away, and you have plenty of time to size up the situation.
The Sheriff, played by Alexander the Great (a strategist formidable in the plains but vulnerable in difficult terrain), is holed up in his fortress and outnumbers you nearly 3:1, but time is on your side.
Your merry men, all half-strength archer squads, control the farms, while the Sheriff slowly starves to death in his fort until he's forced to evacuate his combat ineffective units. Some will head for the farms, some will go for your flag, whose location is placed randomly, but none remain guarding. If you can successfully sneak one unit into the fortress while guarding your flag from whatever detachment of his half-starved dogs go after it, you win.
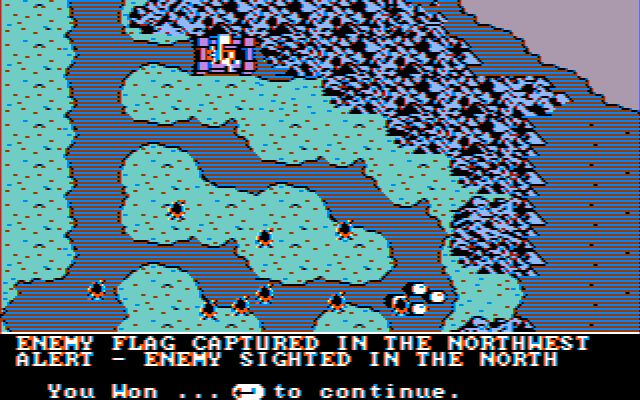
They disperse, leaving clear paths from the north and east.
So much for Alexander the great strategist.
Merry Men waste a tired, hungry patrol that Sheriff marched through the forest.
Well done, Robin Hood, if that is your real name *coughLocksleycough*
The Battle of Pharsalus, a simulation of Caesar's decisive victory over Pompey in 48 BC, is the first true combat campaign of The Ancient Art of War, and would have made for a better introductory than the "race" contests that sandwich it. As the game only has eight AI opponent personalities, Genghis Khan acts as a stand-in for Pompey.
Right off the bat, though, I must dwell on an interface failing. To mount an effective strategy, you've got to know what you're up against and what you're bringing, and there's just not enough time to query each individual unit before they start clashing, let alone set their formations which are hardly ideal to begin with. I really wish that this game offered, if not a "pause and issue orders" option, the ability to query units and set formations and tactics before the action starts without the pressure of time. Lacking any efficient way to view the ranks of myself and Pompey, I'd do this the inefficient way, notating my strategic map even as skirmishes raged, and surrendered, assuring myself that this loss didn't really count.
Pompey slightly outnumbers you, but presses the offense almost immediately, giving you little chance or room to organize an efficient defense. You do not have nearly enough knights to counter all of his barbarian units, some of which are supported by archers and/or knights to make things more interesting. Turning the chaos of ensuing battle into a rout seems difficult, but there's an easier way.
Pompey does not even bother trying to defend his flags, nor does he try to reclaim any lost until he's taken yours. Your southern barbarian unit can easily slip past his forces, and then split up and take both flags at once.
To win, then, you just have to slow down his main battle group long enough for the barbarians to complete their mission. You could probably manage this just by haphazardly throwing everything you've got into his path, so long as you're using decent formations and good about not leaving gaps in your defense lines.
I managed a victory in a little over ten minutes, but it was a bloodbath.
Knights are rushed to the front to thin out the barbarians, while archers fall back and wait for Pompey's slow-moving knights, and also to be a second line for any barbarians that break through the first, and am careful to withdraw them from any engagement that gets too hot. My own barbarians are expendable meat shields, tasked with suicidal charges to cause whatever damage they may.
This doesn't always work to my benefit.
But I'd like to see you carry out sound military maneuvers in this mess.
Barbarians give knights the slip in the south.
Even victories are costly.
They split up and march to the flags. Just gotta slow Pompey down with what I have left.
Often counted as among the earliest realtime strategy games, The Ancient Art of War is not the first strategy game with a realtime component, nor does it involve all of the RTS gameplay elements codified by Dune II, which as far as I know had not been directly influenced by this.
However, of all the early "proto-RTS" games I am aware of, War has the most modern-styled sensibilities and design, despite its archaic visuals and UI/UX. You, viewing a battlefield map from overhead and detached from any direct control, maneuver your troops with a cursor-based interface to fight the enemy over key points. Different soldier types have distinct combat roles, melee and ranged combat are both represented, terrain affects movement and combat conditions, and individual units have strength, stamina, and supply levels to monitor and manage. All that's missing from the Dune II formula is the base-building and resource collection. Notably, the action occurs at two levels - strategic and tactical - which reminds me strongly of the much later Total War series.
As with Sierra Championship Boxing, Ancient Art of War looks best with CGA composite video, and needs an unofficial branch of DOSBox in order to enable this mode. I am using DOSBox-X and have it configured with cga_composite2 and 300 CPU cycles, and find it runs satisfactorily but it is unclear to me if this is optimal; the palette is a bit funky, and with 300 cycles the action still lags a bit, but if I go much higher then it clearly runs too fast, and yet somehow still lags a bit. There was a 1987 re-release with EGA & VGA support, but as you know I prefer to emulate original versions. If anyone has any emulation advice for this game I'd love to hear it.
Ancient Art of War offers 11 missions in roughly incrementing order of difficulty, each assigned one of eight opposing generals with their own competencies and strategic styles. In all missions, the goal isn't necessarily to destroy the enemy, but to capture flags at fortified locations, while preventing them from taking the flags that belong to you.
The first mission, "The Race for the Flags," turned out in retrospect to be a gimmicky one, and might not have been the best choice to place first in the list. Your opponent is Genghis Khan, noted for skill in navigating difficult terrain and exploiting weak defense points, and to win you must beat his horde to the fort at the north end of the map.
K = knights, A = archers, B = barbarians, M = mixed unit
There's no time to waste here, as Khan's horde has a head start. His barbarian unit in the middle-front has full stamina and takes point, marching to the fort by way of the west bridge, unopposed by anything but the terrain, while the rest slow your pursuit down.
This mission seemed impossible at first and I endured several humiliating failures before determining a strategy that had any hope of success. Barbarians are the fastest unit. I have none and must fight my way north, further slowing my units down and draining their stamina already depleted from marching. How could I ever catch up? Trying to outrun Khan's barbarians seemed useless; even if I got around the enemy without fighting, I'd be exhausted from crossing the forest and only able to crawl across the bridge, and by then, Khan's barbarians would be nearly finished crossing the mountains. Intercepting them seemed the only way, but how?
I did win eventually. Narrowly, mind you, and I don't think I could reliably win this mission. But it is indeed possible. You only need one man to reach the fort, and then you win, even if he is the lone survivor.
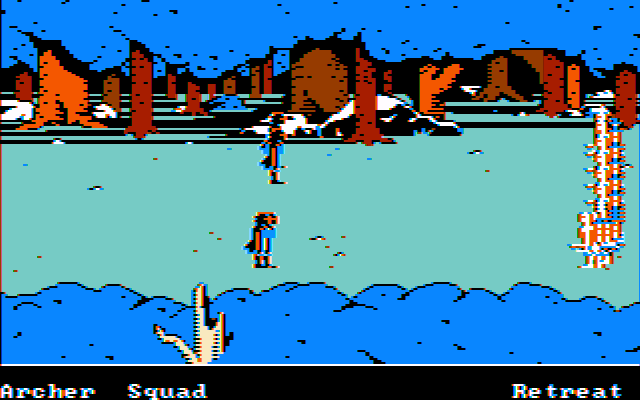
The strategy here is to detach one man from the west archer unit and then push hard through the western passage, fighting north through Khan's units which are more numerous here but weaker. You must keep them away from your commando, who follows the strike force closely without himself engaging or risking capture. Crucially, you must enter the forest to lure the barbarians with an easy kill while your quarterback sneaks through the woods and onto the bridge ahead of the horde. You've got to act fast and efficiently for this to have a chance of working. The "fast march" order is absolutely required here, even though it eats stamina like nothing else.
Khan takes the bait
The three units seen here, archers, knights, and barbarians, have a rock-paper-scissors mechanic, but it isn't a hard rule. Numbers, stamina, and tactics play a role.
Knights will effortlessly chop through ranks of unarmored barbarians.
Well-rested archers will pick off clusters of knights, though the tables will turn considerably if/when any of the knights close in. Tired archers don't do so well, and poorly positioned ones may hit their own.
Agile barbarians will suffer a few losses closing in against archers, but not as many as knights, and then it's clobbering time.
In theory, barbarians (Khan's most plentiful unit) beat archers (my most plentiful unit), but I've found archers to be adequate harassers. Pick a few off, retreat just before they get in range, and repeat indefinitely. This depletes their stamina fast, and quickly makes them ineffective, but even an exhausted archer squad can get a lucky kill or two.
This strategy, combined with dogged persistence and Khan's equally stubborn refusal to not pursue a weakened target, let me clear a path to the forest, and subsequently to keep Khan's hordes off the back of my point man. Still, it was a close call, and took multiple tries.
Once he crosses the bridge, everyone else has the job
of delaying Khan's pursuit for as long as possible, and even then you are far from
assured victory. The horde is more numerous, the barbarians are faster,
and your archer is certain to become exhausted and slow down as he
reaches the mountains.
Desperate units guard the bridge as the commando goes over the mountains.
But they can only hold out for so long.
Tired barbarians chase my tired commando, but this time, victory is in reach.
Don't hold your sword like that!
Some observations on the interface:
There's no convenient way to assess units' strength; you must move the cursor over them one at a time and issue a command to view the ranks.
A separate command shows stamina, supply levels, and marching speed/direction, though stamina can also be reckoned from the unit's posture.
A "view" option displays a minimap, but I found it absolutely useless and unreadable.
Time rate is adjustable, and you definitely want it on "slow" while planning and issuing orders. I wish you could select a specific speed with a keyboard command rather than having to cycle through a set of four. Better yet, an "issue orders while paused" option would have been welcome.
Formations are chosen on the strategic map and can't be changed mid-combat. There is only one logical formation for archer units; placing them all as far back as possible. This is not always their default formation, so change this ASAP.
Pathfinding is nonexistent. Instead, when issuing march orders, units will follow your cursor's movement path exactly. Be sure move your cursor from the unit to its destination efficiently, and along a sensible path.
Judging where difficult terrain begins and ends can be tricky, and it's easy to march units too close to the edge and unintentionally slow them down.
Lastly, the game periodically lags, even with my CPU settings which probably run a bit faster than what was realistic at the time. The more stuff is going on, the more it lags, and the program drops inputs when this happens. This can be quite irritating.
Shortly before completing this mission, I had an exchange with Wargaming Scribe, a long time fan of the game, who advised me that the missions Race for the Flags and Contest of the Gods are gimmicky, unfair, unrepresentative of War's overall gameplay, and that I'd be better off skipping them. So of course I did the opposite thing and did Contest of the Gods to get it out of the way.
Surprise! This one's actually quite easy.
More to come. I feel like this game is going to last awhile.