Ok, one more post about The Ancient Art of War. I had mentioned before the scenario editor as a novel feature, and while War would have been a good game and a complete package without it, its inclusion tremendously increases its value as a product. Nowadays, getting lots of value from a product isn't such a big deal - in fact, I find the idea of playing new War scenarios in perpetuity disagreeable. But being limited to what was available in 1984, the ability to craft your own levels, with access to nearly every building block used in the base game, this was certainly a big deal, and it would be remiss of me not to explore it at least a little.
Scribe and I did some scenario exchange, and you can download them here:
To play, you'll need DOSBox-X (vanilla DOSBox will not load the data disk properly). You may need to edit the included file "dosbox-warcga.bat" to point to your dosbox-x.exe location, but after that you should be able to just run said file, play the game, and load the new scenarios from the ingame menu.
Our scenarios are:
Stirling Bridge - A Braveheart-inspired slaughtermap made by myself. It's mindless and honestly not very good, but it's my first real effort. Commanding the infantry trapped between the River Forth and several companies of Scottish spearmen, can you bring in enough cavalry reinforcements before they gain control of the bridge - or withdraw enough to defend the west encampment?
The Spanish Ulcer - Napoleon invades the Iberian peninsula, made by Scribe. Above average in difficulty compared to the official campaigns, and without relying on a huge numbers disadvantage, but victory through flag capture is a challenge.
The Swedish Deluge - Divide and conquer a fractured Poland in Scribe's second scenario, but hurry before their encampments regain their esprit de corps, or the Russian armies mobilize to divide and conquer you.
100 Bandits - My second effort, inspired by Seven Samurai in broad strokes. Defend your village from the bandit raids from the north, or counter-attack on their turf while they're weak and hungry. Scribe did a short AAR for this one.
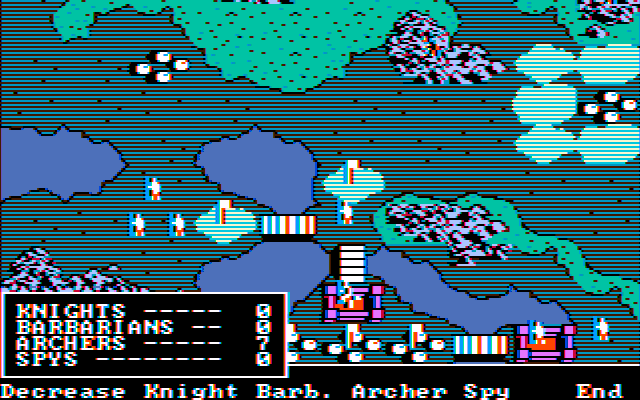
There's not a huge amount to say on the subject of the map editor. It works, and it's pretty elegant - the first step is placing terrain on a grid of 10x20 tiles - every terrain tile used in the main game is available to you here.
The second step is to place flags and units.
Stirling Bridge
100 Bandits
Bandits should be lean. Units' starting formations and marching speed can be customized too.
Finally, after setting default map rules and AI opponent, you write a scenario intro, just like in the official campaigns.
Ok, so this intro is a bit on the nose.
I spent a good amount of time playtesting and tweaking 100 Bandits, mostly for balancing the difficulty. The AI opponent you pick can make a big difference here and not just on a linear difficulty scale; they'll do different things on the same map, and I wish the manual went into some more detail about how they think. Genghis Khan proved my most interesting opponent, and actually did things that surprised me! Stirling Bridge didn't seem to have enough potential to be worth the effort, but I left it in for posterity.
I didn't write AAR's for Scribe's scenarios or my own - this is technically all-new content, and I figured that readers still following this particular DDG series may just as soon play for themselves as read about them, but I did record some a video of successful completion of Scribes' for anyone who would rather watch.
I'm happy to say that The Ancient Art of War finishes strong with a challenging island map that feels more like a puzzle than most.
Your opponent is Genghis Khan, and the rules for this map are:
Forts supply units, but not food.
Farms supply food at medium range.
Fog of war, but with a long line of sight.
Water is for all intents and purposes impassable.
Uniquely to this map, your men begin in bad shape
Khan begins by sending his northernmost unit southward and along multiple bridges to attack my west fort. This is a long march, but Khan's men move quickly without tiring.
My units in the north are the only ones currently in a position to do much, and the fort just to the south is weakly guarded, so I charge it, timing carefully to avoid Khan's warpath, and leaving two men behind to watch the fort and farm.
The opening clashes illustrate a curious mechanic of Ancient Art of War - when units clash, you may command the fight yourself, or allow it to auto-resolve, and occasionally it's better to let it auto-resolve.
For instance, when Khan's mixed unit attacks, your barbarians defending the fort are likely to disappoint should you take command.
But allow auto-resolution, and they'll probably win!
Is it an exploit, or is it simply using the best option that the game provided?
It can help with attacking forts too, and this is at least partly by design. Normally, when a fort is attacked, there are three ways the battle can work:
If both sides have archers, then they trade shots while the knights and barbarians stand by as meat shields. Whichever side runs out of archers first retreats.
If the defender has no archers, then there will be a fight inside the courtyard.
If the defender has archers and the attacker does not, then the defender's archers will take potshots at the attacker until they die or retreat.
But with auto-resolution, some other outcomes are possible:
A hopeless assault (i.e. one without archers) becomes successful because the auto-battle algorithm decided that the attacker won the numbers game.
Retreat is impossible - whichever side loses is eliminated. Should the computer make a futile attack, you might allow auto-resolution and deny them the chance to retreat. Though, this runs the risk of having the first scenario occur to your detriment.
While the fight goes on, a second unit sneaks into the fortress. If the defender wins against the first attacker, they must fight the second inside the courtyard. This tactic is certainly by design - the manual describes it.
I used that last tactic to take the fortress. First I sent the barbarian unit in as a sacrificial pawn, followed immediately by everyone else. This is best done with the game speed set to maximum - movement speed is affected by it, but combat resolution speed isn't!
Following these battles, the map is a bit more open.
None of my units are in any condition to fight, but the second row of islands from the top is nice and wide open, leading a path to a farm and a flag! There is a fort of knights there, but it isn't in my way.
The southeast farm, though its flag has been changed to the enemy's, is now unguarded, giving my nearby units a chance to march in and get some much needed food and rest.
I issue a bunch of orders:
Two knights from the northern group split off and hobble over to the farm and flag to the west.
The rest of the knights go across the bridges to the south to join barbarians in the fort.
Archers in the north also cross the bridges to the west and stand guard near the fortified enemy knights.
One barbarian in the fort splits off and takes the farm to the east, depriving the nearby fortress of food.
The southern units go south to the farm.
And then I wait. The knights take a long time to reach their destinations. The southern units take a long time to rest. The enemy knights in the fortress take a long time to starve. Khan, thankfully, isn't overly aggressive for the next several minutes, but he has five unit-generating forts, and I only have three.
Eventually, my knights reach their destinations, and my units are well-rested.
The southernmost fort blocks the way to three of the flags I need, but my nearby units are in a great position to defeat it using the old sacrificial barbarians trick.
And then I realized something. I can win!
My surviving unit, consisting of 6 archers and 8 knights, splits up to get the remaining flags. The knights head west to the lone flag. A solitary archer heads north to get another two, And the rest of the archers head back east toward the fort guarding the last flag.
This plan is somewhat hampered by the sudden reveal of a task force guarding the west flag.
I retreat back to the southern fortress after capturing the two center flags, and then my northern fortress, which I cannot afford to lose, is attacked! Thankfully, it holds, though had Khan brought more archers - and he certainly has them to spare - it might not have.
I finally send my archers to attack his northmost fortress, totally starved by now, but at this point it's more retaliatory than anything that would yield strategic gain. Sun Tzu would not approve of the wanton slaughter.
Meanwhile, the penultimate flag defense force's condition has deteriorated, and my knights, rested and reinforced, do some serious damage.
My own archers finish them off and take the flag.
One last flag remains, in the east, guarded by two forts.
Both forts are well defended and supplied from the farm that they guard. Defeating either would require overwhelming force, and I have some reinforcements coming just in case they're needed, but sneaking past only requires coordination and timing. My archers, trapped on an island for the entire mission, though exhausted, starved, and useless for battle, are useful for one last distraction.
GAB rating: Good.
This is a tricky one to rate. War is a forward-thinking game, well anticipating much of the RTS formula to come, and yet also avoids being made completely obsolete by improvements to the formula - a fate that very much befell genre codifiers Dune II and Warcraft, in my opinion. Wargame-like aspects such as energy management and supply lines, which don't feature prominently in other such games, make War distinct, as does the potential for victory through deceit and cleverness rather than superior force.
At its best, I had as much fun with it as I with did any other game this year. But as wargame blogger Scribe observed, you have to chew through a lot of pumpernickel to get to the pastrami. Strategy games, more so than other kinds, are prone to becoming technically dated, and this is certainly one of them. The interface is a constant struggle, forcing you to use inadequate tools for navigating troops through the boundaries of difficult terrain and clumsy hotkeys to survey units' stats under the pressure of realtime gameplay. Mechanics can be wonky, straddling the line between unintuitive and broken. AI can be erratic, whether it's Sun Tzu abandoning a strong defensive position for no reason or seeing your archers do the shuffle dance shoulder-to-shoulder as an enemy unit half their size closes in and sticks them with the pointy end. Far too many of the maps are one-note gimmicks, though even the gimmick maps implicitly teach valuable lessons to use on the good ones. And I'm still not really sure how supply lines work.
But I've said before that I can tolerate a lot of flaws in a game that offers me something interesting in exchange, and War definitely does. I haven't even touched on the scenario customization aspect, allowing you to fight any opponent on any scenario with any combination of rules that the engine allows, nor on the scenario creation program, a feature commonplace in the mid-90's but rare indeed in the 80's, which could provide limitless gameplay potential.
In the end, I enjoyed and recommend The Ancient Art of War, and consider it a standout title. It's certainly more accessible than any wargame I've covered yet, but not quite elegant enough nor deep enough to merit a harpoon.
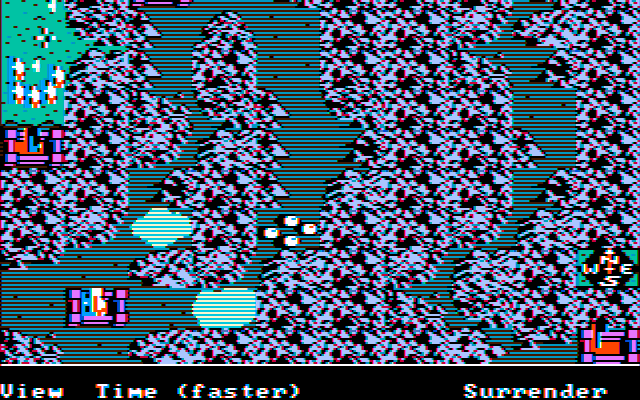
Santa Catalina, this map is a nightmare. Everywhere you go, mountains impede your progress, and your opponent Geronimo is barely slowed down by them. The paths through them are winding, long, and narrow, so narrow that it's difficult to judge whether a unit passing through is considered by the engine's edge-detection algorithm to be "in" the mountains or not, which brings your already low mobility to a near halt and puts you at a fighting disadvantage on top of draining stamina even faster. No matter what, movement is going to be horrifically slow. And meanwhile, Geronimo's units simply go as they please, directly, and being no worse for the wear. Without spies, you can't see them until they're very close, and your spies, hopelessly lost in the mountains and surrounded by hostile braves, aren't long for this world.
The goal is to capture all of the forts, which in this map are self-sufficient. No starving the enemy out - only brute force works, and the map is designed to ensure that mobilizing the sort of power that you need takes forever. Before you can worry about that, though, you've got some immediate problems to deal with.
From the start, Geronimo controls five of the seven unit-producing
forts, and captures a sixth - the one in the southeast corner - almost immediately. You must grab the closest
fort - for expediency's sake I will refer to it as Fort Bowie - right away, or you lose. And even if you act without hesitation,
you might still lose.
Looks like you can just walk in and take it, right? But your archer unit is embedded a few pixels into the
mountains and will take a good two minutes to move away from it on a
fast march. That's nearly enough time for the enemy unit nearby to head
off northwest, burn your spy at the stake, and then go northeast and
take the other fort. If he skips the first step, you lose.
I do this, and meanwhile, move my nearby knights north, and my barbarians in the west toward two of the forts there. Geronimo quickly captures the spies and the forts in the two east corners.
My barbarians take two of the forts in the west. One is completely undefended, the other lightly so. I take it by splitting the unit in two and having one unit engage the defenders on the wall, and the other sneak inside while they fight. It is vitally important that you allow the first unit's encounter to auto-resolve, which feels like an exploit, but the manual actually explains how to do this.
Geronimo then sets his sights on Fort Bowie, and attacks with the two archer units in the region.
It holds, but barely. The onslaught will continue from the south, and I have little to defend with except for two knight units, which are of little use against archers, and no use at all for fort defense except as arrow fodder.
How can I survive? By abusing trash stacks. I split up the knights into as many smaller units as the engine allows, and engage Geronimo's braves outside the fort, wearing him down with trash mob after trash mob, while each subsequent one of my own fights at full efficiency. While this goes on, I have a lone archer sneak around back to take the northeast fort.
This goes pretty badly at first.
But each sortie wears them out a little more, until they're so tired that their archers' shots bounce off my armor and their barbarians fall down if I breathe on them.
This costs me my entire guard of knights, but they served their purpose. Geronimo's raiders are so utterly depleted by the time they reach Fort Bowie that a lone archer on the battlements can handle what's left of them.
The difficult part is over. The tedious part, taking the rest of the forts, begins, and I will spare you the exhaustive detail on what transpires between here and the end.
Geronimo continues to periodically attack my forts in the northeast, but without anywhere near the sort of ferocity as before. There is plenty of time between attacks for my forts there to train new archers, and the long march Geronimo's men must take to reach them is tiring even for them. And all the meanwhile, my forts in the west are also training men.
I decide to concentrate on the western fort in the forest. In retrospect, taking the northwest fort first may have been wiser, but I was at least correct not to focus on the southeast one - getting there would have meant sending troops on a very long path through unavoidable mountain terrain, where they would have met Geronimo's own and had to fight at both a stamina disadvantage and a terrain disadvantage.
For the next 30+ minutes, I micromanage the forts to optimize the training, and march full units as they're available up through the pass and into the forest, positioning them close to the fort there. Forest is nearly as slow as the mountains, but at least it's safer - units deep in the mountains have a tendency to vanish.
Geronimo continues to attack, often making dumb moves like sending a full unit without any archers to attack my fort's exterior.
Eventually, I have five full, well-rested units stationed outside Geronimo's western fort, and over a hundred more men at the various forts.
I send them all in. Two are held up at the walls, and are essentially lost, but the other three make it into the courtyard.
Even though I failed, Geronimo sees the writing on the wall and surrenders, accepting a fate worse than death - exile to Florida.
I've tweaked my DOSBox CGA emulation settings before playing this map, and now the colors look more vibrant to my eyes. Is this an improvement, or is it just more garish now? Let me know!
Boju was the site of a decisive battle between the ancient kingdoms of Wu and Chu. Legend, though not historical record, has it that Sun Tzu himself led Wu's pitiably small army to victory, diminishing Chu's power and bringing Wu's to its peak.
In Wu -vs- Ch'u, a fanciful interpretation of this event, you, a young Chu general, face rather significant strength disadvantage against Wu. Their army has 91 men, yours 67, but more importantly, they have twice as many archers as you, made all the more important here by the prevalence of forts, and half of your army consists of arrow fodder knights. On top of that, they control three unit-producing forts, you only get two.
Thankfully, this map has no fog of war, so he can't easily pull off that opposite trick where he looks strong where he's weak and weak where he's strong (corollary - always attack a Sun Tzu-quoting war bro when he looks strong).
My first goal, I figured, would be to besiege the fort closest to the
west edge of the map, positioning troops on the hill to cut off its vulnerable supply line.
The main
difficulty is the long march, but once
reached and secured from the hill, the only way the fort can take it
back is by fighting a literal uphill battle, or to cut through the woods
to the village while mine need only march downhill to meet them.
First things, though - gotta make sure that the forts will actually provide you with reinforcements. They will do this as long as you have at least one unit in them with fewer than 14 men. At the start, both of your forts have full strength units, so I immediately split them up and leave two one-man units in each - this helps reduces the amount of micromanagement needed to ensure the reinforcements never stop.
The southeast fort dumps its excess troops nearby so they can react to Wu's motions quickly, retreating back into the fort if need be. The northeast fort sends its excess troops westward toward the objective. The units by the mountains head north, to capture one farm I can easily reach, and to support the northeast fort, and I also have one man up north detach and go for the other nearby farm.
Meanwhile, most of Wu's units are holding fast, except for two. The unit by the middle bridge heads southward to reinforce the southwest fort, and the unit by the northwest bridge heads toward the farm on the other side.
I withdraw to the hill. He stupidly follows.
One enemy unit eliminated, I can march unimpeded to my goal.
As I do this, Sun attacks my north position with some surplus soldiers from the fort, eliminating one of my units.
And, unluckily for him, he doesn't stop, sending a unit down from the relative safety of the hill they guard, to attack my unit on the relative safety of the hill I guard.
Now Wu is at a serious strategic weakness.
Look at all those exposed farms! Apart from the one in the far south, I can just march in and take them all, and then wait as two of his three forts are forced to make a move or starve to death.
The difficulty here is that marching such a long distance is tiring, but there's no way around that. Better to pressure the forts with tired, vulnerable troops than to not pressure them at all.
Then, while micromanaging my reinforcements from the forts, I notice Sun Tzu has done something surprising.
He's abandoning yet another farm, sending its sentry back up north to support the middle fortress! I know that the art of war is to surprise the enemy, but surprising him with free lunch might be missing the bigger picture.
And I cross the bridge and take the farm, giving the entire map's food supply to me.
Meanwhile, the enemy unit goes north to threaten my position on the midwest farm.
But this isn't much of a threat. I withdraw to the hill and it follows, where I rout it and easily retake the farm.
A few minutes later, as I wait for the forts to starve, Sun Tzu surprises me yet again.
The south fort is completely abandoned! So I move in to take it.
Our forces clash a few more times at the farms, but he simply can't hold onto them. My forts keep training more men, and before long my forces aren't just better fed than his, but also well outnumber his.