

Scenario 2 follows the Rebelstar victory on the moonbase, as Joe Capricorn #2 and Captain Krenon, assumed (despite the reality) to survive the first scenario, attempt to escape on the Starlingale.
Main-Comp attacks while half of the Starlingale's security team is on an away mission.
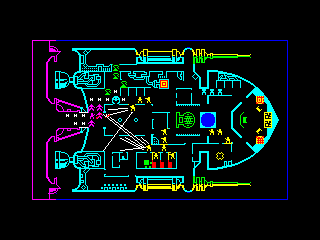
I will once again command Rebelstar, who takes the defender role this time, and Scribe plays Main-Comp, who must disable the Starlingale in twelve turns. I deploy first, in the magenta area, but Scribe will have the first move.
My units are mostly familiar, minus the incredibly useful grenadiers:
- Two defenseless navigation computers, placed at the bridge. Main-Comp's target.

- Three pilots with laser pistols, at the bridge

- Three slow-moving robots with laser rifles at the north flank of the bridge

- Two commanders with their rapid-fire photon guns

- Three laser gunmen, survivors of the moonbase raid

- Eight laser riflemen

We know from the last mission that laser pistols are better than laser guns, and photon guns are even better. Speed is more useful to a defender than accuracy, and a quick unit can jump out of cover, squeeze off multiple unaimed shots, and jump back into cover. A lasgunner, on the other hand, takes far longer to aim and fire a single shot, and is liable to run out of movement points doing this, forcing him to end his turn in whichever spot he fired from.
But my main rifleman security detail are even worse than lasgunners. They're just as slow to shoot, and although they fire more accurately, damage is poor - worse than laser pistols - which is doubly bad against Main-Comp's armored robots which negate a fixed amount of damage from every shot. Range is not great either, with a linear damage reduction applied over a distance until it drops down to nothing (or too little to penetrate armor). So, they don't miss often, but hitting and doing zero damage isn't any better than a miss.
Main-Comp attacks with an exotic array of killbots.
- Four Zorobtrons, slow but powerful robots with gas grenades

- 13 Flybots, fast, weak robots with fast, weak "zeeker" guns

- Four Slaverbots with powerful laser whips

- One mining bot

- Two human guards with laser pistols

The last scenario taught me the power of grenades, and this time I'm up against them. Gas grenades don't demolish walls, but can bypass them, killing whoever takes cover behind it. "Zeekers" could be trouble - the Flybots are fast and expendable, letting them swarm and suppress key targets, and their weapons' weakness is made up for by speed and accuracy; five weak shots is at least as good as one strong shot. Laser whips are something altogether new - shorter range than pistols, but longer than melee, and the Slaverbots wielding them are faster than Zorbotrons and mining bots, though a bit slower than humans.
Main-Comp will get the first move, and will almost certainly inflict massive casualties if I place my men too close to the aft. Anything I put in the central magenta area is likely to die right away. The two commanders are especially prime targets; the only units that can really take advantage of cover apart from the pilots who are all the way up in the bridge.
But I'm also outgunned and outnumbered, and if I spread my defenders too far apart, Main-Comp can just ignore half of them as they push through the other half while using flybots to swarm isolated units. I've got to slow them down until my reinforcements arrive, or I lose.
I deploy the majority in cover, with two riflemen covering the gantry, away from the walls.

Main-Comp deploys.

As before, I have a reconstructed video of the entire battle.
Turn 1
They advance, killing both riflemen in the center, but the narrow corridor slows their entry.

My men do their best to return fire from cover, but only manage to kill one guard and hit a few Flybots. The rear guard advances from their post, and I can only hope Main-Comp fails to sneak a Flybot past them.

Turn 2
Main-Comp continues its advance, suppressing my northern flank with Flybots. Slavers move past, entering a northern passage. The Zorbos and surviving guard advance toward the north flank and fire at my riflemen reserve, killing two.

Joe Capricorn and his first mate Darwin Jones are pinned down.
I send one riflemen up north to swat a fly, Darwin, who moves south and kills the Flybot blocking Capricorn.

Capricorn, free, moves south to shoot at the intruders, joined by Krenon from the south, but all that their combined firepower can take out is one Flybot and one Zorbotron.
Two riflemen step out of cover, and shoot at the guard, wounding him.

The pilots and robots move closer to the action, and I detach one man from the south flank.

Turn 3
Major losses as flybots swarm and kill Joe Capricorn and a rifleman, trapping Darwin Jones, while the guard and Zorbotrons destroy Krenon and the two exposed riflemen.

Darwin Jones desperately kills two Flybots.

My plotbots move to intercept the slavers, and I detach another gunman from the south flank. The pilots, now joining the sole survivor of the original rifle team, fire from cover, but only manage to kill another two Flybots.

Turn 4
The Flybots, escorted by Slavers, mobilize en masse toward the bridge, killing Darwin Jones along the way, while the Zorbotrons continue shooting gas bombs from cover, killing another rifleman.

Situation: Not good! Two Flybots are heading unimpeded toward the bridge, my best men are dead, and my second best men are being pummeled by artillery while kinkybots close in for the kill.


Eight more riflemen arrive. Super.
I hurry to intercept and shoot at the flies, but only manage to take out one of them, and one Slaver.

The riflemen advance to engage the Zorbotrons, but only succeed flaking off some of their paint and killing the human guard.

Turn 5
It's a nightmare for the Starlingale, as Slaverbots move in and kill two of the pilots while Flybots continue onward to the bridge. Zorbos pound the absolute crap out of the rifle reinforcements, and even one of the Flybots scores a double Zeeker kill.

No time to grieve - I do my best to chase and kill the Flybots with what I've got left, but am only half successful. Amazingly, three riflemen with unerring aim utterly fail to kill even one of them.

Turn 6
The Flybot enters the bridge, destroys one of the navigation computers, and comes to rest on the right arm of the captain's chair. The rest of the robots continue to advance and/or flagellate my crew - the final pilot is crushed by a miner, a plodbot is flanked and flogged by two Slavers, and the three remaining riflemen are zeeked and gassed, killing two of them.

I send my nearby gunman into the bridge to shoot the Flybot, but only manage to singe the chair it sits on. Meanwhile, my plodbots double-team and fail to kill a slaver, and the last rifleman shoots and finally kills that damned fly.

Turn 7
The Flybot in the bridge finishes off the other navigation computer, and the robot rampage continues against the few survivors.

Once again, the attackers have a major advantage here, maybe even more so than on Moonbase. Riflemen suck, their underpowered laser rifles barely able to hurt Main-Comp's softest robots, and laser gunmen less able to take advantage of cover than the moonbase's guards were. Only the two commanders have half-decent firepower, and Main-Comp has many options for flushing them out.

We tried this scenario a second time, swapping sides, and Scribe employed a stalling strategy of blocking off the bridge with two Plodbots, stationed in the narrow doorwars. This made it all but impossible for Flybots to sneak into bridge without some support from slow-moving artillery, but nevertheless, Main-Comp wins again, this time with an even bigger victory point margin. By turn 2, I had wiped out half of Starlingale's crew, mostly with Flybots, while the big boys followed as closely behind as their actuators allowed, and by turn 8, I breached the bridge and took out the nav computers, leaving no survivors but for a single pilot and an away-team rifleman.
Back in our main reality/timeline, the Starlingale and her crew is lost, but their primary mission on the moonbase was still achieved, and Joe Capricorn's final clone lives. One mission left - the final assault on Main-Comp's master control unit.


No comments:
Post a Comment
Commenting with signin or name/URL is encouraged but not required. If the spam filter deletes your legitimate comment, apologies - it does that sometimes.