
With some grasp on how things work in this game, and a better, if not quite complete map of the land of Midnight, I played out a complete, and successful game.
Phase 1 would be to recruit as much manpower as quickly as possible, with priority given to the known lords, for the more lords are recruited, the more efficiently they can spread out and recruit men to their armies. Meanwhile, I'd have Morkin try to sneak around and try to grab the ice crown.
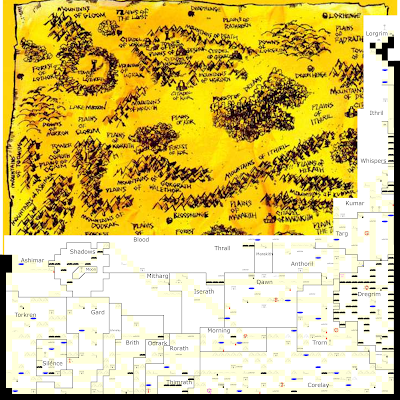
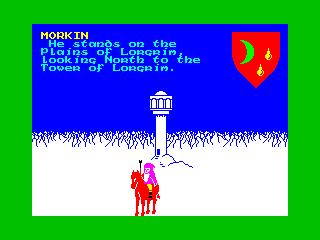
Luxor, Morkin, Corleth, and Rorthron all start at the Tower of the Moon, hidden deep within the Forest of Shadows.
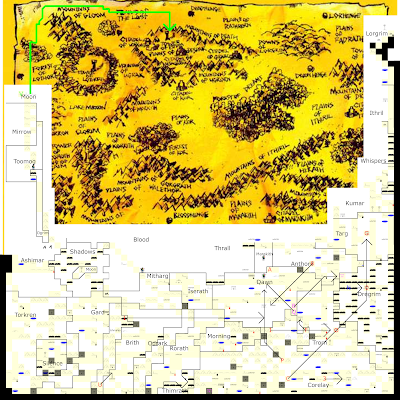
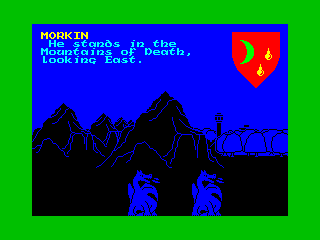
I figured Morkin's best way of evading Doomdark's armies was to cross the mountains of Ashimar all the way north by northwest, hug the western edge of the map and ride north, then east across the Mountains of Gloom, cross the Plains of the Lost, and then slip through the Mountains of Death from the North into the Tower of Doom's backdoor, and perhaps then he could ride all the way to Lorgrim's domain to dispose of it.
Meanwhile, I'd have everyone else focus on recruitment in the charted lands to the south. The rules on who can recruit who are a little unclear, but from what I could tell, work something like this:
- The Free (e.g. Luxor) may only recruit the Free.
- The Fey (e.g. Corleth) may recruit the Fey. Thimrath, deep in the south of the map, had been the only other Fey lord I encountered so far.
- The Wise (e.g. Rorthron) may recruit any lord, but may not recruit armies.
- Morkin may not recruit lords nor armies.
Corleth's priority would obviously be to find Thimrath first, represented by the purple Q. Unfortunately, in my mapping efforts, I had been neglectful in identifying keeps of Fey and Free, and would have trouble raising armies for them. But they would be useful in exploring the uncharted lands in Mitharg, Iserath, and Dawn, being fleeter of foot than their man counterparts.
Luxor, I figured, could recruit Lord Thimrath, represented by the I, and Rorthron to Dawn, represented by the 8. From there, they could branch out and recruit the rest of the lords, hitting keeps and citadels along the way.

On day 2, Corleth came across Lord Brith, who I had seen before and been unable to recruit in the past game, but this time was perfectly able to. To be fair, in the last game his keep was under a brutal siege. I sent him southeast while Luxor continued his path southwest.
On day 4, Morkin, up north and approaching the Mountains of Toomog, found a nasty surprise.
 |
| The manual said these guys couldn't cross the mountains! |
'Hide' is not an option for Morkin, the one lord who really needs it, while 'To Battle!' is, even though he can never recruit an army. Instead I ducked into the adjacent mountain range and prayed they wouldn't follow.
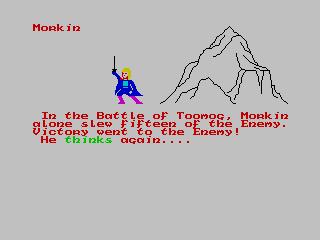
It didn't work. Fifteen kills isn't bad, but 985 remained, and to make things worse, Morkin got pushed farther into the mountains, right up against some ice trolls, which I fought and then fled due north, away from the army.
Some observations I made over the next few days as I continued to carry out my plan:
- Lord Gard, found at his citadel to the southeast, could not recruit men at a keep to the north in his domain. I assume that this is because his army, consisting of 1,200 warriors and 1,000 riders, was full. I sent him exploring east.
-
While exploring east, a lith dispensed comically useless advice.
Ya don't say. - After recruiting Lord Dawn, I sent him on a long journey to the domain of Targ, but recruiting Lord Utarg there wasn't an option for some reason. Nor could Lord Athoril, who I found and recruited nearby.

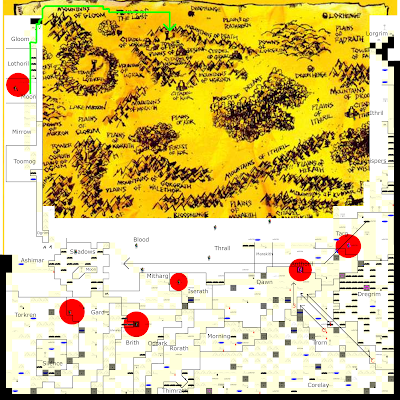
By day nine, Doomdark's forces began to break through, and an army of 1,180 riders were spotted at Dawn, with more certainly on the way.
The situational map:
My plans:
- C - Luxor, with 900 exhausted warriors, journeys northeast through Corelay in an attempt to reach and recruit Utarg before Doomdark does.
- V - Morkin, travels north through the Domain of Moon in an attempt to slip through Doomdark's armies.
- B - Corleth the Fey, with 200 exhausted warriors, journeys northwest toward Dregrim to recruit more of his kind.
- N - Rorthron the Wise enters Dregrim to recruit Lord Dregrim at his citadel.
- 1 - Gard, with 1,200 warriors and 1,000 riders, tired, heads east toward Dawn to fight.
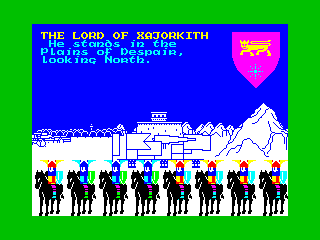
- 3 - Xajorkith, with 200 warriors and 800 riders, fresh, heads east through Corelay to recruit more.
- 8 - Dawn, with 900 warriors and 500 riders, slightly tired, recruits more in his domain.
- Q - Thimrath the Fey, with 400 warriors and 600 riders, slightly tired, heads northwest through Dawn to fight.
- U - Brith, with 700 warriors and 600 riders, quite tired, recruits more in his domain.
- I - Rorath, with 400 warriors and 800 riders, quite tired, heads east into Trorn to recruit Lord Trorn.
- P - Morning, with 1,200 warriors and 300 riders, fresh, heads northwest into Dawn to fight.
- A - Athoril, with 300 warriors and 800 riders, fresh, fights Doomdark's army at the keep of Dawn while waiting for reinforcements.
- F - Mitharg, with 1,200 warriors and 500 riders, quite tired, heads northwest toward Dawn to fight.
The results of the night:
- Armies caught up with Morkin, driving him to a location called "Moonhenge" where he could recruit Fawkrin! Morkin, however, was "utterly exhausted" and unable to go anywhere. I had Fawkrin suicidally engage the army to try to buy Morkin some time.
- At Dawn, Lord Athorils army slew 800 enemies and lost 485 men, leaving him with 615 riders to face Doomdark's 1,470.
- An unseen battle raged on the Plains of Blood.
In the day:
- Rorthron recruited Dregrim, and I decided to sent Rorthron up north to try to recruit Utarg while Luxor instead sought reinforcements throughout Corelay. Dregrim, already able to recruit a full army's worth of warriors, headed back west toward dawn.
- Xajorkith was unable to recruit men in Corelay and then I realized I misread his strength; he had 1,200 warriors, not 200. It's an easy mistake to make, given that the game insists on being cute and spelling out numbers in word form. I redirected him toward Dawn and let Luxor press onward to recruit throughout Corelay instead.
- The rest of the lords continued with their plans, and those with tired soldiers stopped for a drink at lakes on the way to bring their stamina back up to "utterly invigorated." Sadly, each lake is only good for one drink.
Morkin and Fawkrin remained pinned down by Doomdark's armies, somehow both still surviving, and multiple unseen battles unfolded not just in the Plains of Blood, but in the domains of Shimeril, Shadows, Thrall, and Ithril.
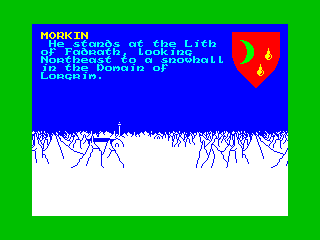
Over the next two days, by some miracle, Doomdark's armies in the northwest, numbering at almost 3,000 riders, turned their attention toward Fawkrin, leaving Morkin free to continue his path north, where he found some much-needed Waters of Life among a row of mysterious liths, and a Cup of Dreams in a snowhall to the north of it. Fawkrin survived this, somehow, killing five of their numbers before retreating. His job would now be to slow them down as long as possible while Morkin rode onward. Athoril was able to hold on to his post at Dawn until backup arrived, and drove his besiegers out, but this was no time to celebrate, as Doomdark's armies continued to advance on other regions, mostly unopposed. Rorthron made it to Utarg's citadel and recruited him, even as a nearby keep fell to Doomdark's hordes.
Athoril and his allies pushed east against approaching armies, while Luxor continued toward the farthest reaches of Corelay for recruits.
By day 13, I had visited most of the keeps in the southern domains and taken all the men I could, and was actively engaging Doomdark's troops on the front lines.
- Luxor (C), Xajorkith (3), Torn (O), headed northwest toward Dawn, the epicenter of the action.
- Morkin (V) had reached the Mountains of Gloom unopposed and began heading east toward his destination. Fawkrin (H) bitterly fought against 2,950 of Doomdark's riders in the Domain of Moon.
- Rorhtron (N) headed southwest to scout the border.
- In Targ,
- Doomdark commanded 905 riders.
- Corleth commanded 200 warriors and 200 riders, fresh.
- Utarg commanded 1,200 riders.
- In northeast Dawn,
- Doomdark held a keep with 40 warriors and 70 riders.
- Lord Dawn commanded 1,160 warriors and 485 riders, but were nearly exhausted.
- Dregrim commanded 975 warriors and 210 riders, tired.
- Thimrath the Fey commanded 360 warriors and 585 riders, very tired.
- Morning commanded 1,200 warriors and 300 riders, fresh.
- Athoril commanded 230 warriors and 345 riders, tired.
- Mitharg commanded 1,185 warriors and 495 riders, tired.
- In Iserath,
- Doomdark assaulted a citadel with 1,390 riders.
- Gard commanded 1,065 warriors and 930 riders, fresh, but his courage was faltering.
- Shimeril, not yet recruited, commanded 420 warriors and 410 riders, invigorated.
- In Gard,
- Doomdark's occupied a citadel with 540 warriors and 20 riders.
- Brith commanded 870 warriors and 580 riders, invigorated. But Brith himself was reduced to a blubbering coward by Doomdark's ice-fear magic, and unable to attack, only camp outside.
Results - total victory in Targ and Dawn. Iserath held through the night, but reinforcements of nearly 4,000 warriors approached. Gard and Brith looked to be total losses, with the meager forces there failing and Doomdark's reinforcements incoming.
At this point, I didn't fancy my odds of a defensive strategy. Perhaps I could whittle down Doomdark's forces by annihilating his armies wherever I could outnumber them, as I had in Targ and Dawn, and retreating wherever I could not, but I had no idea how many troops he had in total, I was running out of places to reinforce and refresh my tiring armies, and the ice-fear wasn't getting any weaker.
So, I had everyone but Morkin, Rorthron, and Fawkrin press on through the Forest of Thrall, over the Mountains of Ithrill, and toward Ushgarak, with Doomdark's armies nipping at their heels every step of the way. Nearly every keep they passed was overtaken, and they walked around, but nevertheless still recruited a few more lords along on the way. If Doomdark conquered an undefended Xajorkith, so be it - as long as Luxor and Morkin both live, the game goes on. Morkin, meanwhile, continued his quest in relative peace.
Lord Marakith, found at his citadel in Marakith, was the first to arrive at Doomdark's doorstep across the Plains of Kor, which was littered with benefit-granting Liths, including multiple time-resetting Cups of Dreams. A clue was found here too, that Lake Mirrow could also destroy the Ice Crown. An intimidating force of 4,800 warriors and 2,400 riders guarded the final citadel. Marakith camped outside the citadel and waited for the rest of the lords to catch up.
Morkin, crossing the Plains of the Lost, had one last obstacle to his destination; the Mountains of Death. The Tower of Doom, holding the Ice Crown, was somewhere within. Fawkrin, at last, perished in battle, having taken out 70 of Doomdark's men singlehandedly over the course of many days. Rorthron, too, fell, ambushed by armies while crossing the Plains of Blood in search of recruits.
 |
| Morkin, crossing the Mountains of Death, sees the Tower of Doom in the distance. |
As Morkin slowly made his way through this maze of ice and rock, all of my armies gathered across the Plains of Kor, walking through a mountain range to avoid a costly siege on the Citadel of Kor, and camped outside Ushgarak. All of my armies except Brith's, who got wiped on the Plains of Blood as Lord Brith pissed himself in utter terror, and, alarmingly, of Luxor, who lagged behind his followers in the difficult terrain of Corelay, and found himself under attack by multiple armies and too exhausted to flee or fight back effectively. If he fell, my military plans would be shot, and Morkin would be my last hope.
Morkin grabbed the Ice Crown, unguarded, and rode like the wind due east across the frigid plains toward Lorgrim, aided by a Cup of Dreams found in an igloo. My armies, Luxor excepted, gathered outside Ushgarak.
The army stats - the numbers tally warriors/riders.
- Doomdark: 7,070/7,185
- Corleth: 200/200, tired, very bold
- Gard: 630/710, utterly tired, afraid
- Xajorkith: 1,200/800, slightly tired, afraid
- Dregrim: 790/125, very invigorated, slightly afraid
- Thimrath: 350/560, slightly tired, very bold
- Rorath: 410/840, very invigorated, very afraid
- Athoril: 245/270, exhausted, very afraid
- Mitharg: 1,185/460, very tired, very afraid
- Utarg: 0/1,200, invigorated, slightly afraid
Incapacitated armies:
- Dawn: 1,200/470, tired, utterly afraid
- Trorn: 730/335, quite tired, utterly afraid
- Morning: 1,190/290, slightly tired, utterly afraid
- Herath: 790/485, invigorated, utterly afraid
That's 5,010 warriors and 5,165 riders. Not terrific odds for a mostly tired army attacking a citadel, but with Luxor under attack, I had no time to spare, and went all in on the siege while the lords too scared to attack waited at the rearguard.
The results:
- Doomdark: 6,585/5,720 survivors
- Corleth: 75 kills, 400 deaths. No survivors except Corleth himself.
- Gard: 205 kills, 1,205 deaths. 135 exhausted riders survived.
- Xajorkith: 560 kills, 1,270 deaths. 405/325 survivors, tired.
- Dregrim: 345 kills, 700 deaths. 215 invigorated warriors survived.
- Thimrath: 320 kills, 900 deaths. 10 quite tired riders survived.
- Rorath: 505 kills, 825 deaths. 425 invigorated riders survived.
- Athoril: 70 kills, 515 deaths. No survivors except Athoril himself.
- Mitharg: 350 kills, 1,300 deaths. 345 utterly tired warriors survived.
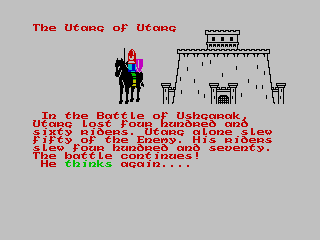
- Utarg: 520 kills, 460 deaths. 740 slightly tired riders survived.
 |
| Utarg alone had a slightly respectable k/d ratio. |
For all that blood, Doomdark still had well over ten thousand defenders, an utter disaster. The situation was clearly hopeless. I'm not sure whether or not Luxor's presence would have tipped the odds enough to win - if his aura had granted all of the armies enough courage to join the fight, then we would have slightly outnumbered them. And perhaps, with that courage and a few days of rest, everyone would have fought more effectively too. But then, I don't really understand how the fight mechanics work either. For instance, does it consider the entire combined fighting force, or does it merely resolve each combat result independently, e.g., resolving the outcome of Corleth vs. Doomdark's entire 14,000-strong garrison before moving on to Gard vs. everyone Corleth didn't kill? And if the latter, then how are you supposed to ever win, given that nobody can have more than 2,400 men?
Morkin continued toward Logrim, and Doomdark finished off the rest of the armies, killing Corleth, Gard, and Xajorkith. On day 24 of the solstice, Morkin completed his quest.
 |
| Morkin spots the Tower of Lorgrim through a crack in the northeast glacier |
 |
| Lord Lorgrim awaits. |
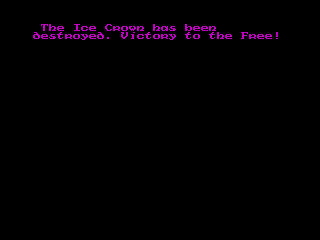 |
| Anticlimax! |
I'll admit that this victory felt a bit lucky, and I have to wonder if my disastrous military campaign made any kind of difference to the outcome. I had utterly failed at protecting Xajorkith. Morkin could have been killed as early as day 4, and I have no idea how improbable it is that he wasn't. Nor do I have any idea if he might have been killed by patrolling armies in the Mountains of Death - I didn't see any, but the region is stupidly close to the Citadel of Ushgarak, where my armies didn't seem to be much of a distraction to Doomdark.
And I have no clue what it takes to earn a military victory. Much of the map remained unexplored, especially up north, and I'm sure there were many more lords and soldiers to recruit, but how does one explore it under the threat of Doomdark's warpath? Would the forces I had assembled with the knowledge gathered from two previous playthroughs had been enough, had I used them more cleverly, or used a different strategy entirely?
GAB rating: Above average. I admire Singleton's vision, if not necessarily his originality in worldbuilding. With a fairly weak computer, even at the time, The Lords of Midnight feels vast in scope, in a way that it wouldn't have had it been presented as a top-down strategy game. He accomplished much, with relatively little to work with. Maybe even more impressively, the game doesn't look half bad despite the system's two-tone limitations.
However, its strength in immersive presentation is also its greatest weakness - this is more of a wargame than an open world adventure, and as a wargame, it's far too difficult to assess the situation by stitching together intelligence from a dozen or so ground-eye perspectives and a crude map. The messages you receive between rounds about the Foul's advances give only the vaguest idea of where Doomdark's armies are, and zero indication of their numbers, and the only way to get a more precise report is if a lord you control happens to be within fighting distance of an enemy and you manually observe and query in every compass direction. As an open world adventure, there's just not enough to do.
And if the game actually expects you to be able to recruit every single lord without telling you exactly where to find them, forcing you to painstakingly search every square of the land while under the pressure of Doomdark's invasion, well, that's insane.
I could also point out the tons of quirks that get in the way of
gameplay, like the difficulty in parsing status reports such as "Corleth
the Fey lost five hundred and sixty five riders and slew one thousand
two hundred and fifteen of the enemy." Or how badly named the "think"
command is when it's so essential for gathering critical details. Or how the game
often does nothing to alert you when a lord runs into trouble, or even dies. Or how the generic message "he thinks again" can mean anything from "you are dead" to "you attempted an illegal move and we're not explaining why."
Ultimately, I respect The Lords of Midnight as a landmark title, and as a significant accomplishment in technology and design, but didn't enjoy playing it very much, and can't unequivocally recommend it.
 |
| Screenshots hosted at Mobygames |
The Lords of Midnight was followed by a sequel, Doomdark's Revenge, later in 1984, and shortly after Singleton's death in 2012, remade as mobile games with an art style that faithfully recreates Singleton's desolate landscapes in HD vectors and adds quality of life improvements such as a dynamic ingame map. A planned third game, Eye of the Moon, was never finished. The remakes are available for free at GOG.
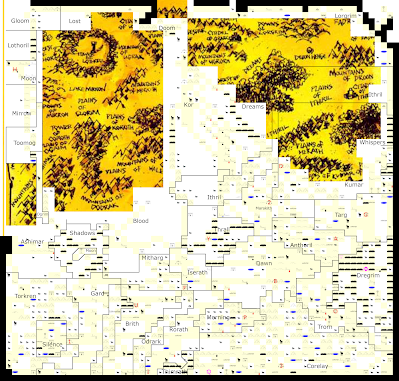
My final map:


Woo hoo! Time for Seastalker.
ReplyDeleteA unique take on "Fog of War"
ReplyDeleteI am preparing to cover this game, and I have read quite a few AARs on LoM, and this one is by far the best one I have read, and that's not a comment I append to all the AARs I read, here or elsewhere :).
ReplyDeleteI believe that's because you played your final [winning] run without knowing all the map (but with some pre-knowledge), so you had enough information to run a plan and then a plan B, but you still kept some "exploration" in your AAR. It also meant that this AAR was not super optimized with Morkin knowing exactly where to go and where to return (to Farflame or Fawkrin), or worse having one of those two characters follow Morkin for an immediate victory next to the Tower of Doom
Instead, that's the only AAR where plan A failed with the death of Lorgrim and where you tried to apply a plan B going to Lorgrim (you never found Farflame, who is super OP as he moves unhindered by terrain as he flied over it). The guide recommands not to go for the Lorgrim strategy, so no AAR of players a bit too prepared ends like this, but well you did not know it was impractical and risky so you did it and succeeded :).
It also shows no savescumming and I like how you played the "military part" not knowing that it would ultimately become irrelevant due to Morkin's victory - a bit like in LOTR really.
So great job there. I won't do as well as I want to win militarily and it is notoriously super very hard so I ll definitely map almost everything before.
By the way, you also missed Lord Blood and his army just 2 tiles from the starting tower of the Moon. I found him in my first "test" run where I was trying to understand the controls. I even assumed his position was randomized as he is just doing nothing in the middle of a forest but no.
Thanks for that! And good luck with your military campaign - victory to the free!
DeleteYeah, I went in basically blind, only knowing what I learned from my first two failures. I don't think I used save states at all, not even so I could close the emulator and resume later, which retrospectively seems insane now that I know Fuse can crash if you plug in or disconnect headphones while it's running. I'm curious to learn more about how battle works, but not curious enough to spend time investigating.
It's interesting to read someone approach the game with fresh eyes, yet seriously.
ReplyDeleteAt the time, I felt that Midnight was a quite accomplished fantasy world, even if greatly indebted to Tolkien. At least the usual orcs and elves were avoided, and the winter scenario was fairly novel. Granted, having a bad guy named "Doomdark" is a little silly!
Generally, you'd collect as many lords as possible, retreat to Xajorkith and handle the brunt of Doomdark's assault there. Placing them elsewhere seems to matter little. After enemy forces stop appearing, you can approach Doomdark's lands and attempt the millitary victory.
The battle of Xajorkith gives the game a useful narrative backbone, but it also kind of forces the player to this track. I'm not sure if it is possible to have the military victory in other ways.