
Big shocker - a 150-turn game of Reach for the Stars is radically different from a 40-turn one. Even though my 150-turn game had a slower start thanks to the task force setup rule, and slower expansion thanks to the solar debris rule, my empire grew exponentially until it ran out of space, and took on the rest of the galaxy through force. At the end of my 40-turn game, I had four planets, three of them taken by conquest. Now, I'm on turn 139 out of 150 and had 50 worlds, 13 of them by conquest. The process of deciding what to build turn by turn is pretty time consuming, but I've only got six of these phases left.
Here, I'm going to show how two turns near the end of the game are conducted, starting with turn 139.
 |
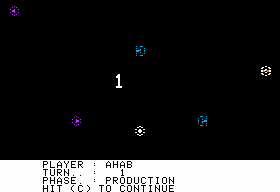
| The state of the galaxy in Turn 139 |
This general map of the galaxy isn't all that useful to be honest,
but it's the closest thing the game has to a one-screen summary of the
game state, except perhaps for the scoreboard. The galaxy wraps around
the borders.
This is what the icons mean:
- A solid white box is a friendly fleet orbiting a star system. There is no visual distinction between fleets at stars I control and fleets at stars I don't control, but almost all of these are ones I do control.
- A white box with a colored star in the middle is a star system
with at least one planet that I control, with no fleets present. The
color of the star indicates star class, but this is a moot point right
now and never meant much to me to begin with.
- A black box with a white border is an enemy fleet. During production phases, the only enemy fleets visible to you are ones orbiting stars with planets that you control, which means that every black box here is an interdicted system, and therefore a problem that needs to be solved.
- A colored star without a box around it is a star system that I cannot observe because I have no fleets there and do not own any of its planets.
- Numbers designate the sectors of the galaxy, 1 through 9. This has no meaningful effect on gameplay, but are useful landmarks when scrolling through the main galaxy view.
Odd-numbered turns such as this one begin with the production phase and follow with a movement phase. I have 3615 RP's in reserve which I can use at any non-interdicted planet or a combination of them in addition to the RP's generated by the planets themselves, which can be as high as 632 at an extremely industrious one. Typical use of these reserves are to rapidly build up a developing planet producing very few RP's on its own so that it can be self-sufficient next turn, or to instantly build a bunch of warships at a convenient planet beyond what it could normally build on its own.
However, before committing any production orders at all, I am already planning my movements, because my movement needs will inform production needs.
Most of my planets are overpopulated, so I won't mention it every single time I build transports.

The right-facing Enterprise icons are my own fleets, and other ship icons
represent enemy fleets - mostly Player Four in this case. The green and pink text is my own annotation -
green for my own systems, pink for the rest, which I assume
are colonized by my opponents and heavily defended by PDB's. One system
here, unlabeled, is the white dwarf Sabik which went nova long ago.
Numbers are the count of M4 warships, which is the only kind of ship I
care about for production planning purposes. A zero means other ship types are present. Enemy fleets are only
visible when fighting your fleets or when they've moved into systems
with planets you control; for all I know, there could be thousands of
warships at Arneb. Megrez has no inhabitable planets, and in retrospect, I should have used another color for these stars, but it's too late now.
There are four problems in this sector that need my attention. Etamin is interdicted by two M4 warships, Nunki by two more, and Nihal by a single M1 warship. The fourth problem is that one of the planets on Etamin is uninhabited, thanks to several turns of heavy bombardment.

Etamin, being interdicted, can't access the global reserve, but as it has 100 factories, it can build four M4 warships locally, which should easily be enough to drive out the two sent here by Player Four. It's also overpopulated, which is something that happens constantly at this point in the game. There's enough RP left over from the warships to build some transports, which I can use to repopulate the other planet.
The other planet here is borderline useless, having been bombarded so much that it can only support six factories. But points are points, and I'll get some just by having people here.
As for the other problems, I can have Nihal build a single M4
warship, plus transports for its overpopulation. Nunki can only build
two, but I'll send another two from Kochab. With a warp speed of 17
hexes per turn, M4 warships can go pretty much anywhere in a sector in a
single turn, as long as there isn't solar debris in the way.

No problems in sector 2, but Altair is undeveloped and vulnerable, having been recently liberated from a bothersome fleet. I immediately max out its industrial capacity and give it the maximum possible investment in social growth and PDB's, which in total costs me 526 of my global pool's 3615 RP.
We can see space dust here, which slows down any ship passing through it.

Here we can see my main conquering fleet, which last turn I had
absentmindedly sent to Gemma, a system with no habitable planets. I'll
sent it up to Thuban instead, which has two.
Regulus is under attack and can only build one warship while
interdicted. So I'll send over Agena's four. In the mean time, Agena and
Schedar both need help being built up, so I let them draw from the
global RP pool, leaving me with 2070.

Sector 4 is where Player Four's main fleet resides, orbiting Almak, blasting the crap out of my colony there. In fact, there are three planets there, one occupied by me, one by Player Three, and one by Player Four.
As much as I'd like to summon a big fleet near Almak, sent it in to decimate Player Four and take the other two planets there for myself, this just isn't possible. I could send part of my own fleet from Gemma, but I'd rather focus on taking Thuban. If I counterattacked with a big enough fleet, Player Four would probably just withdraw and bother me somewhere else. So I'd rather just delay him at Almak for as long as possible with inexpensive PDB's. Almak is likely to fall before the end of the game, but with any luck Player Three and Four will fight over it for some time while I keep conquering their planets.
Zosma and Sirius both draw a bit from the global RP pool, leaving me with 1732 RP.

There's a lot of stuff in sector 5, but only two problems. At Deneb, which has two M4 warships, I build another two, so that I can send four to Acrux. Deneb is also quite overpopulated - it had been interdicted for a long time - so I build a lot of transports. At Pollux I build some emergency PDB's, and at Ross, I build two warships to send to Pollux.
All of this costs a lot of RP. I've only got 752 left in the global pool.

Three systems are under attack here. At Nath I can build some
emergency PDB's, but only one warship. At Rastaban I build two warships.
At Izar, another two. At Phaeda, I can build another seven, enough that
I can have exactly four at each of these systems, but this depletes my
global RP reserve almost completely; only 41 RP are left.
 |
| Not much going on here. |
 |
| Nor here. |
 |
| Gemma to Thuban viewed properly. |
I finished up my production orders on the remaining 19 planets, which was straightforward. Overpopulated planets had transports built, and if any RP remained, put into social development to repair the damage caused by overpopulation. Where planets were industrialized but not fully developed, I put as much into planetary and social development as I could. At fully developed worlds, I just put their RP's into the pool for next turn. Most of the planets that I hadn't already built up earlier had full industrial capacity already; a few were missing one or two factories from being bombed in earlier turns, but these could be replaced locally.
Procyon, which had 50% of its industrial capacity filled, had to
forgo re-allotment, as the meager remains in the RP pool didn't allow
for this. Kochab had no industry whatsoever, and had to remain this way
for now.
The production cycle was complete, and moved onto turn 139's movement cycle. As I had planned during my production phase:
- At sector 1, I moved two M4 warships from Kochab to Nunki.
- At sector 3, I moved four M4 warships from Agena to Regulus.
- At sector 5, I moved four M4 warships from Deneb to Acrux, and two from Ross to Pollux.
- At sector 7, I moved seven M4 warships from Phaeda; three to Nath, two to Rastaban, and two to Izar.
- At sector 9, I moved 51 M4 warships from Gemma to Thuban.
Everything else on the board - scattered warships and a massive load of transports, was sent to Thuban. They'd come when they'd come.
I finalized my orders and ended the turn.

Roughly a minute passed, as the AI players pondered their own moves, and some symbols flashed across the screen to represent them, too quickly for me to follow.
Then, combat happened.
- My warships arrived at Acrux, and Player Four withdrew.
- Transports from Player Four arrived unexpectedly at Kochab, which was defended only by transports of my own. Player Four won, but barely. Thankfully, Kochab had PDB's, so there was little risk of a landing by transports alone.
- My warships arrived at Pollux, which Player Four had reinforced. We were equally matched, but Player Four won without losing a single ship.
- Players Three and Four fought a lot at Almak, but gave me no way to see what was going on.
- Players Three and Four fought briefly at Tarazed.
- Combat at Nihal against a whopping 54 M4 warships from Player Three, plus a few M3's and M1's. It is unclear where they came from, but I had no chance of winning here. I withdrew to Thuban.
- Combat at Antares as Player Three sent two M1 warships there. My transports in orbit are enough to destroy one and make the other withdraw.
- Combat at Phaeda. Player Four moved two warships here, but four of my own arrive from an earlier turn. They withdraw.
- Combat at Thuban, defended by 28 M4 warships by Player Four. They fight valiantly but it's hopeless, and withdraw when they are down to the last four. I am left with 49 of my own, and gain 538 victory points.
Next came the planet attack phase, and I had my main fleet right over Thuban.

Two planets, only one of them colonized. I immediately sent my transports to take the uncolonized world and attacked the other, easily taking out all of the PDB's, leaving me with 24 surviving warships.
Afterward, the AI attacked some of my planets, in a typically confusing manner that leaves you wondering what just happened.

This action whizzes by without any of your input, and normally the only way I'd know what just happened is by tediously checking my list of planets to see if any are missing, but since I recorded a video this time, here's what happened:
- Player Three attacks Player Four's planet on Almak with 2 warships, and wins with 1 survivor.
- Player Three attacks Nihal with 54 warships, and wins, with 23 survivors.
- Player Four attacks Spica with 3 warships, and loses.
- Player Four attacks Schedar with 2 warships and wins without loss.
- Player Four attacks Rigel with 5 warships and wins, with 2 survivors.
- Player Four attacks Zosma with 3 warships and loses.
- Player Four attacks Deneb with 3 warships and wins, with 1 survivor.
- A bunch of boom sounds while Deneb is at the center of the screen.
I had lost Nihal and both of my planets on it, but gained Thuban, with one planet already settled, and another one ready to be conquered. In addition, the chaos on Almak caused me to regain control of one of the planets there, which Player Four had conquered some time ago. Almak was definitely a volatile situation, though.
Turn 140, being even, has only a movement phase.

A single enemy transport hovers over Kochab, so I send one warship from Etamin to shoo it away, and have the transports at Etamin settle the uncolonized planet there.

From Nunki, two warships go to Wesen, and the other two to Aludra.

I move warships from Regulus to Schedar.

Jumping ahead to sector 6, I move two ships from Phaeda to Adara, and four from Nath to Pollux.
 |
| A rare Player Three fleet sprite appears over Almak! |
Things get complicated in Sector 4, and Sector 6 reserves have to pitch in to help. Two ships apiece go from Phaeda and Izar to Vega. Four from Rastaban and the other two from Izar to go Almak. Two from Etamin goes to Sirius, and the last goes to Rigel.

Shedir is the only system here with enemy ships I haven't already ordered to be intercepted, but I can't see a good way to get at it. Solar debris means it would take three turns for backup from Acrux to arrive. At least there are PDB's there. I send another ship from Acrux to Rigel.

I send my remaining three ships from Acrux to Deneb. Acrux is conveniently the only star in a position to send anything there.

Nothing to do here.

I could move my fleet from Thuban to Mirzam in preparation for another attack, but there's still one unconquered world at Thuban, and if I leave it alone, they could build PDB's. So for now I leave my fleet there. Transports will arrive soon, and then I can take it and move on.
I moved all other fleets toward Thuban.
Events during the combat phase:
- Player Four withdraws from Adara.
- Player Four withdraws from Kochab as 32 of my warships land there.
- Player Four withdraws from Wesen.
- Player Two lands a surprise attack on Schedar with 16 warships, and I withdraw.
- Player Four routed at Pollux.
- Melee with Player Three and Player Four on Almak, but both opponents withdraw.
- Player Four withdraws from Rigel.
- Surprise attack on Antares. One warship of my own arrives, but is destroyed along with several transports.
- Player Four rallies a useless defense fleet at Thuban. One of my warships is destroyed, but so are most of them, awarding me 112 victory points.
Events during the planet attack phase:
- On Almak, 5 of my warships attack Player Three's planet and win, with 4 survivors.
- Transports arrive at Thuban and I immediately land, conquering its outstanding planet.
- Player Two attacks Spica with 4 warships and wins with 1 survivor.
- Player Two attacks Schedar with 13 warships and wins with 9 survivors.
- Natural disaster on Zosma harms the social level somewhat.
I lost two planets on Schedar and one on Antares, and gained one on Etamin and Thuban. But I had nearly 30,000 victory points, leading over my closest rival Player Four by over 12,000.
I won't go into further extreme detail over what transpired over the final ten turns, but these were the major events:
- Turn 141 - Victories at Antares and Mirzam, and PDB's destroyed. Defeats at Izar, Ross, and Etamin. One world at Etamin lost to Player Four.
- Turn 142 - Two planets on Mirzam conquered. Ships regrouped to Schedar. Victories at Schedar and Etamin, and PDB's destroyed, reclaiming a lost colony on each. Defeats at Pollux and Aludra. 52 worlds on 31 systems controlled, and a 13,000 point lead.
- Turn 143 - Victories on Schedar and Almak, and PDB's destroyed. Defeat at Antares and Etamin.
- Turn 144 - Planet on Schedar conquered. Ships regrouped to Antares. Player Three attempts to attack Schedar but is thwarted by a very large group of transports arriving this turn. Victory at Antares, but I'm not ready to conquer it. Successful defense of Etamin. Defeat at Nunki, planet lost. 15,000 point lead.
- Turn 145 - Defeats at Adara, Almak, Acrux, and Etamin. Etamin is lost. Nunki rebels and reverts back to my control.
- Turn 146 - Antares conquered. Ships regrouped to Etamin. Defeats at Kochab, Schedar, and Almak. Kochab is lost. Victory at Etamin - one planet reverts to my control and the other is recolonized. One colony at Agena starves to death. 16,000 point lead.
- Turn 147 - Agena recolonized. Ships regrouped to Kochab. Victories at Kochab, Acrux, Almak, and Etamin. PDB's destroyed at Kochab and Almak, and Kochab conquered. Defeats on Spica and Regulus. 54 worlds on 31 systems controlled, and a 17,000 point lead.
- Turn 148 - All ships moved to the nearest unconquered worlds, as this is nearing the end. Defeats on Mintaka and Dubhe. Victories on Nihal, Wolf, and Polaris. PDB's and Nihal and Polaris destroyed, but Wolf has too many. I attempt to take Arneb with 387 transports - this fails but it takes out most of their PDB's. 18,000 point lead.
- Turn 149 - Final production cycle. I forgo all economic investment and build only PDB's and transport/warship combos to attack nearby planets. PDB's are doubled wherever possible. Nihal and Almak conquered. Defeats at Algol, Nunki, Kochab, Dubhe, Almak, Wolf. Kochab is lost, and the planet on Almak is retaken. Victories at Arneb, Tarazed, Polaris, and Diphda, and all PDB's on these planets are destroyed. One planet of Tarazed colonized. 56 worlds on 32 systems controlled, and a 19,000 point lead.
- Turn 150 - Final turn. Arneb and Tarazed conquered. Defeats on
Saiph, Schedar, and Adara. One planet on Schedar lost. Victories on
Polaris, Wolf, and Diphda. Diphda conquered. I bombard Polaris for a few
points, as conquest is impossible. Wolf has too many PDB's to fight.
My final share of the galaxy was 58 planets on 34 systems, and my final score was nearly 40,000 - not quite
enough for an "overwhelming" victory even if scores above 32,000 worked
properly, but come on. I more than doubled the score of my nearest
rival.

GAB rating: Good. Reach for the Stars is lightyears ahead of
any 8-bit strategy game I've seen yet. You can see its wargame roots,
with its hex grid and victory points - no surprise given it's based on a
hex-and-counter board game - but overall it bears a closer resemblance
to Master of Orion from a decade later than it does to any of its
contemporaries, and strikes a similarly right complexity balance.
It isn't perfect - the presentation is dry, the interface doesn't always make it simple to find out things I want to know, the AI can behave erratically, harassing your weak systems with laserpoint precision one turn only to back off for no good reason the next, and your success in short games is very much at the whims of the CPU while long games get bogged down in micromanagement. Nevertheless, this is far and away the best strategy game I've seen as of 1983, it anticipates one of my favorite genres, and strikes the right chords, providing an addictive experience where it seems like every turn might lead to an exciting conquest, discovery, or development. I promote this to the ivory deck, with my unqualified recommendation to all fans of grand strategy.
Keating and Trout released two major revisions of Reach for the Stars in the years to come. The Second Edition was released in 1985 for Apple II and Commodore 64 like the original. It features:
- A reworked UI skin that uses graphics and lowercase fonts rather than the BASIC-like text displays seen in the original.
- Fixes for a few of the original interface warts. "Q" is now consistently used to commit orders, and movement phases now prompt you to end them once all units have moved; no more pressing Ctrl+E.
- A "tutorial" mode - essentially just a standard game with default gameplay options and a fixed RNG seed to ensure that the instructions in the manual align with what happens ingame.
- Some new optional gameplay features.
The new optional features are:
- Variable movement costs - Tweak the speeds of all ship types
- Automatic explorer move - Explorers always explore on their own, without needing to be prompted to with the Ctrl+X shortcut.
- Hidden victory conditions - Scoreboards are locked out until the end of the game, leaving the current winner a mystery.
- Enhanced computer players - Even harder computer opponents. The manual offers no specifics on what this means, except for a dire warning against letting an enhanced veteran get on his feet.
- Random game - New values are randomly assigned to all movements and research and production costs.
Third
Edition, released in 1988, was similarly released for Apple II and
Commodore 64, and also ported to Amiga, Apple IIgs, Macintosh, PC, and
PC-98 computers by third parties. This version completely reworks the
interface, changing it from a command-based interface to a menu-based
one, although some of the old keyboard commands still work. Despite the
interface overhaul, all of my main complaints remain.
Third Edition also provides some gameplay tweaks, but the biggest one is the addition of an Advanced Scenario, with these new gameplay features:
- Planets support armies in addition to PDB's. On peacefully settled planets, armies are recruited from the local population. On conquered planets, they must be brought in from offworld by transports. Armies defend planets from invasion, pacify the population on conquered planets, and are necessary to maintain PDB's.
- Conquered planets rebel if the local population exceeds the army size by a factor of four.
- On conquered planets, almost everything costs double.
- PDB's no longer require maintenance, but do require presence of armies, which do require maintenance. Transports that land on hostile or conquered planets now convert into armies instead of PDB's, and if enemy armies are present, will fight for control of the planet. PDB's may be constructed on conquered planets.
- Explorer ships may not be constructed.
- Expanded tech trees. Instead of just having four levels of ship tech, there are also four levels of navigation tech, and industrial tech.
- Ships may not travel beyond a maximum range of a friendly colony. Improved navigation technlogy will expand this.
- The number of factories you may purchase per turn is limited by the planet's population size.
- Overpopulated planets automatically cull their surplus population at the end of each turn, without any environmental damage.
- Maintainance costs increase progressively as a planet's social level improves.
- Planet's industrial and population capacities may improve when social and planet environment levels max out.
Here are comparison shots of each version.
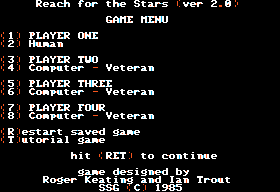
Players menu:
 |
 |
 |
Options menu:
 |
 |
Features menu:
 |
 |
Start of turn - note the removal of sector numbers in Third Edition:
 |
 |
 |
"Flickering cursor" mode - this is buried in a menu in Third Edition.
 |
 |
 |
 |
Star map - in Third Edition the cursor is movable and the selected planet's name will be highlighted:
 |
 |
 |
Planet orders - in Third Edition the middle column shows quantity ordered and the right column shows RP spent, rather than the inconsistent notation used before:
 |
 |
 |
Task Force orders - in Third Edition this is split between two menus:
 |
 |
 |
 |
Task Force formation - in Third edition movement orders are here instead of in the above screen:
 |
 |
 |
Utility menu:
 |
 |
 |
Task Force report:
 |
 |
 |
Star System report:
 |
 |
 |
Victory report:
 |
 |
 |
System Task Force list:
 |
 |
 |
Orbital combat:
 |
 |
 |
Planetary combat:
 |
 |
 |


A bit late, but thank you for the version comparison. Very useful to me :).
ReplyDelete