

The
Labyrinth is a bit of a doozy. As the manual warns, the rooms are all
long stone corridors, unnumbered to reflect their undistinguished
appearance, and the exit is not in the same place as its entrance, which
closes behind as you enter. The usual Dunjonquest strategy of making
quick dungeon runs and retreating when your health starts to dip is
impossible here - when you enter, you either solve the maze, or you die,
and randomly discarded food scattered in the halls are your only source
of health, aside from what you bring in.
Not that dying is necessarily a bad outcome. With some luck, it's a way to leave the labyrinth, and you may even find and keep some of its treasures, which are valuable enough to upgrade your weapons and armor a bit. I found $1600 worth before locating the exit, enough for a +4 enchantment.
At the very least, there aren't any traps here, and almost no secret doors. Almost. I wandered around for quite some time and mapped out a good chunk of the maze before realizing that the exit was behind the only secret door. It wasn't even that far from the start, though being a maze, one could easily traverse the majority of it before even entering the room where it's found.
In a vignette in the manual's
backstory, Hammerhand had met an adventurer named Shalimar, who had been
lost in this labyrinth for days, but escaped with a bag of treasures,
and a good gash in her side from a minotaur's axe to prove her efforts.
Shalimar advised "watch out for minotaurs" when he asked where the exit
was. Almost all of the monsters here are minotaur-like creatures:
unitaurs,
gynotaurs, saytaurs (a pun on satyrs?), criotaurs, elasmotaurs,
extra-tough brontotaurs, and yes, regular minotaurs. True to Shalimar's
hint, they are found in the room concealing the exit, but can be found
in other rooms too.

I
had actually entered the minotaur room early on, but completely missed
the secret door despite searching for it. The total lack of secret doors
discovered elsewhere had misled me to think that this dungeon didn't
have any, and the presence of minotaurs in other rooms had me disregard
Shalimar's clue. This is a bit of a problem with secret doors in this
series; there's just no way to be 100% sure that a room hasn't got any.
With
the exit located and my armor upgraded, I had no trouble mapping out
the rest of the maze and looting its treasures, which were good enough
to buy +5 armor and +4 weapons from Malaclypse, and still have about
2,000 left over after restocking on basics.
But
the real treasure was a pair of boots, which doubled my distance
traveled without draining more stamina. With this, fatigue instantly
became far less of a problem, and kiting monsters in medium-sized rooms
was suddenly possible. I also found a crystal ball of no monetary value
and unclear effect - the manual said as much that what you ought to do
with it is hard to discern. Neither treasure appeared on my character
sheet, but the boots' speed was permanent. It makes me wonder what other
treasures may have subtle effects on your abilities - the previous
level had a mysterious talisman.
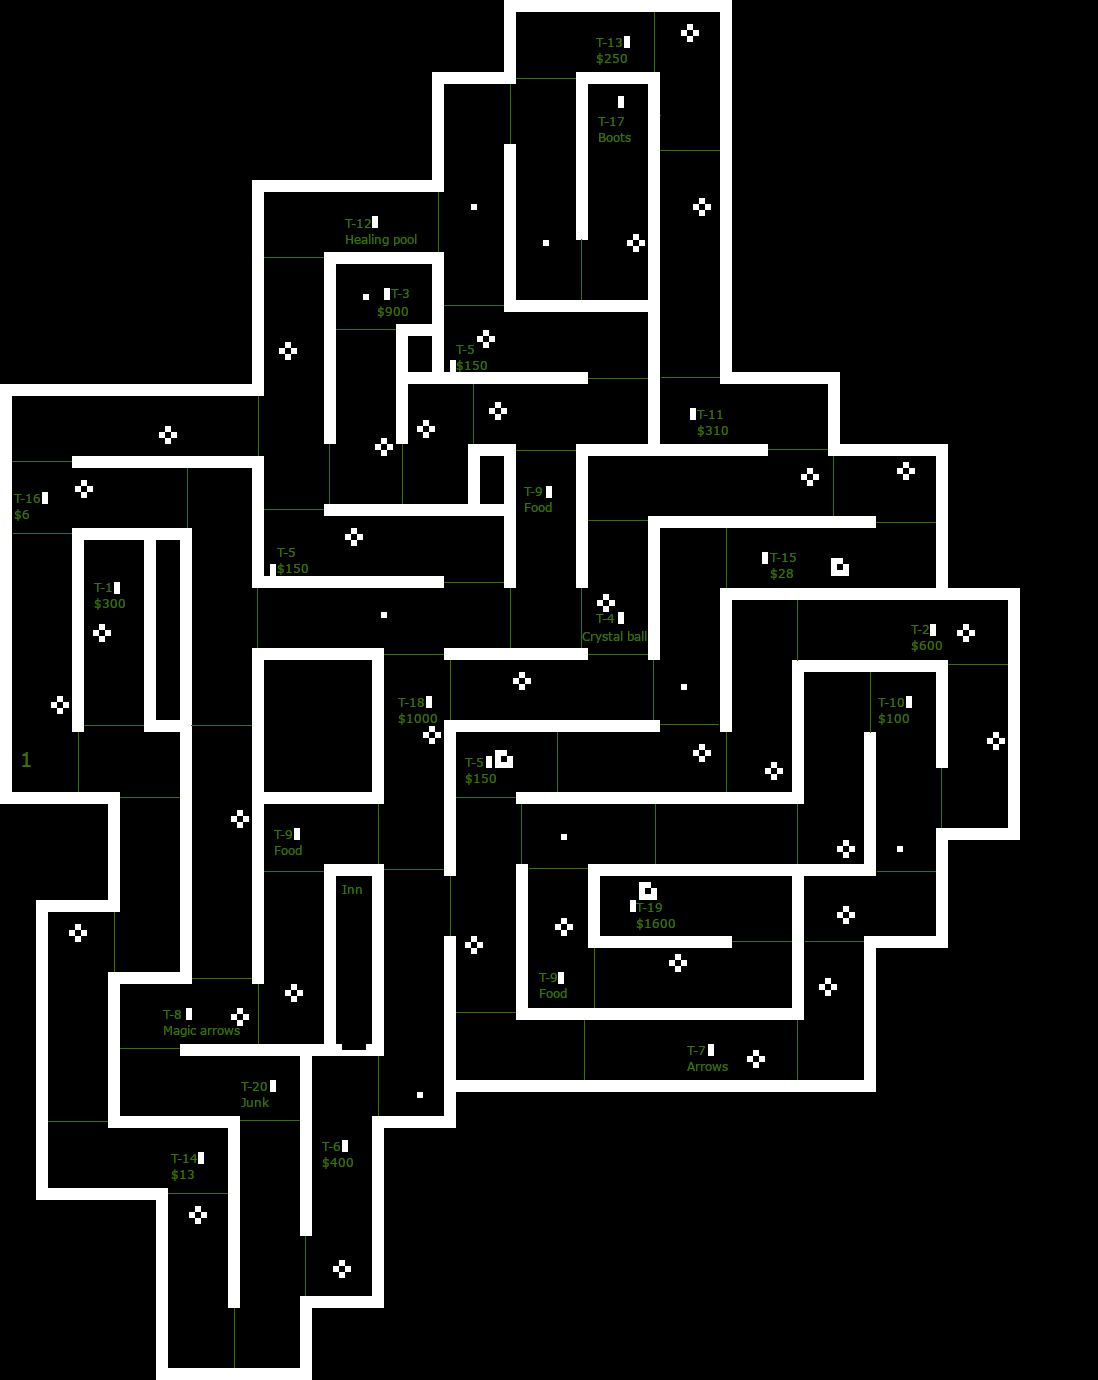
My map of The Labyrinth, which includes treasure numbers in lieu of room numbers:
The
next level is the Vault of the Dead, a more conventional dungeon, with
room numbers and descriptions that suggest this place has been
undisturbed for centuries. Secret doors and traps abound too, either or
both in nearly every room, and unsurprisingly the enemies here are
predominantly undead, though there are also gargoyles and lesser enemies
like rats. The biggest threat here is the chilling touch inflicted by
ghostly enemies, which permanently reduces your stats. This, I found an
intolerable loss, and never saved my character in this event. Even
worse, some of these spectral foes are invisible, and while checking for
secret doors in a room I thought was empty, I would suddenly see the
screen shake and the message "A CHILL" appear, and instantly know my
character was ruined.
 |
| Struck by an invisible ghost |
For
this dungeon, I started getting into the habit of juicing up at the
apothecary before each run, to maximize my stats and therefore minimize
my chances of ever taking a hit. This included the $100 mandrogora,
whose purpose I still remained ignorant of, just on the off-chance that
it helped. This would cost in total $300-$400 per run depending on what
was available and also on how successful I was at bargaining, but most
of the treasures here were valued in the hundreds to the thousands. I
could afford this, and then to buy all the elixirs, nectars, and magic
arrows I could get my hands on, and still upgrade my weapons and armor
every few runs. The most valuable treasure, a huge golden statue, is
very close to the entrance, but taking it dumps you into a pit of extremely
dangerous vipers. It's worth $4000, itself enough to by a +6 enchantment
and have hundreds left over.
With magic armor
+6 and plenty of magic arrows to take out ghosts from afar, I simply
stopped getting stat-drained altogether, and eventually cleared out all
60 rooms and their treasures. By the end of it, I had a +6 weapon, +7
armor, 30 magic arrows, 33 elixirs, and 32 nectars. This dungeon also
had a few treasures of no monetary value, and no obvious effect.
- An ebony caduceus (along with $1000 worth of diamonds)
- A serpent amulet
- A silver apple, consumed upon finding it
- Two orichalcum keys
- A pouch of herbs (along with a gold ring)
- A glowing spider found in a laboratory shelf full of glowing blue flasks
- Quite a bit of junk
I did notice that my constitution went up a point, which I assume but did not verify was attributed to the apple. It would be really nice if this game was clearer about what stuff does.
My map of The Vault of the Dead:

Last stop, the plains of hell!


No comments:
Post a Comment